Displays & Controls
Remote Control
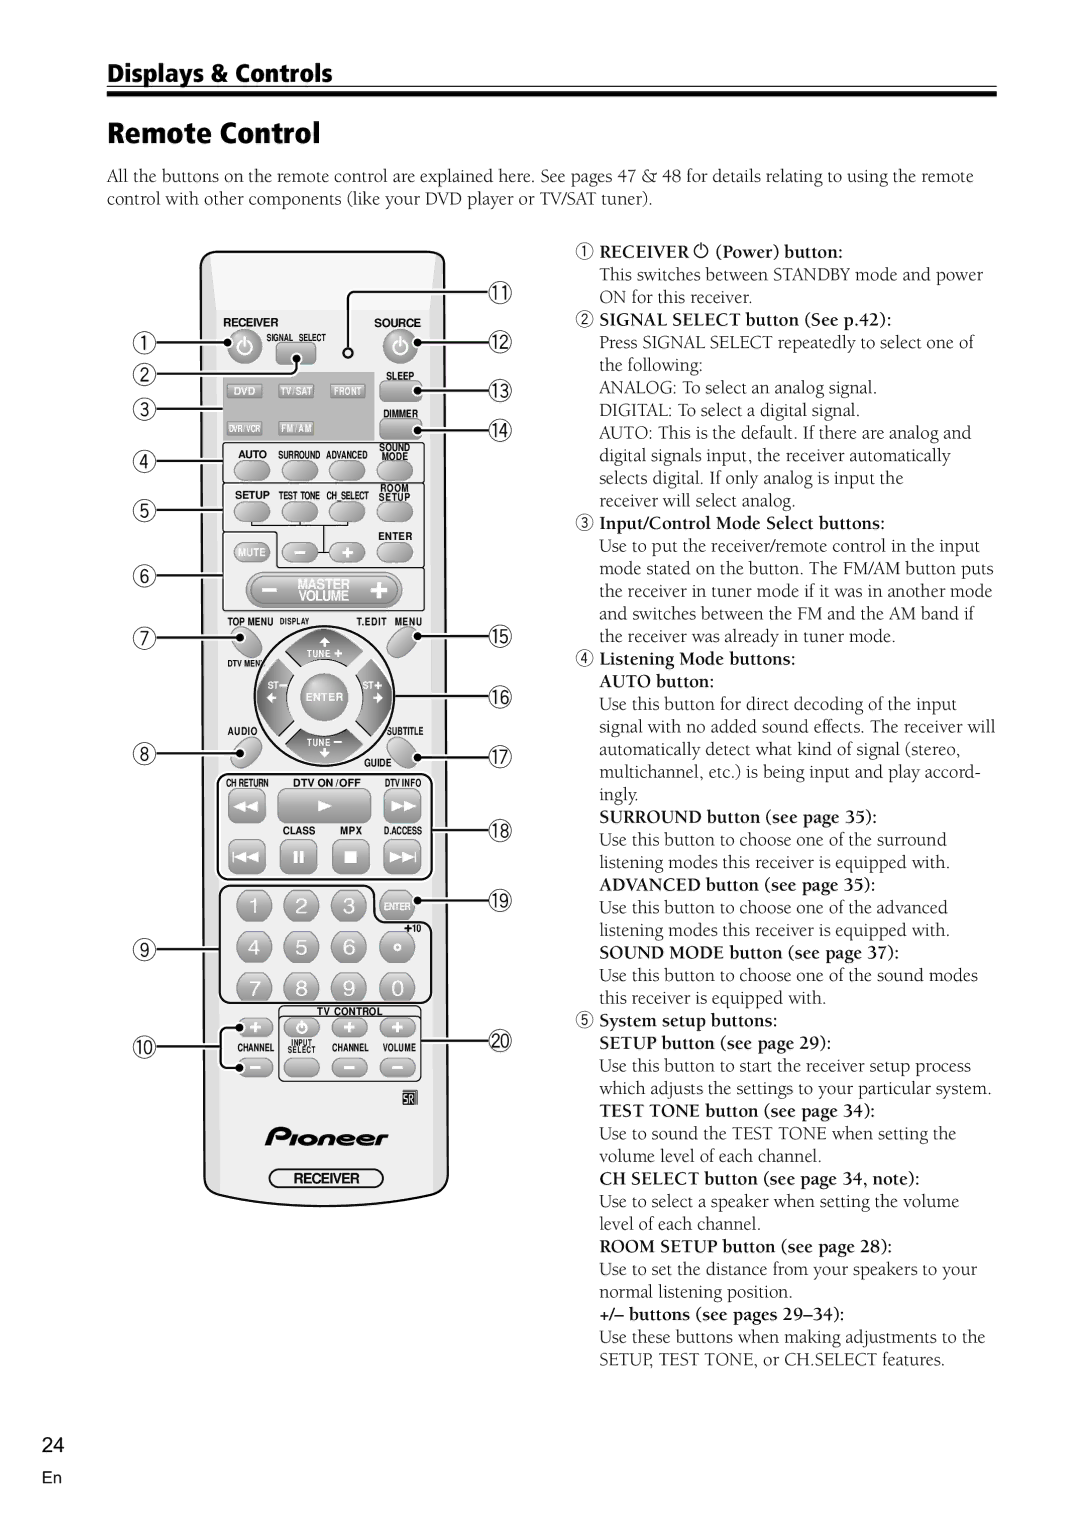
All the buttons on the remote control are explained here. See pages 47 & 48 for details relating to using the remote control with other components (like your DVD player or TV/SAT tuner).
1
2
3
4
5
6
7
8
9
0
RECEIVERSOURCE
SIGNAL SELECT
|
|
| SLEEP |
DVD | TV/SAT | FRONT |
|
|
|
| DIMMER |
DVR/ VCR | FM / AM |
|
|
AUTO | SURROUND ADVANCED | SOUND | |
MODE | |||
SETUP | TEST TONE | CH_SELECT | ROOM |
SETUP | |||
|
|
| ENTER |
MUTE |
|
|
|
| MASTER |
| |
| VOLUME |
| |
TOP MENU | DISPLAY | T.EDIT MENU | |
DTV MENU | TUNE |
| |
|
|
| |
ST |
| ST |
|
| ENTER |
| |
AUDIO | TUNE | SUBTITLE | |
|
| ||
|
| GUIDE | |
CH RETURN | DTV ON /OFF | DTV INFO | |
| CLASS | MPX | D.ACCESS |
|
|
| ENTER |
|
|
| 10 |
TV CONTROL
INPUT
CHANNEL SELECT CHANNEL VOLUME
RECEIVER
1RECEIVER ![]() (Power) button:
(Power) button:
This switches between STANDBY mode and power
-ON for this receiver.
2SIGNAL SELECT button (See p.42):
=Press SIGNAL SELECT repeatedly to select one of the following:
~ANALOG: To select an analog signal.
DIGITAL: To select a digital signal.
!AUTO: This is the default. If there are analog and digital signals input, the receiver automatically
selects digital. If only analog is input the receiver will select analog.
3Input/Control Mode Select buttons:
Use to put the receiver/remote control in the input mode stated on the button. The FM/AM button puts the receiver in tuner mode if it was in another mode and switches between the FM and the AM band if
@the receiver was already in tuner mode.
4Listening Mode buttons: AUTO button:
#Use this button for direct decoding of the input signal with no added sound effects. The receiver will
$automatically detect what kind of signal (stereo, multichannel, etc.) is being input and play accord- ingly.
| % | SURROUND button (see page 35): | |
| Use this button to choose one of the surround | ||
|
| ||
|
| listening modes this receiver is equipped with. | |
^ | ADVANCED button (see page 35): | ||
Use this button to choose one of the advanced | |||
|
| ||
|
| listening modes this receiver is equipped with. | |
|
| SOUND MODE button (see page 37): | |
|
| Use this button to choose one of the sound modes | |
|
| this receiver is equipped with. | |
5System setup buttons:
&SETUP button (see page 29):
Use this button to start the receiver setup process which adjusts the settings to your particular system.
TEST TONE button (see page 34):
Use to sound the TEST TONE when setting the volume level of each channel.
CH SELECT button (see page 34, note):
Use to select a speaker when setting the volume level of each channel.
ROOM SETUP button (see page 28):
Use to set the distance from your speakers to your normal listening position.
+/– buttons (see pages
Use these buttons when making adjustments to the SETUP, TEST TONE, or CH.SELECT features.
24
En
