Converting from 230 Volt to 460 Volt (Three Phase Only)

Consult the wiring diagram inside the starter box cover. A similar diagram is also included at the back of this manual. The sander must comply with all local and national codes after being wired.

1.Replace the current contactor with the 460V magnetic contactor (part no. 31A-MSA-2; purchased separately).

2.Re-connect the incoming leads to the motor in accordance with 460 volt operation, as shown in the wiring diagram.

3.If using a plug, install a proper UL/CSA listed plug suitable for 460 volt operation.

Three-Phase Test Run

On the three-phaseunit, after wiring has been completed, you should check that the wires have been connected properly:

1.Connect machine to power source and press the start button.

2.The sanding disc and belt should move in accordance with the arrow directions on the machine. If the movement is backward, stop the machine and disconnect machine from power.

3.Switch any two of the three wires at "R,S,T".

Grounding Instructions

(Refer to page 7 for more information on grounding this machine.) This machine must be grounded. In the event of a malfunction or breakdown, grounding provides a path of least resistance for electric current to reduce the risk of electric shock.

Improper connection of the equipment- grounding conductor can result in a risk of electric shock. The conductor with insulation having an outer surface that is green with or without yellow stripes, is the equipment- grounding conductor. If repair or replacement of the electric cord or plug is necessary, do not connect the equipment-grounding conductor to a live terminal.

Check with a qualified electrician or service personnel if the grounding instructions are not completely understood, or if in doubt as to whether the tool is properly grounded.

Repair or replace a damaged or worn cord immediately.

Extension Cords

An extension cord is not recommended; if possible, position your Sander within reach of the power supply. If an extension cord becomes necessary, make sure the cord rating is suitable for the amperage listed on the machine’s motor plate. An undersize cord will cause a drop in line voltage resulting in loss of power and overheating.

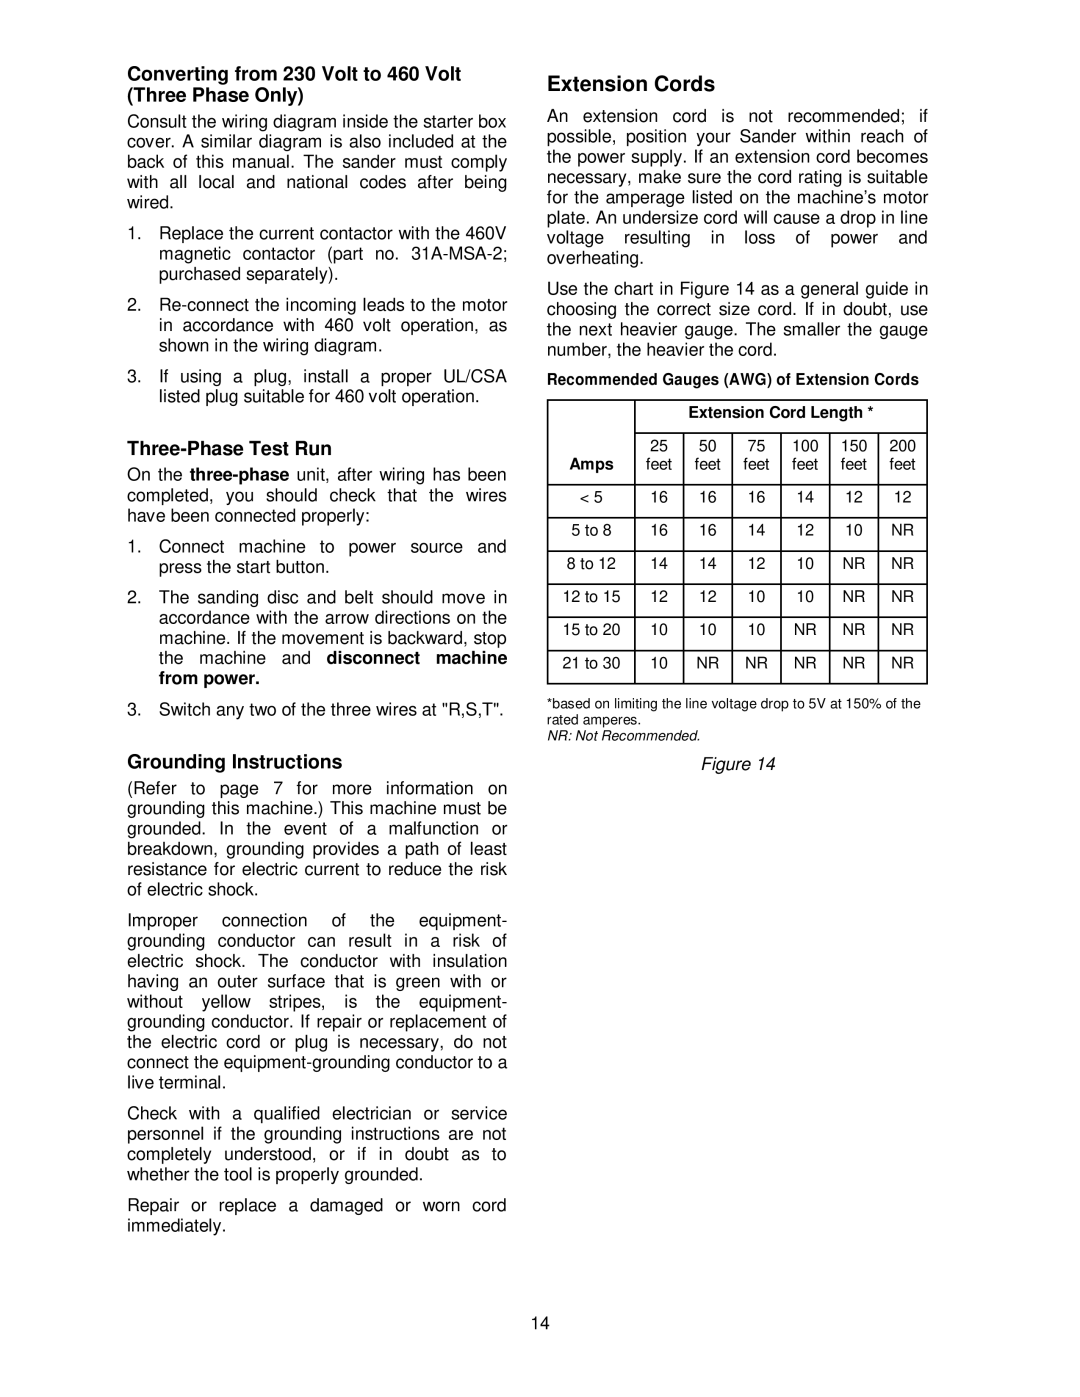
Use the chart in Figure 14 as a general guide in choosing the correct size cord. If in doubt, use the next heavier gauge. The smaller the gauge number, the heavier the cord.

Recommended Gauges (AWG) of Extension Cords


Extension Cord Length *


Amps

25

50

75

100

150

200

feet

feet

feet

feet

feet

feet


< 5


16

16

16

14

12

12


5 to

8

16

16

14

12

10

NR


8 to 12

14

14

12

10

NR

NR


12 to

15

12

12

10

10

NR

NR


15 to

20

10

10

10

NR

NR

NR


21 to

30

10

NR

NR

NR

NR

NR


*based on limiting the line voltage drop to 5V at 150% of the rated amperes.

NR: Not Recommended.

Figure 14

14

Page 14
Image 14
Powermatic 31A operating instructions Extension Cords, Converting from 230 Volt to 460 Volt Three Phase Only

31A specifications

The Powermatic 31A is a high-performance 12" planer that has become a favorite among woodworkers and craft enthusiasts alike. Renowned for its powerful features and robust design, the 31A stands out in the woodworking community for its ability to deliver precision and efficiency in planing wood.

One of the key features of the Powermatic 31A is its 3 HP motor, which provides ample power for handling a wide range of hardwoods and softwoods. The motor is designed to run smoothly and quietly, reducing vibration during operation, which is essential for achieving fine finishes. The combination of power and stability allows users to tackle even the most challenging jobs with ease.

The machine is equipped with a 12" wide cutter head that utilizes four high-speed steel knives, which are known for their superior cutting capabilities. This allows for a smooth, even finish and reduces the amount of sanding required afterward. The adjustable infeed and outfeed tables are another notable feature, providing support for long workpieces and ensuring accuracy throughout the planing process.

In addition to its mechanical prowess, the Powermatic 31A boasts a quick elevation mechanism that allows users to make rapid adjustments to the height of the cutter head. This feature enhances efficiency and allows for easy transitions between different thicknesses of wood. The inclusion of a hinged cover also allows for quick access to the cutter head for maintenance and knife replacement, minimizing downtime.

The built-in dust collection system is another notable characteristic of the Powermatic 31A. This system helps to keep the workspace clean and safe by efficiently removing sawdust and debris, thereby ensuring that the work environment remains tidy and reducing the risk of respiratory issues caused by wood dust.

Moreover, the heavy-duty cast iron construction of the Powermatic 31A enhances its stability during operation, contributing to a better cutting experience. The robust design also ensures longevity, making it a reliable choice for both professional woodworkers and hobbyists.

With precision engineering and advanced technologies, the Powermatic 31A melds power and functionality, making it an indispensable tool for anyone serious about woodworking. Whether you are milling lumber for furniture-making or crafting intricate wood designs, this planer delivers in performance, making it a top-tier choice in its class.