Montaje

Herramientas Requeridas:

Llaves – 10, 13 y17mm

Llave (Allen) – 8mm

Destornillador Phillips

Instalación de la Lijadora sobre la Base

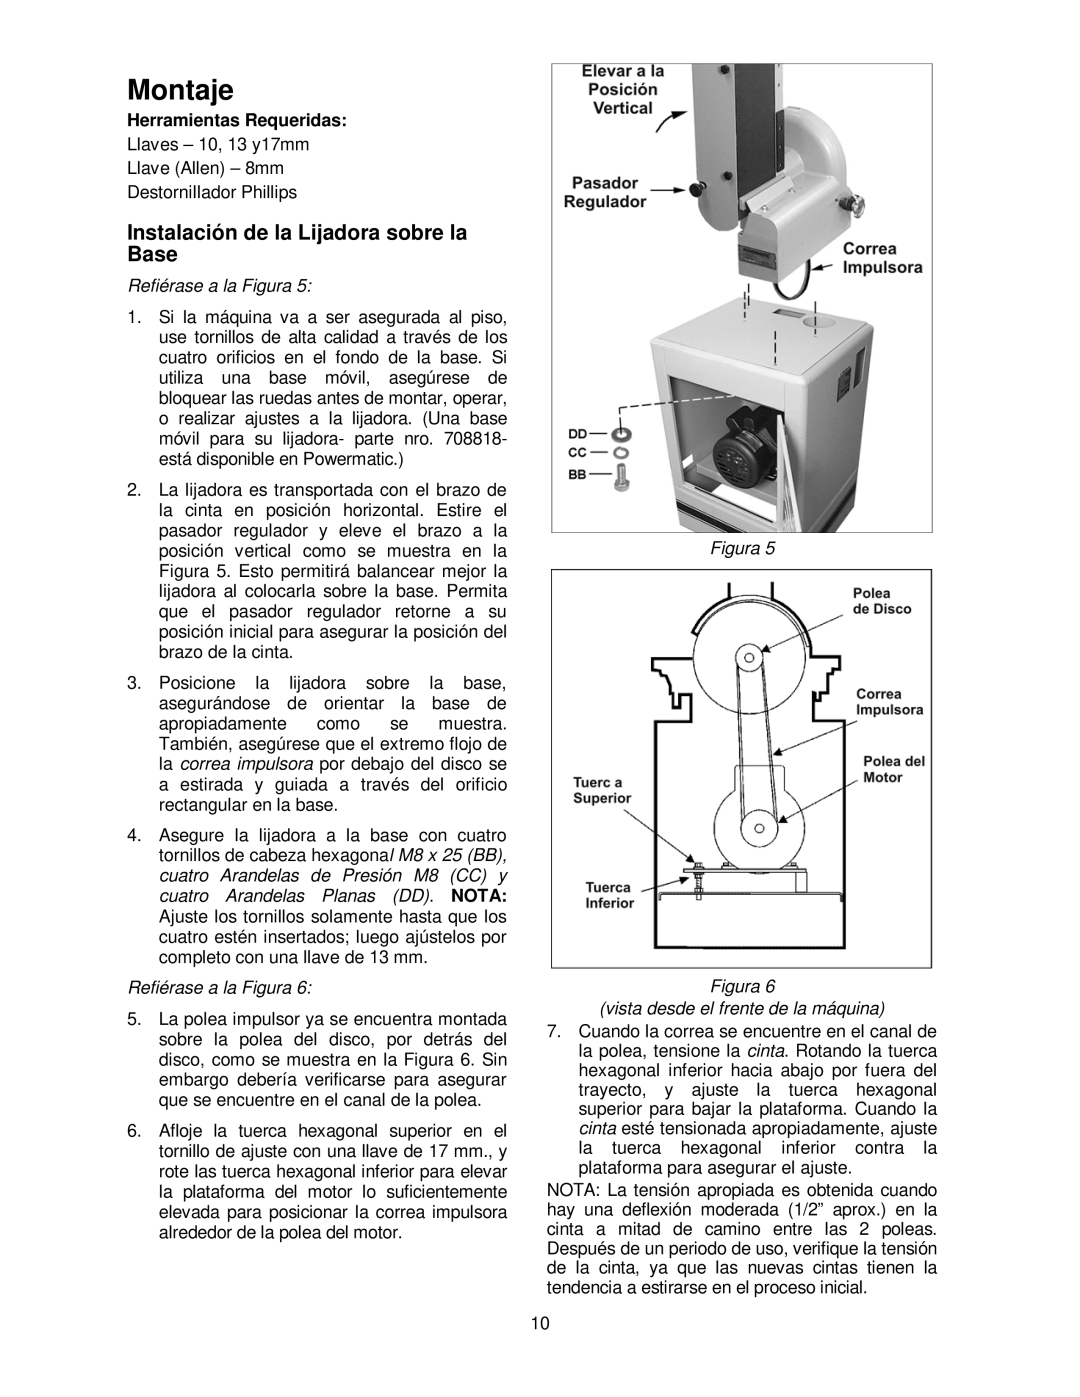
Refiérase a la Figura 5:

1.Si la máquina va a ser asegurada al piso, use tornillos de alta calidad a través de los cuatro orificios en el fondo de la base. Si utiliza una base móvil, asegúrese de bloquear las ruedas antes de montar, operar, o realizar ajustes a la lijadora. (Una base móvil para su lijadora- parte nro. 708818- está disponible en Powermatic.)

2.La lijadora es transportada con el brazo de la cinta en posición horizontal. Estire el pasador regulador y eleve el brazo a la posición vertical como se muestra en la Figura 5. Esto permitirá balancear mejor la lijadora al colocarla sobre la base. Permita que el pasador regulador retorne a su posición inicial para asegurar la posición del brazo de la cinta.

3.Posicione la lijadora sobre la base, asegurándose de orientar la base de apropiadamente como se muestra. También, asegúrese que el extremo flojo de la correa impulsora por debajo del disco se a estirada y guiada a través del orificio rectangular en la base.

4.Asegure la lijadora a la base con cuatro tornillos de cabeza hexagonal M8 x 25 (BB), cuatro Arandelas de Presión M8 (CC) y cuatro Arandelas Planas (DD). NOTA: Ajuste los tornillos solamente hasta que los cuatro estén insertados; luego ajústelos por completo con una llave de 13 mm.

Refiérase a la Figura 6:

5.La polea impulsor ya se encuentra montada sobre la polea del disco, por detrás del disco, como se muestra en la Figura 6. Sin embargo debería verificarse para asegurar que se encuentre en el canal de la polea.

6.Afloje la tuerca hexagonal superior en el tornillo de ajuste con una llave de 17 mm., y rote las tuerca hexagonal inferior para elevar la plataforma del motor lo suficientemente elevada para posicionar la correa impulsora alrededor de la polea del motor.

Figura 5

Figura 6

(vista desde el frente de la máquina)

7.Cuando la correa se encuentre en el canal de la polea, tensione la cinta. Rotando la tuerca hexagonal inferior hacia abajo por fuera del trayecto, y ajuste la tuerca hexagonal superior para bajar la plataforma. Cuando la cinta esté tensionada apropiadamente, ajuste la tuerca hexagonal inferior contra la plataforma para asegurar el ajuste.

NOTA: La tensión apropiada es obtenida cuando hay una deflexión moderada (1/2” aprox.) en la cinta a mitad de camino entre las 2 poleas. Después de un periodo de uso, verifique la tensión de la cinta, ya que las nuevas cintas tienen la tendencia a estirarse en el proceso inicial.

10

Page 42
Image 42
Powermatic 31A Montaje, Instalación de la Lijadora sobre la Base, Herramientas Requeridas, Refiérase a la Figura

31A specifications

The Powermatic 31A is a high-performance 12" planer that has become a favorite among woodworkers and craft enthusiasts alike. Renowned for its powerful features and robust design, the 31A stands out in the woodworking community for its ability to deliver precision and efficiency in planing wood.

One of the key features of the Powermatic 31A is its 3 HP motor, which provides ample power for handling a wide range of hardwoods and softwoods. The motor is designed to run smoothly and quietly, reducing vibration during operation, which is essential for achieving fine finishes. The combination of power and stability allows users to tackle even the most challenging jobs with ease.

The machine is equipped with a 12" wide cutter head that utilizes four high-speed steel knives, which are known for their superior cutting capabilities. This allows for a smooth, even finish and reduces the amount of sanding required afterward. The adjustable infeed and outfeed tables are another notable feature, providing support for long workpieces and ensuring accuracy throughout the planing process.

In addition to its mechanical prowess, the Powermatic 31A boasts a quick elevation mechanism that allows users to make rapid adjustments to the height of the cutter head. This feature enhances efficiency and allows for easy transitions between different thicknesses of wood. The inclusion of a hinged cover also allows for quick access to the cutter head for maintenance and knife replacement, minimizing downtime.

The built-in dust collection system is another notable characteristic of the Powermatic 31A. This system helps to keep the workspace clean and safe by efficiently removing sawdust and debris, thereby ensuring that the work environment remains tidy and reducing the risk of respiratory issues caused by wood dust.

Moreover, the heavy-duty cast iron construction of the Powermatic 31A enhances its stability during operation, contributing to a better cutting experience. The robust design also ensures longevity, making it a reliable choice for both professional woodworkers and hobbyists.

With precision engineering and advanced technologies, the Powermatic 31A melds power and functionality, making it an indispensable tool for anyone serious about woodworking. Whether you are milling lumber for furniture-making or crafting intricate wood designs, this planer delivers in performance, making it a top-tier choice in its class.