Connections & Setup


ETHERNET


DIGITAL


AUDIO


OUTPUT


SUBWOOFER

CTR


R

R


FIXED/

REAR


VARIABLE


AUDIO


L


OUTPUTS

L


Component with HDMI


REAR


MATRIX


SURROUND

R

L

WIRED


OUTPUTS


HDMI Out


IR


Audio Out


CableCARD™

R


AUDIO/

L


VIDEO


OUTPUT


V


INPUT 1

INPUT 3


HDMI/DVI

R

R


INPUT


Use menu for


DVI audio.


L


L


COMPOSITE


INPUTS


V

V


CABLE


INPUT


2


S-VIDEO

S-VIDEO


R

R


For Factory Use Only


L

L


COMPONENT/


COMPOSITE


INPUTS


Use menu for

PR

PR

OR


composite


video.


1B

POWER

PB

PB


(AC 120V~60Hz)


1A

ANTENNA

Y/VIDEO

Y/VIDEO

INPUT


INPUT 2

INPUT 4


TV


R L

DVI Out

Audio Out

Component with DVI

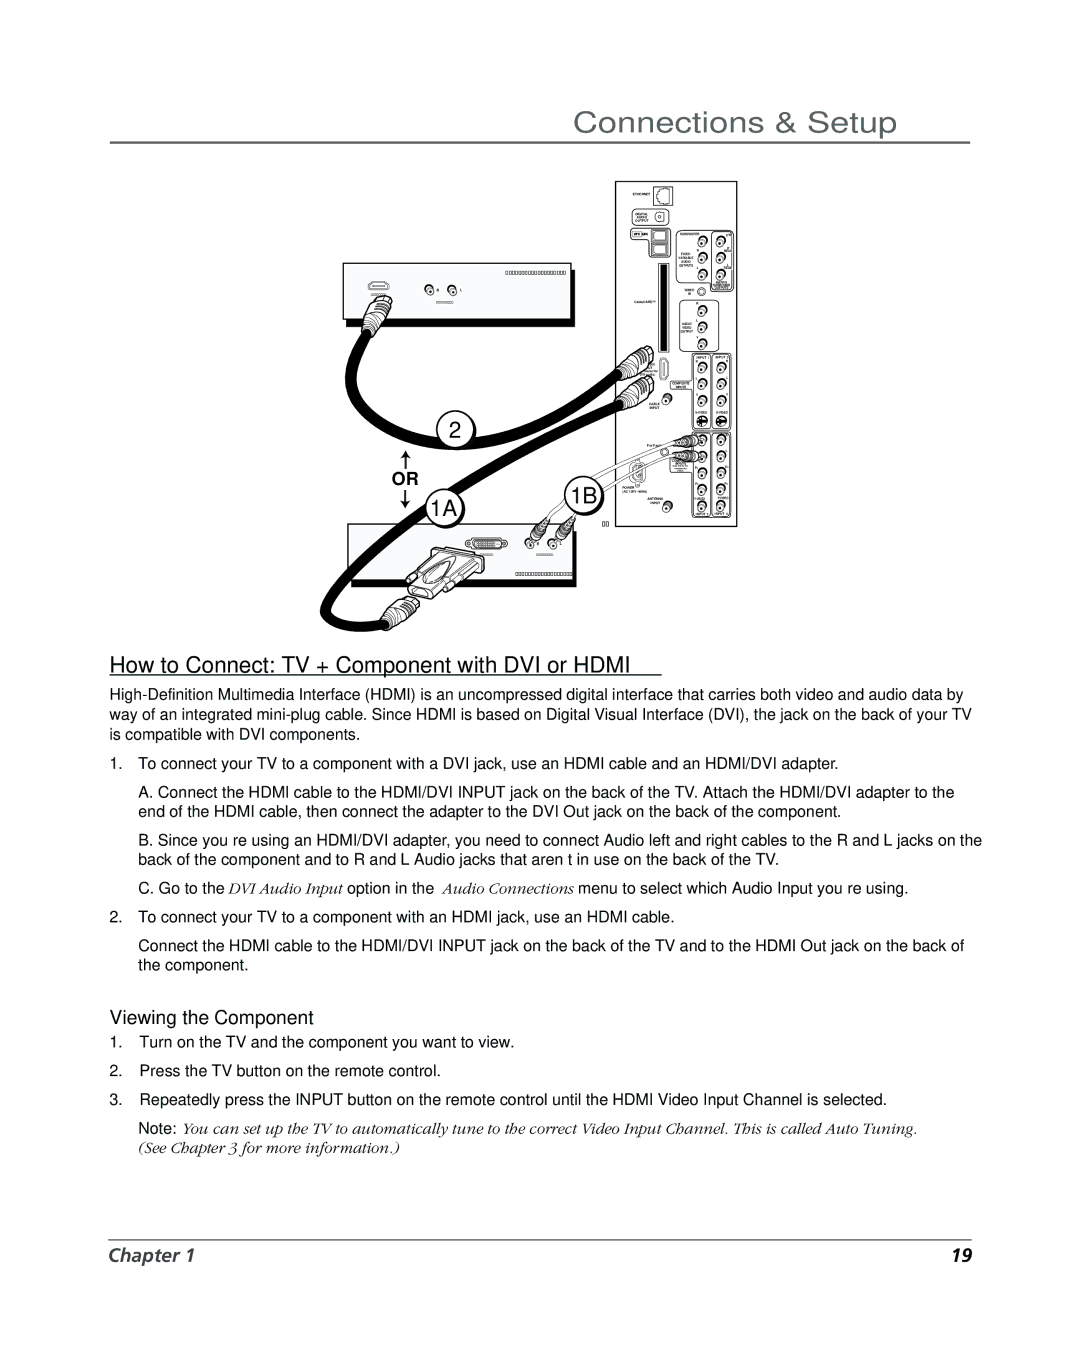
How to Connect: TV + Component with DVI or HDMI

High-Definition Multimedia Interface (HDMI) is an uncompressed digital interface that carries both video and audio data by way of an integrated mini-plug cable. Since HDMI is based on Digital Visual Interface (DVI), the jack on the back of your TV is compatible with DVI components.

1.To connect your TV to a component with a DVI jack, use an HDMI cable and an HDMI/DVI adapter.

A.Connect the HDMI cable to the HDMI/DVI INPUT jack on the back of the TV. Attach the HDMI/DVI adapter to the end of the HDMI cable, then connect the adapter to the DVI Out jack on the back of the component.

B.Since you’re using an HDMI/DVI adapter, you need to connect Audio left and right cables to the R and L jacks on the back of the component and to R and L Audio jacks that aren’t in use on the back of the TV.

C.Go to the DVI Audio Input option in the Audio Connections menu to select which Audio Input you’re using.

2.To connect your TV to a component with an HDMI jack, use an HDMI cable.

Connect the HDMI cable to the HDMI/DVI INPUT jack on the back of the TV and to the HDMI Out jack on the back of the component.

Viewing the Component

1.Turn on the TV and the component you want to view.

2.Press the TV button on the remote control.

3.Repeatedly press the INPUT button on the remote control until the HDMI Video Input Channel is selected.

Note: You can set up the TV to automatically tune to the correct Video Input Channel. This is called Auto Tuning. (See Chapter 3 for more information.)

Chapter 1

19

Page 21
Image 21
RCA DVR2160, DVR2080 manual How to Connect TV + Component with DVI or Hdmi, Viewing the Component

DVR2080, DVR2160 specifications

The RCA DVR2160 and DVR2080 are advanced digital video recorders that have solidified their place in the home entertainment sector. Both models offer a compelling array of features and technologies designed to enhance user experience while delivering high-quality video recording and playback.

Starting with the RCA DVR2160, this model features a twin tuner system that allows users to watch one program while simultaneously recording another. This is particularly beneficial for families with varied viewing preferences. The DVR2160 has a storage capacity that can accommodate a significant number of hours of video content, allowing viewers to record their favorite shows without worrying about space constraints. The user interface is intuitive, making it easy to navigate through recorded content and scheduled programs.

One of the standout technologies in the DVR2160 is its digital video upscaling capability. This feature enhances standard definition content to near high-definition quality, providing an improved viewing experience for older content. Additionally, the unit supports various formats, including MPEG-2 and MPEG-4, which is essential for compatibility with different broadcasting standards.

Moving on to the RCA DVR2080, this model is a more budget-friendly option but doesn't skimp on essential features. The DVR2080 also boasts a twin tuner system, enabling simultaneous viewing and recording, similar to its counterpart. The storage capacity, while slightly lower than the DVR2160, still offers ample recording time for regular users.

One of the key characteristics of the DVR2080 is its user-friendly scheduling feature, which enables users to set recordings in advance with ease. This model also includes an electronic program guide that allows viewers to browse through available programming and set recordings with just a few clicks.

Both DVR models come equipped with HDMI outputs, ensuring high-quality video transmission to compatible TVs. They also support USB connections, allowing users to expand their storage or connect to additional devices easily.

In conclusion, the RCA DVR2160 and DVR2080 provide a versatile and user-friendly experience for anyone looking to take control of their viewing habits. With their dual tuner systems, ample storage, and advanced technologies, these DVRs are committed to making every viewer's experience enjoyable and hassle-free. Whether you are a casual viewer or a dedicated binge-watcher, RCA's DVR options cater to a variety of needs.