USER’S Guide
Important Information
Product Registration
Table of Contents
Reference
Making Connections
Getting Started
ANTENNA/CABLE
Connecting Components to Your Monitor
Before You Connect
Screw-on coaxial cable Push-on coaxial cable
Cable
AUDIO/VIDEO/S-VIDEO Inputs INPUT1, INPUT2, INPUT3
To View the Video Inputs
Video Cable
AUDIO/COMPONENT Video Inputs
Selected AUDIO/VIDEO Outputs
Selected Video Output
Component Video Tip
Audio Output Tips
Speaker wire
Audio Output
External Speaker Rating
Monitor and a VCR
Direct Channel Tuning
Optional Component Connection Examples
Viewing the VCR Input Channel
Monitor, VCR, and a Satellite Receiver
Viewing the Components
Monitor, VCR, Satellite Receiver, and a DVD Player
Component Video
Receiver & Speakers
Connect to either Fixed or Variable Output
Mode
Svga Video Inputs -SVGA1, SVGA2
Scan Rates
Menu
Stereo mini-jack Cable
SVGA1 Input Connection Examples
Viewing the SVGA1 Input
Adapter
SVGA2 Input
Viewing the SVGA2 Input
USB INPUTS/OUTPUT
Connecting the G-LINK Cable
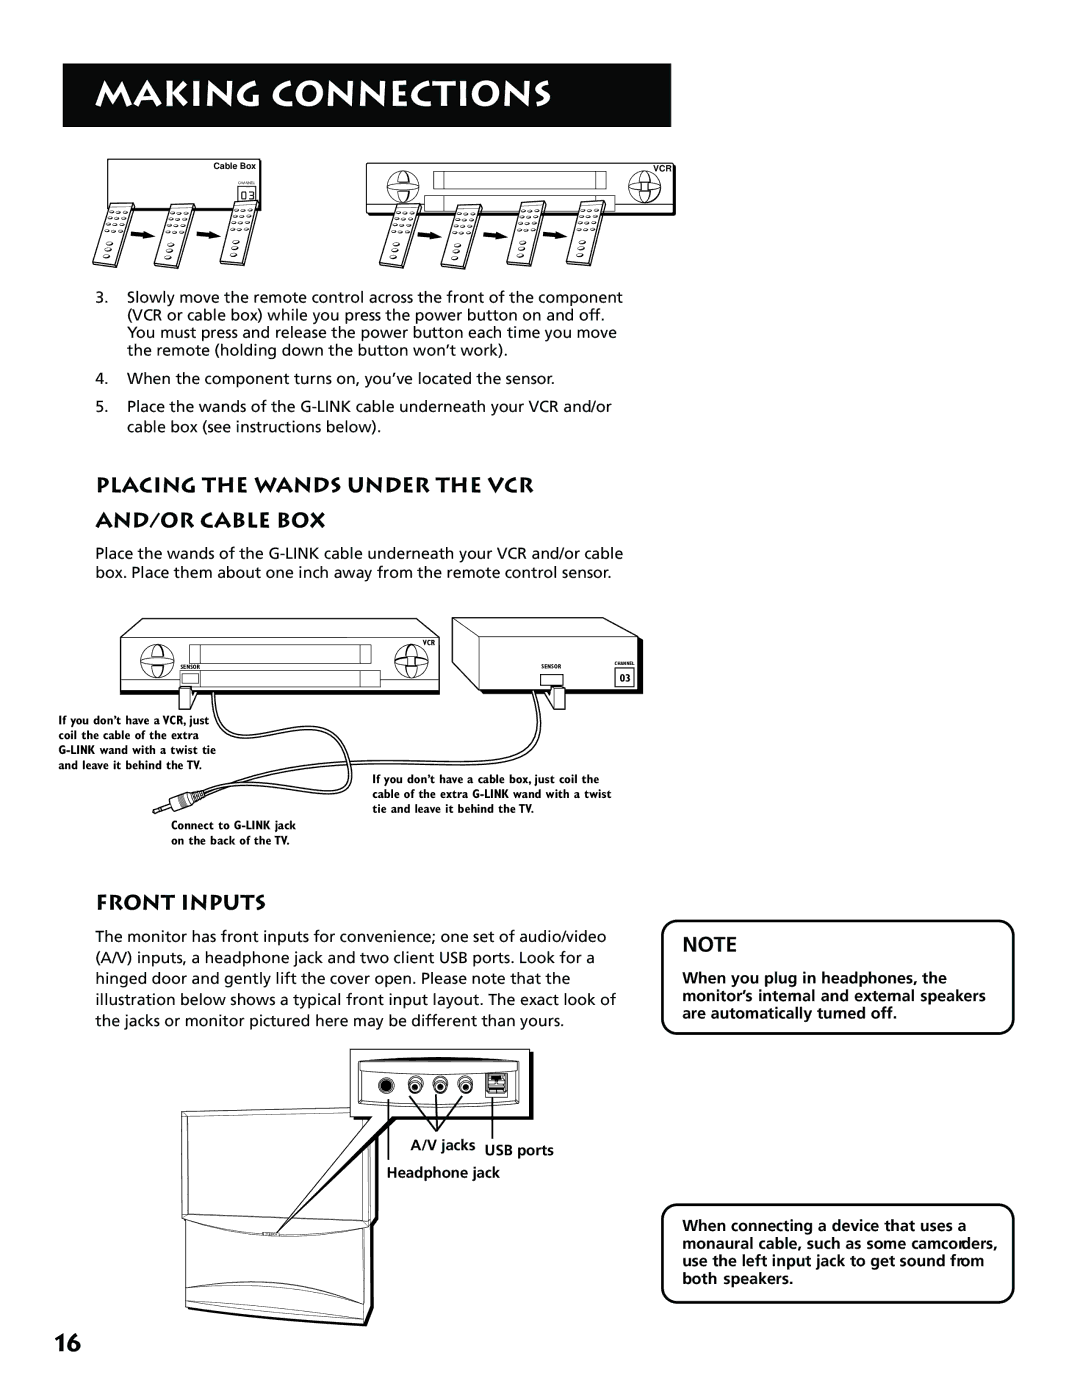
HOW to Find the Remote Control Sensor
USB cable type a
Placing the Wands Under the VCR AND/OR Cable BOX
Front Inputs
Jacks USB ports Headphone jack
Setting UP
SET UP the Monitor
Place Batteries in Remote
SET UP the Guide PIUS+ Gold System
Plug in the Monitor
Turn on the Monitor
Setting UP
RUN Auto Channel Search
Remember
HOW to USE Your Universal R E M O T E
Modes of Operation
Remote Buttons
LED
Using the Whoinput Button
Programming the Remote
Using Direct Entry
Testing the Remote
Using Automatic Code Search
Programming the Remote
Using the Remote to Control a Device
Front Panel
Modes of Operation
VCR
Menus and Features
Using the Monitor
Audio Menu
Main Menu
Picture Quality Menu
Screen Menu
Channel Menu
SET Time Menu
Parental Controls and V-CHIP
Parental Controls
Chip TV Rating Limit
Ratings Limits Screen
Blocking Age-Based Ratings
Hierarchy Age-Based Ratings
Viewing Age-Based Ratings
Blocking Specific Content Themes
Content Themes
Rating status field
Viewing Specific Content Themes
Content themes Content status fields
Rating field Rating status field
Viewing Movie Ratings
Chip Movie Rating Limit
Blocking Movie Ratings
Rating
Front Panel Block
Chip Unrated Program Block
Channel Block
LOCK/UNLOCK Parental Controls
Using the PIP Feature
PIP PICTURE-IN-PICTURE Operation
PIP Buttons
SET the VCR1 Channel
Using the Autotuning Feature
How to Set Up the Autotuning Feature
SET the VCR2 Channel
SET the DVD Channel
SET the SAT/CABLE Channel
Channel Banner
Guide PLUS+ Gold Menu
About the Guide PLUS+ Gold System
Information
Channel Mapping
Getting In & Out of the Guide PIus+ Gold System
Downloading Data
Different Guide PIus+ Gold System Menus
Grid Guide Action Buttons
Action Button command numbers
Grid Guide
Grid Guide Action Buttons Menu Selection
Sort
Sort Menu Action Buttons
Sort Menu Action Buttons Selection Categories
News
Schedule
Schedule Menu Action Buttons
Editor
Messages
Messages Menu Action Button
Messages Action Buttons Menu Selection
Editor Menu Action Buttons
Setup
Troubleshooting
Expanded Information
Reference
Good Information to Know
RCA Multimedia Monitor Specifications
Picture
Troubleshooting
Turns off while playing
No sound, picture okay
Can’t select certain channel
Noisy stereo reception
Guide Plus+ G-LINK cable not working
Care and Cleaning
Guide comes on when I turn on TV
Sound okay, picture poor
Radio Interference
Accessory Order Form
Detach
Placing an Order
USE Your Credit Card
RCA Projection Multimedia Monitor Limited Warranty
DVD
Vesa Dpms
North Meridian Street Indianapolis,

