Connections & Setup
TIME
TIMER
![]() CLOCK SET
CLOCK SET
CLOCK SET |
|
| |
AUTO CLOCK | ON |
| |
EDS CH |
| AUTO |
|
SELECT | / | : SET | OK |
PREVIOUS |
| : QUIT | MENU |
MONTH |
|
| |
DAY |
|
| |
YEAR |
|
| |
TIME |
| ||
SELECT | / | : SET | OK |
PREVIOUS |
| : QUIT | MENU |
| MENU |
|
|
|
|
|
| |
| TIME |
|
|
|
|
|
| |
| VIDEO ADJUST |
|
|
|
|
| ||
| AUDIO ADJUST |
|
|
|
|
| ||
| CLOSED CAPTION |
|
|
|
| |||
| TIMER RECORDINGS |
|
|
|
| |||
| LANGUAGE |
|
|
|
|
|
| |
| SETTING |
|
|
|
|
|
| |
|
|
|
|
|
| |||
|
| SETTING |
|
|
|
|
| |
| SELECT | / | : SET | OK |
|
|
| |
| PREVIOUSFUNCTION | : QUIT | MENU |
|
| |||
|
| AUTO CH PRESET |
|
|
|
| ||
|
| CH SEARCH |
|
|
|
|
| |
|
| CH MEMORY |
|
|
|
| ||
|
| CH MEMORY |
|
|
|
|
| |
|
| CABLE |
|
|
|
|
|
|
|
| AIR | 54 |
|
|
|
|
|
|
| SELECTADD | / | : SET |
| OK | ||
|
| PREVIOUS |
| : QUIT |
| MENU | ||
|
| SELECT |
| / : SET |
| OK | ||
|
|
|
| |||||
|
| PREVIOUS | : QUIT |
| MENU | |||
|
|
|
|
|
|
|
|
|
Setting the Clock
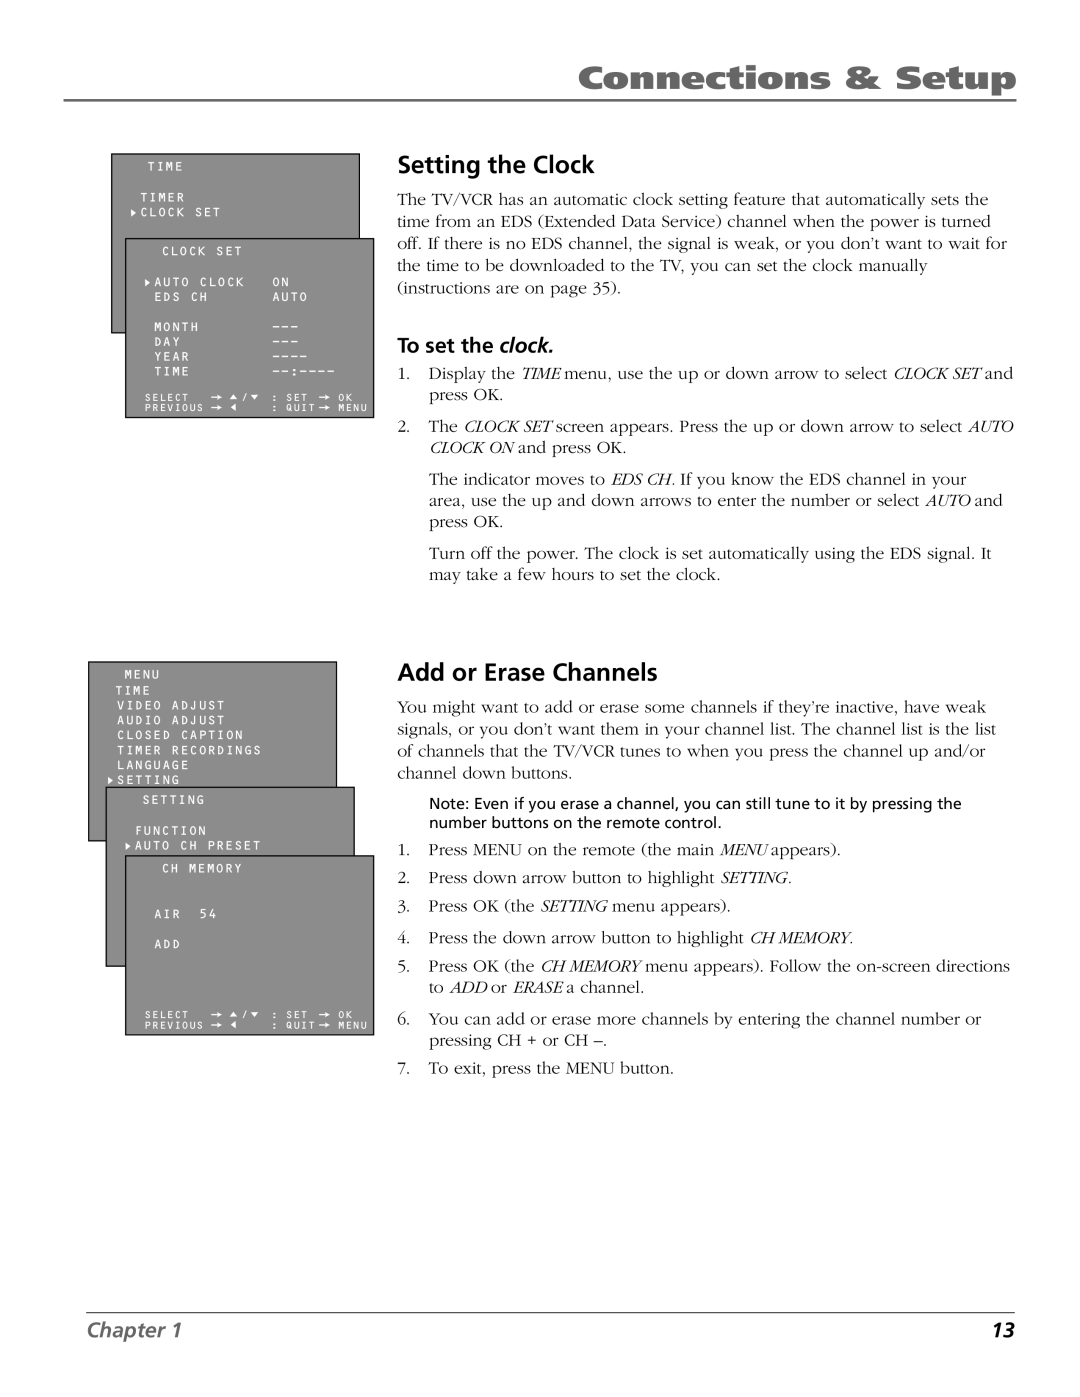
The TV/VCR has an automatic clock setting feature that automatically sets the time from an EDS (Extended Data Service) channel when the power is turned off. If there is no EDS channel, the signal is weak, or you don’t want to wait for the time to be downloaded to the TV, you can set the clock manually (instructions are on page 35).
To set the clock.
1.Display the TIME menu, use the up or down arrow to select CLOCK SET and press OK.
2.The CLOCK SET screen appears. Press the up or down arrow to select AUTO CLOCK ON and press OK.
The indicator moves to EDS CH. If you know the EDS channel in your area, use the up and down arrows to enter the number or select AUTO and press OK.
Turn off the power. The clock is set automatically using the EDS signal. It may take a few hours to set the clock.
Add or Erase Channels
You might want to add or erase some channels if they’re inactive, have weak signals, or you don’t want them in your channel list. The channel list is the list of channels that the TV/VCR tunes to when you press the channel up and/or channel down buttons.
Note: Even if you erase a channel, you can still tune to it by pressing the number buttons on the remote control.
1.Press MENU on the remote (the main MENU appears).
2.Press down arrow button to highlight SETTING.
3.Press OK (the SETTING menu appears).
4.Press the down arrow button to highlight CH MEMORY.
5.Press OK (the CH MEMORY menu appears). Follow the
6.You can add or erase more channels by entering the channel number or pressing CH + or CH
7.To exit, press the MENU button.
Chapter 1 | 13 |
