Introduction
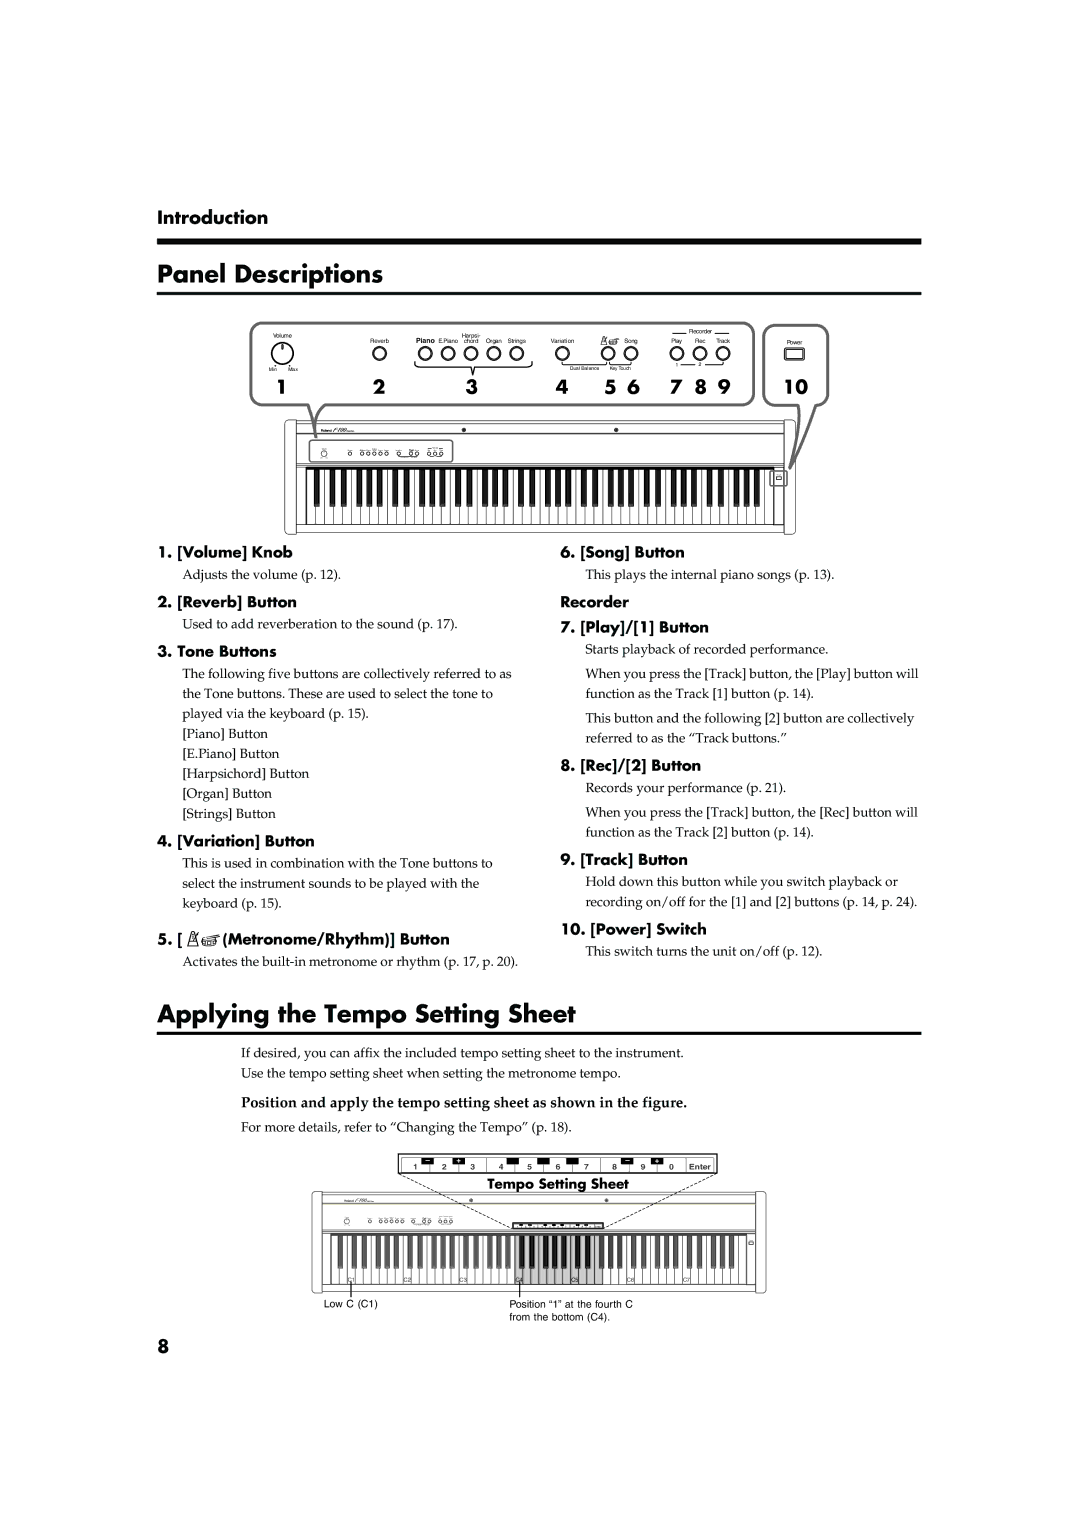
Panel Descriptions
Volume | Harpsi- |
|
|
| Recorder |
| |
|
|
|
|
| |||
| Reverb | Piano E.Piano chord Organ Strings | Variation | Song | Play | Rec Track | Power |
Min | Max |
| Dual Balance | Key Touch | 1 | 2 |
|
|
|
|
| ||||
1 | 2 | 3 | 4 | 5 6 | 7 8 9 | 10 | |
Volume | Piano E.Piano | Harpsi- |
|
|
|
|
| Recorder |
|
Reverb | chord | Organ | Strings | Variation | Demo | Play | Rec | Track | |
|
|
|
|
|
|
|
|
| Power |
1. [Volume] Knob | 6. [Song] Button |
Adjusts the volume (p. 12). | This plays the internal piano songs (p. 13). |
2. [Reverb] Button
Used to add reverberation to the sound (p. 17).
3. Tone Buttons
The following five buttons are collectively referred to as the Tone buttons. These are used to select the tone to played via the keyboard (p. 15).
[Piano] Button
[E.Piano] Button
[Harpsichord] Button
[Organ] Button
[Strings] Button
4. [Variation] Button
This is used in combination with the Tone buttons to select the instrument sounds to be played with the keyboard (p. 15).
5. [ ![]()
![]() (Metronome/Rhythm)] Button
(Metronome/Rhythm)] Button
Activates the
Recorder
7. [Play]/[1] Button
Starts playback of recorded performance.
When you press the [Track] button, the [Play] button will function as the Track [1] button (p. 14).
This button and the following [2] button are collectively referred to as the “Track buttons.”
8. [Rec]/[2] Button
Records your performance (p. 21).
When you press the [Track] button, the [Rec] button will function as the Track [2] button (p. 14).
9. [Track] Button
Hold down this button while you switch playback or recording on/off for the [1] and [2] buttons (p. 14, p. 24).
10. [Power] Switch
This switch turns the unit on/off (p. 12).
Applying the Tempo Setting Sheet
If desired, you can affix the included tempo setting sheet to the instrument. Use the tempo setting sheet when setting the metronome tempo.
Position and apply the tempo setting sheet as shown in the figure.
For more details, refer to “Changing the Tempo” (p. 18).
–
1
+
2 3
4
5
6
7
8 | – | 9 | + | 0 | Enter | ||
|
|
|
| ||||
Tempo Setting Sheet
| Piano |
|
|
|
|
|
|
|
|
|
|
|
|
|
|
|
| – | 2 | + | 4 | 5 | 6 | 7 | – | 9 | + | Enter |
|
|
|
| 1 | 3 | 8 | 0 |
| |||||||
C1 | C2 | C3 | C4 |
|
|
|
|
|
| C5 |
|
| C6 | C7 |
Low C (C1) | Position “1” at the fourth C |
| from the bottom (C4). |
8
