VA-76
Page
Page
Features
Unpacking your VA-76
Lyrics display
Useful options
Compatibility note
Important notes
Important notes
Contents
Mixer, effects and editing
Song Composer 16-track, etc
Programming User Styles
Registrations User Programs
FX Types & controllable parameters
Miscellaneous
Panel descriptions
Front panel
Display
Jkeyboard Mode section
Disk indicator
Orchestrator button
Data button
VariPhrase section
Super Tones buttons
TEMPO/TAP button
Zip drive
Floppy disk drive
BENDER/MODULATION lever
Ribbon controller
Rear panel
Audio connections
Setting up and demo songs
Set the Volume knob to the MIN position
Listening to the demo songs
If you selected ALL Demo
If you selected Tone Demo If you selected VariPhrase Demo
If you selected Style Demo
Easy Routing quick registration
Scratching the surface
General idea
Keyboard parts
If you press the As a Soloist field, there are two options
Here is how it is structured
Start playing on the VA-76
Press the Function Menu button
Master
Which button does what? Panel Info
Press the i Panel Info field
Set the Volume knob to a reasonable level e.g. about 1/4
Using the VA-76’s Arranger
Press the Variation button
Intro & Ending
Professional transitions Fill
Press the START/STOP button to start Arranger playback
Balance if the melody is too soft or too loud
Adding a melody to the accompaniment
Changing the tempo
If the TEMPO/TAP button does not light, press it
Play a few notes in the right half of the keyboard
Selecting sounds for the right hand
Super Tones
Press another Super Tones button
Press the ONE Touch button
Using VariPhrases
One Touch
If you press the third field, the display looks as follows
Press the Variphrase Melodic button so that it lights
Press the Load field
Listening to Standard Midi Files
Press the Song List field
Press the Play field to start playback
On the Song Composer page, press the Minus One field
Minus One playback
Feel free to use the performance functions see
UP1 linked to Song
VA-76 clinics
Keyboard Mode clinic
Settings affected by the Keyboard Mode Arranger button are
Arranger and Piano modes
Other
Split point in Arranger mode
Using the Whole Keyboard Mode
What are ‘parts’?
Switching parts on and off
Using the Split Keyboard Mode
Selecting Tones for the Keyboard parts
Tone clinic
Tone selection via the front panel
Specify the part for which you want to select another Tone
Let us briefly summarize the various Tone categories
Press the Part field in the lower left corner of the display
Tone selection via the display
Press the Tone field in the display
Press the Tone field to return to the Tone selec- tion
Press the Variations field to call up the following display
Press the 8 Trem Organ field to select that Varia- tion
Selecting different Tone Maps
On the Tone selection page, press the Map field
Word about the new Tones
Drumming on the keyboard
Alternatively…
Press the MDR field
Setting the Roll resolution speed
Roll
Play a few notes on the keyboard to try out the drum sounds
Selecting Drum Sets for the MDR part
Select the MDR part
VariPhrase clinic
Switching on the VariPhrase part
See page 59 for how to select Music Styles
Selecting other phrases for playing
Playing with the VariPhrases
Combining/splitting a VariPhrase with another Keyboard part
Key Assign
Trigger
Here’s how to select the Mono mode
Press the Mode MONO/POLY button to make it light
Press the Mono field Press Exit to return to the Master
Beam controller
Adding realtime expression
Things you ought to know about VariPhrase
Other controllers
Realtime VariPhrase control via the display
Display now looks more or less as follows
Single Part/Palette
Adding effects to the VariPhrase part
Reverb and Chorus depth
On any of the above pages, press the Single Part field
Example Flamenco Roll
Expression clinic
Beam Controller
Move your hand over the eyes while playing something
Aftertouch
Ribbon controller Touch control
Pitch Bend/Modulation
Selecting the sections to be transposed
Setting the transposition interval via the display
Transposition
Transposition is indicated on the Master
PAD buttons
Octave
FC-7 Foot Controller
Scale Tuning
Sustain Footswitch Hold
Foot Switch
Expression Foot Pedal
Metronome Output
Metronome Mode
Metronome
Count-In
Using live vocals
OFF- The count-in function is off
You should now be able to hear your voice
Single Part
You can also add Reverb and Chorus to your voice
Style selection via the front panel
Arranger/Music Style clinic
Selecting Music Styles
Each Style group contains eight banks
Working with the Disk Link memories
Style selection via the display
Press the Style field in the display
Disk User
Orchestrator
Orchestrator and Morphing
Ejecting the Zip disk
Start playing with the newly selected Style
Morphing
See Using the VA-76’s Arranger on
Do one of the following
Press the Bass field in the right column
See steps 1 and 2 above Press the 2nd Style field
Press the Drum field in the right column
Press the 1st Style field in the display
Song Composer clinic
Recording your music
Count-In and/or metronome
Redoing the melody 2nd Trk
Listening to your song
Press the Stop √ field twice
Saving your song to disk
If you’re ready, press the Play field to start recording
Instrument or for MS-DOS, the following message
If your disk is not formatted either for VA series
Your brand-new song a name
Press the Song Name field Enter the name
If you press Single Phrase
Playing with the User memories
Loading VariPhrases, VariPhrase Sets or audio files
Press the Phrase field in the left column
Selecting a User memory
Input Over indicator must never light
Sampling your own phrases
If you press Phrase Set
Enter a name for the phrase you are about to cre- ate
About the phrase RAM memory
Press the Sampling Capture button
See
Press the Preview field to listen to your sample
Phrase Edit touching up the audio material
Truncate
Press the Edit field
Use the im fields to set the desired Normalize percentage
Normalize
Press Execute to change the level of the selected phrase
Original Key
Encoding the phrase
Press the Encode field
Event Sense
Method 2 entering the tempo value right away
Press Save
Saving your VariPhrase
Insert a Zip disk into the Zip drive and press the ZIP field
Coarse Tune
Phrase Parameters
Pitch
Press the Pitch field to select the following
Amplitude
Phrase Ctrl
Pan
Portamento
Type portamento type
Time Sw
Mode
Start
Playback
Global VariPhrase functions
Key Assign
Trigger
Controller functions for the VariPhrase part
Mode
Style Linked Phrase Select
Selecting the foot switch function
Truly global VariPhrase parameters
Pause
Here’s how to set the tempo value
Sync Settings
Sync Adjust
Double Speed On BPM Lower Than
Upper1 functions
More about the Super Tones
Upper 2 Split
Upper2 functions
UP1 Linked to Song
Press the Execute field to save your choice
Press the UP2 Split field
Both must be displayed in white
Press the Options field
Splitting Upper2 and the VariPhrase part
Tuning Upper2 Coarse and Fine
‘Dynamic’ second split point UP2 to Left
Part and use the VariPhrase part instead so as to
Portam Time
Portamento Upper 1-2 Portam
That field is displayed in white
LWR Hold
Portamento Mode Mono/Poly
Assigning the Lower Hold function
Velocity sensitivity
Velocity switching Min and Max
Key Touch
Press a Mem 1~Mem 3 field to select a Scale Tuning memory
Scale Tuning
Consider the following example
Customizing the pitch changes Pitch Edit
Changing the pitch of other notes
Storing your new scale
But let us not return to the Master page just yet
Page
Starting a Music Style
More about the Arranger
Arranger and Music Styles
Stopping a Music Style
Sync Options
Selecting other Style divisions
Sync Stop
Major, minor, seventh
Using Aftertouch to select Arranger patterns
Fill In Half Bar
Use the im fields to select Arranger
Style Morphing part
Select the following display
One Touch
Melody Intelligence
Press the Melody Intell button so that it lights
Programming your own Tone selections Memorize
Ignoring certain One Touch settings Cancel Options
While on the One Touch page, press the Cancel Options field
100
Chord recognition area
More refined Arranger settings
ARRanger Hold
101
Bass Inversion
Arranger Chord Mode
102
Dynamic Arranger
103
Fill Ritardando
Arranger Options
Arranger Tempo
RIT and ACC
While still holding those keys, press the CAP- Ture field
Chord Family Assign, Alteratn
105
Use the TEMPO/DATA dial to select on or OFF
Intro& Ending Alteration
Musical Style playback Wrap
106
About the lock
Selecting Tones for the Arranger parts
107
Press the Style button or the Style field on the Master
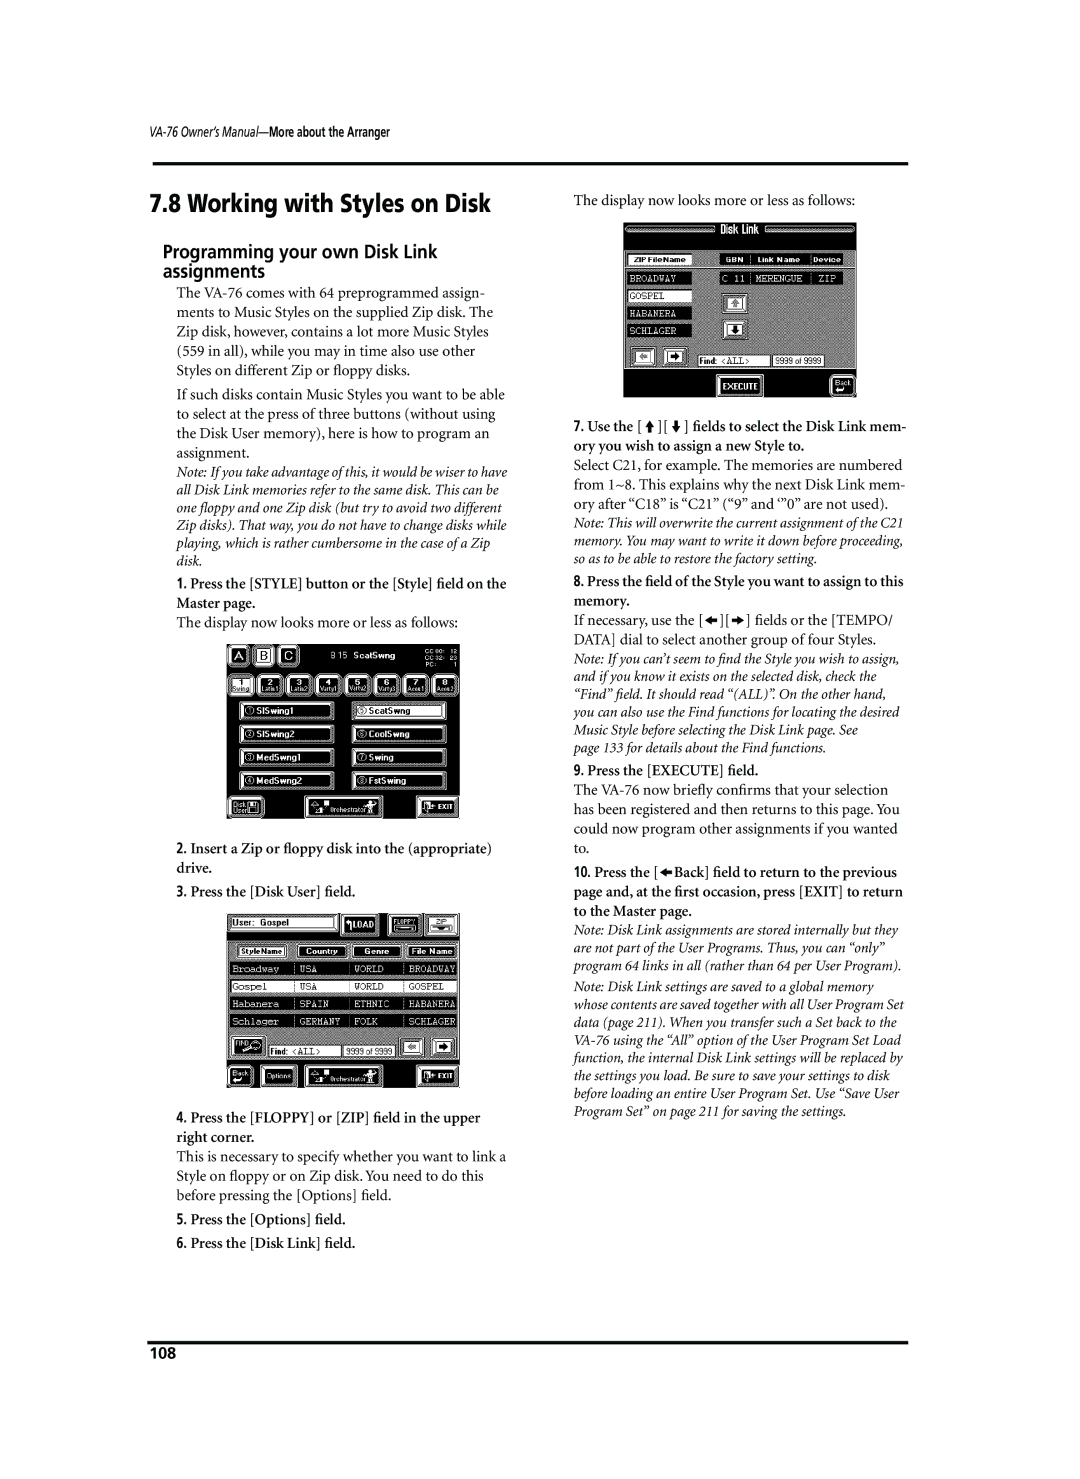
Working with Styles on Disk
Programming your own Disk Link assignments
Press the Options field Press the Disk Link field
Press the Find field
Find locating Styles on a Zip disk
109
Rename Style Options
110
Press the YES field to go ahead and delete the Style
Style Delete
Press the Delete field to call up the following
111
Via sliders on so-called palette pages
Mixer, effects and editing
Structure of the Mixer pages
112
Use a Single Part
Volume and pan
Global Volume
About the Audio In part
Muting parts
Keybrd Mixer volume of the Keyboard parts
Style Mixer volume of the Arranger parts
PanPot stereo position
On the Single Part page, press the Auto/ Man field
Output Assign
More locks
Man
Above example, the Keyboard Parts section has been selected
Applying Reverb, Chorus, or Delay to a part
Effects and Equalizer
116
Number of types depends on the selected effect
Effects settings
Press the Reverb field and modify the Reverb send level
Select the effects parameters you wish to edit
Chorus types & Parameters
This is where you can edit the Reverb effects processor
Reverb types & Parameters
118
Equalizer
Delay types & Parameters
119
Choosing the parts to be processed by the equalizer
Using the insertion effect
Insertion effect M-FX
Realtime control via the display
FX Selection Mode automatic Tone link for Upper1
121
Assigning the M-FX to a Keyboard part
122
FX Send processing the M-FX with the other effects
Selecting an M-FX type
123
VariPhrase/Audio In Chorus types
VariPhrase and Audio In effects
VariPhrase/Audio In Reverb types
124
Here are the Part parameters you can edit
Settings make it slower
Modulation Vibrato
125
Envelope
Timbre TVF
126
See above for what to do then
Writing your settings to a User Program
127
Selecting a User Program Group, Bank, Number
Selecting User Programs
Free Panel
Free Panel memory can be selected in two ways
Selecting User Programs using the Downup buttons
129
Linking a Song to a User Program
Automatic functions for User Programs
Song & Midi Set Link
130
If you don’t want a User Program to be recalled, select Off
User Program selection at power-on
Linking a Midi Set to a User Program
131
Formatting a disk
Song Composer the basics
132
Play & Search finding Songs by playing a few notes
Song List searching songs on disk Find
Before recording
133
Play the notes of the Song you want the VA-76 to find
Song playback functions
Lyrics function
If you make a mistake, proceed as follows to correct
Changing the song tempo
Fast Forward, Rewind, and Reset
Loop playback Markers
Soloing and muting parts
Song/Keyboard-part balance
Using the metronome
Press the Solo field again to switch off the solo function
Muting tracks/MIDI channels
Compiling or editing a Song Chain
Song Chains
Transpose
Proceed as follows
To play back a Song Chain, proceed as follows
Playing back a Song Chain
Display on your VA-76 may look slightly differ- ent
Press the Play field to start playback of your Song Chain
Deleting a Song Chain
Chain Mode
Song Options
Press the Rename or Delete field
Press the Execute field to save this information to Zip disk
Input
140
Selecting the 16-track sequencer
11.1 16-track Sequencer
General considerations
Tracks and Midi channels
Example 1 Recording a track
Selecting the Recording Mode and the first mea- sure
142
Press the Quantize field and set the desired reso- lution
Selecting a Tone or Drum Set
Press the Octave field
Press the Tone field in the upper left corner
Recording in Punch In/Out mode
Volume Level
Recording in Erase or Merge mode
Want some effects?
Example 2 Recording a song from scratch
Using two drum tracks 2nd Drum Track
Saving your song
145
All tracks will be initialized as follows
Initializing only track 13 for VariPhrase use
146
Editing 16-track songs
Easy editing and useful functions
Erase
In-depth editing of a 16-track song
Available options for ‘Note’
148
Insert
Data Type
Delete
From/To, Bar, Beat, CPT- See
Bar, Beat, CPT- See
Transpose
Velocity
From/To & Bar, Beat, CPT- See
From, To, Bar, Beat, CPT, Execute- See page 148 for
Gate T
Shift
From, To, Bar, Beat, CPT- See
Change
Utility other useful functions
152
Copy
Volume, Expression, Reverb, Chorus -127~
153
Exchange
Mode Replace, Merge- Selects the Copy mode
See page 68 for how to enter names
Name
Initialize
Using the Style Converter
Style Converter
General considerations
Press the To field to go to the next
Press the From field to go to the next
151 for details
156
Edit Lyrics
157
Playback and Lyric synchronization recording start
Now you’re all set for the synchronization work
Press the Lyrics Synchro field
158
Go to the TXT Import
‘Utility’ functions for Edit Lyrics
Deleting a text file on disk
159
Save without Lyrics
Exporting the Lyrics data as text file
160
You can do this for all 16 song parts
Header Post Edit
161
162
Patterns
Programming User Styles
Concept
Tracks
Looped vs one-shot
164
Selecting the User Style Composer
Recording User Styles from scratch
Selecting the track, the Mode, the Type and the Division
Quantize
Record mode
Specifying the key
Working with clones
Length specifying the pattern length
Tone selection
Time signature
167
Press the BAR field
Cloning and edit functions and possible warnings Shared
Press the Length field. The display now looks like this
As you see the bar values are now surrounded by a box
Audition your pattern and then keep or redo?
Tempo
Recording
Press the Master field in the upper left corner
Muting parts while recording others
Saving your Style to disk
Programming other parts and divisions
Naming your User Style
Working from top to bottom programming hints
Playback in Arranger mode
Remarks
Metronome and Count-In
Copying individual Style tracks
Copying entire Styles using Load all tracks
Copying existing Styles
172
From
Copy mode
To use another Style on disk…
Animated clock tells you that the data are being copied
Editing on the fly by recording
Adding or changing settings of existing parts
Editing User Styles
Adding notes in realtime
You can play on the keyboard to listen to the result
On the above display page, select the ADrums track
175
See also Length specifying the pattern length on
Setting the preset tempo
Length
176
Use the TEMPO/DATA dial to set the desired time signature
User Style Edit mode
Time Signature
177
From Note/Than Note, To Note- See
Erase
Delete
Track, Mode, Type, Division- See page 178 for
Track, Mode, Type, Division- See page 178 for details
Insert
Velocity
From Note, To Note- See
Details
Gate T
Shift
From, To, Bar, Beat, CPT- See page 178 for details
Auditioning the pattern
User Style Micro mode
Change
See page 178 for details
182
Move Mix
183
Copy
User Style Utility
Copy Mix
184
Execute- Press this field to copy the data
Name
185
Selecting the desired parameter
Miscellaneous
Beam
Available controllers are
187
Modulation
Pitch Bender
188
Best way to proceed is as follows
Touch Control Ribbon
Parameters for Keyboard parts excluding the VariPhrase part
189
Parameters for Arranger control
Sustain Switch CC64
Parameters for the VariPhrase part
190
191
Foot Pedal Expression
Volume control Expression
Press m to have access to the Arranger parts
No function for a part Off
Formant Up/Down
13.2 FC-7 & Pad parameters
FX Value 1/2
193
Use the TEMPO/DATA dial to select the desired function
Hold Lower1, Hold Lower2, and Hold Lower 1- 2 on
Jump to the FC-7 and PAD display page see
Off- The PAD button in question has no function at all
Bass Inversion See PAD
Global parameters for the entire VA-76
Tone Recall
195
Virtual Band Autorun
Main Factory Resume settings
Factory Resume
196
Midi in general
Midi
Midi messages used by the VA-76
Control change messages
198
System Exclusive messages
About Midi implementation charts
Master Volume Universal System Exclusive- This
199
Transmitting Midi data TX
Preparations for using the Midi functions
Receiving Midi data RX
How-to’s…
Local
Keyboard MIDI, Style MIDI, Song Midi
What’s next?
201
Tx Filter page of the Style parts
Limit
Filter
202
Style TX Sync
Utilities Midi
Midi Sync RX/TX
Song TX Sync
Style RX Sync, Song RX Sync
Basic
Style
On/Off
NTA Note-to-Arranger
Midi parameters Param
SoftThru for Local
PartSwtc
Rx Velocity, Tx Velocity
206
Saving a Midi Set
Midi Set selection at power-on
Midi Sets
Selecting a Midi Set
Loading a Midi Set from disk
208
Disk Load loading data from disk
Disk functions
Autoload
Load Style/copy Style
Load Phrase
Load User Prg
Load Midi Set
210
Save Song
Disk Save saving data to disk
Save Style
Save User Program Set
To save a VariPhrase Set, press the Phrase Set field
Save Midi Set
Save Phrase
212
Press the field that corresponds to the desired option
Delete Disk Utility
Format
213
Press the From FDD→ To FDD field
Copy functions
Copying an entire floppy disk to another floppy
Display now responds with Insert Source Protected
Copying from Zip to floppy disk example copy- ing Styles
215
Copying VariPhrases or VariPhrase Sets between disks
Copying other file types
Rename
Press the field of the file you wish to rename
217
Specifications
218
FX Types & controllable parameters
219
220
Chorus Effects
55 DS→ Delay
221
Tones
Reference
222
223
VA-76 Tones
224
225
UFO FX
226
Tone Map
227
228
229
230
231
232
Drum Sets
233
234
104
235
236
Orchestra Ethnic
237
Gamelan SFX Rhythm FX
238
239
GM2 Analog GM2 Jazz
240
241
GM2 SFX
242
Standard Room
243
HipHop Jungle
244
TR-707 Closed Hi-Hat EXC1 Closed Hi-Hat
245
VA-76 Drum Sets
246
SFX Rhythm FX
247
Rhythm FX CM-64/32L Standard Room Power Electronic
248
249
250
Internal Music Styles
251
Chord Intelligence
252
253
VA-76 Chord Intelligence
Midi Implementation Chart
254
Numerics
Index
255
256
Index
257
258
START/STOP
259
260
261
262
263
264
265
Information
266