User Instructions
This package should include the following
Contents
Contents
Contents
Contents
Read ME First
Page
Menu List for DKP-8, DKP-12, and KP-12 Keypanels
Menu Item Description
Menu List for DKP-8, DKP-12, and KP-12 Keypanels
DKP-8 Keypanel Reference View Push-button version shown
DKP-12 Keypanel Reference View Push-button version shown
KP-12 Keypanel Reference View Push-button version shown
Menu List for DKP-8, DKP-12, and KP-12 Keypanels
Applying Power
Power-Up and Initial Settings
MD1, Key Type and Set Addr Messages
Power-Up Indications
Basic Intercom Operation
Talk and Listen Indicators
Keys and Displays
Flashing Call Indicator
Headset/Speaker/PRGM Selection and Volume Adjustment
Copy Call Waiting
All-Purpose Phone Key Operation
Telephone Operation
Manual Dialing with an All-Purpose Phone Key
Dialing an Autodial Number Using an All-Purpose Phone Key
Dialing a Number Using a Redial or Autodial Key
General Description
Using the Top-Level Menu
Top Level Menu, - - Clear call waiting
Top Menu Level, Call List Names
Top Level Menu, Display
Top Level Menu, Display, KEY Type
Top Level Menu, Display, KEY Icom
Top Level Menu, Display, Level
Top Level Menu, Display, Port Num
Top Level Menu, Display, Listen
Top Level Menu, Display, Page Use
Top Level Menu, Display, Solo
Top Level Menu, Lists
Top Level Menu, Key List
Top Level Menu, Level
Top Level Menu, Lists, Icom
Top Level Menu, Lists, IFB
Top Level Menu, Lists, P-P Point-to-Point
Top Level Menu, Lists, Ifsl
Top Level Menu, Lists, RLY Relays
Top Level Menu, Lists, ISO
Top Level Menu, Lists, Spcl Special Lists
Top Level Menu,
Top Level Menu, Menus
Top Level Menu, Lists, UPL
Top Level Menu, TGL Lisn Toggle Listen ON/OFF
Using the Top-Level Menu
Menu Mode
Select Control Operation in Menu Mode
Keypanel Menus in Menu Mode
Menus, Autodial for KP-12/DKP-12 Only
Menus, KEY ASGN, Autodial For KP-12, DKP-12 Only
Menus, KEY Asgn
Menus, KEY ASGN, General Description
Menus, KEY ASGN, Autofunc
Menus, KEY ASGN, Clear
Menus, KEY ASGN, Copy
Menus, KEY ASGN, Lists
General Description
Menus, KEY ASGN, LISTS, PL Party Line
Menus, KEY ASGN, LISTS, IFB
Menus, KEY ASGN, LISTS, Icom
Tap Select
Menus, KEY ASGN, LISTS, ISO
Menus, KEY ASGN, LISTS, Ifsl
Menus, KEY ASGN, LISTS, P-P Point-to-Point
Menus, KEY ASGN, LISTS, RLY Relays
Menus, KEY ASGN, LISTS, Spcl Special Lists
Menus, KEY ASGN, Phone For KP-12, DKP-12 Only
Menus, KEY ASGN, Local I/O For KP-12 Only
Menus, KEY ASGN, LISTS, UPL
Menus, KEY ASGN, Redial For KP-12, DKP-12 Only
Menus, KEY ASGN, UPL
Menus, KEY OPT, BTN Lock Button Lock
Menus, Key Opt Menu
Menus, KEY OPT, Chime
Menus, KEY OPT, Exclusive
Menus, KEY OPT, CLR OPT
Menus, KEY OPT, Copy
Menus, KEY OPT, Group
Menus, KEY OPT, Latching
Menus, KEY OPT, Solo
Menus, SERVICE, Foot SW with GPI module only
Menus, Service Menu
Menus, SERVICE, Dimmer
Menus, SERVICE, KEY Type
Select MENUS, SERVICE, Lock
Menus, SERVICE, MIC Ctrl
Menus, SERVICE, MIC Comp
Select SERVICE, Unlock
Menus, SERVICE, MOD Asgn
Menus, SERVICE, MIC Gain
How Mods Work
Procedure to Assign Mods
Menus, SERVICE, Mute LVL
Using Multiple Expansion Panels KP-12 Only
Menus, SERVICE, OPTO-ISO KP-12 with GPI Module Only
Call waiting window displays OPT1
Menus, SERVICE, Save CFG
Menus, SERVICE, OUT Ctrl
Menus, SERVICE, Reset
Menus, SERVICE, SET Addr
Menus, SERVICE, Tally
Menus, SERVICE, Sidetone
Menus, SERVICE, Test PNL
Menus, SERVICE, Tone
Settings for Intercom Port Numbers
596
KP-12 Audio Transmit Board Connections
Page
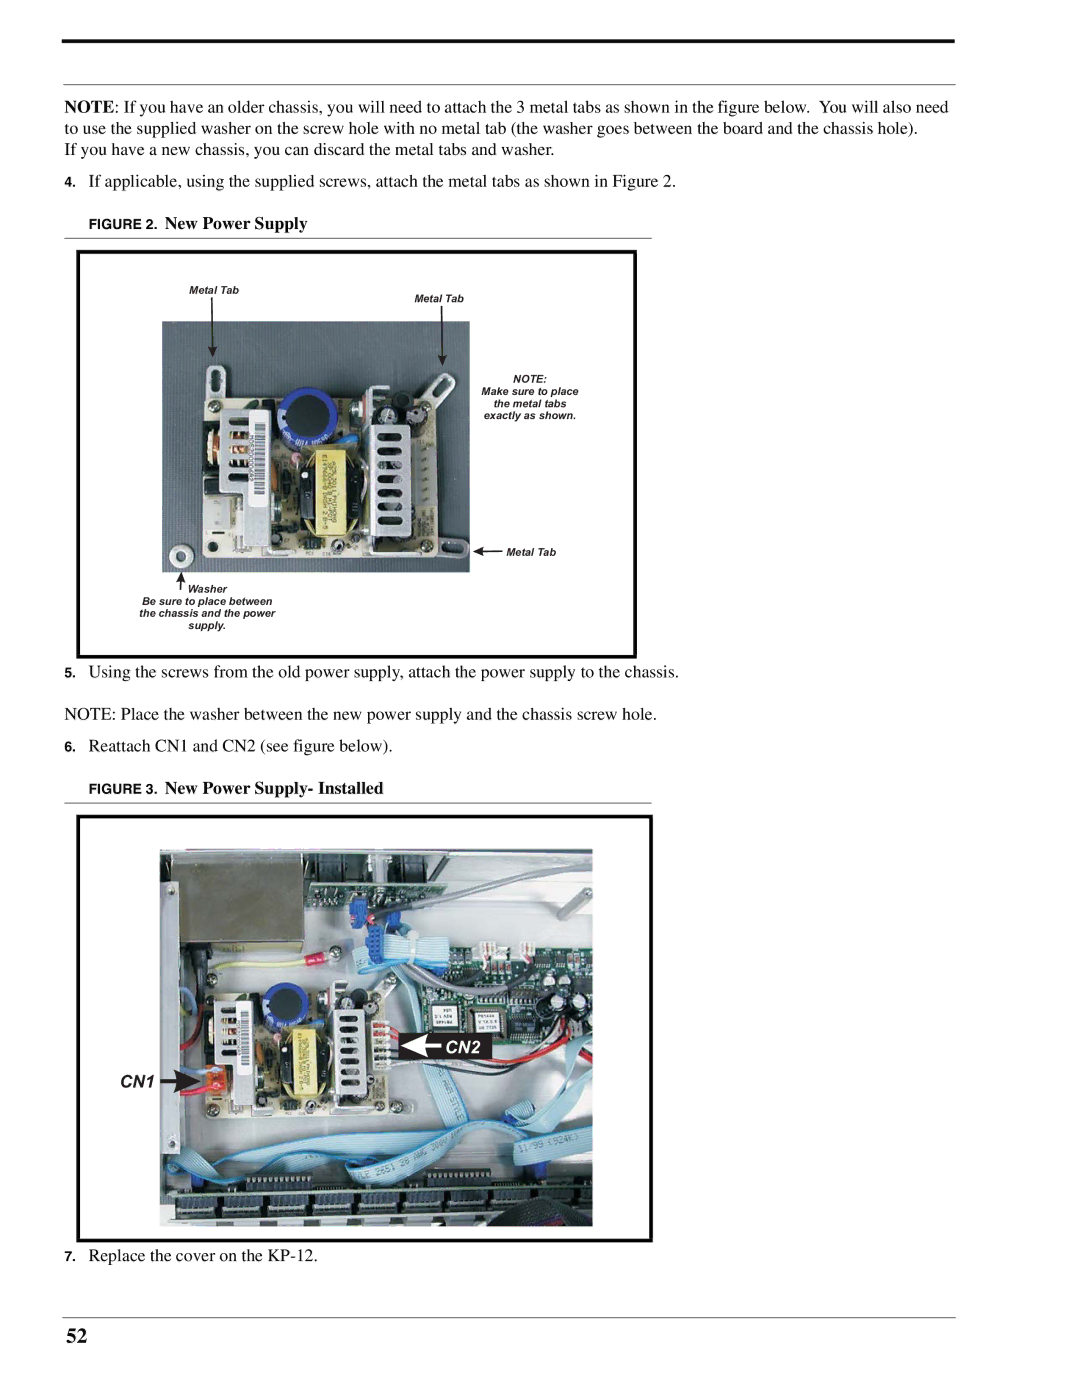
Replacing the KP-12 Power Supply
Replacing the KP-12 Power Supply
CN2
Page
Portland Avenue South Burnsville, MN 55337 U.S.A

 CN2
CN2