DVD-R120 DVD-R121 DVD-R122
English
No rights are granted for commercial use
Maintenance of Cabinet
Precaution
Important Safety Instructions
Handling Cautions
Using MPEG4 disc
Disc Specifications
Using CD-R/RW
Disc Storage
DVD-RAM Disc Playback and Recording
DVD-RW VR mode
DVD-RW Video mode
Do not use the following discs
Contents
Copying from a Camcorder
General Features
Using a DVD-R
Using a DVD-RAM
Using a DVD-RW
Before reading the user’s
When using a DVD-RW disc in Video Mode
When using a DVD-R disc
Setting the Remote Control
Accessories
Preparing the Remote Control
Unpacking
Controllable TV Codes
Front Panel Display DVD-R120
Description
Front panel DVD-R120
Front Panel Display DVD-R121
Remote Control Reciever 11. PR
Front panel DVD-R121
Front Panel Display DVD-R122
Remote Control Reciever 10. PR
Front panel DVD-R122
Connects to equipment having Component video output
Rear Panel
Fan
Tour of the Remote Control
Additional connections
Quick Overview
Quick Overview
Video output cable
TV mode
Connecting the DVD
DVD mode
Other type of connecting the Video output cable
Video, Component video and Progressive Output Modes
Your TV
Case 2 Connecting to an S-Video output jack
Case 3 Component Video output jacks
Case 1 Connecting to your TV
If your TV has audio input jacks, use this connection
Connecting to AV3 IN, DV input jack
Case2 Connecting a DV Device to the DV in jack
Camcorder
… / † , œ / √ Buttons
Auto Setup function
On-Screen Menu Navigation
OK Button
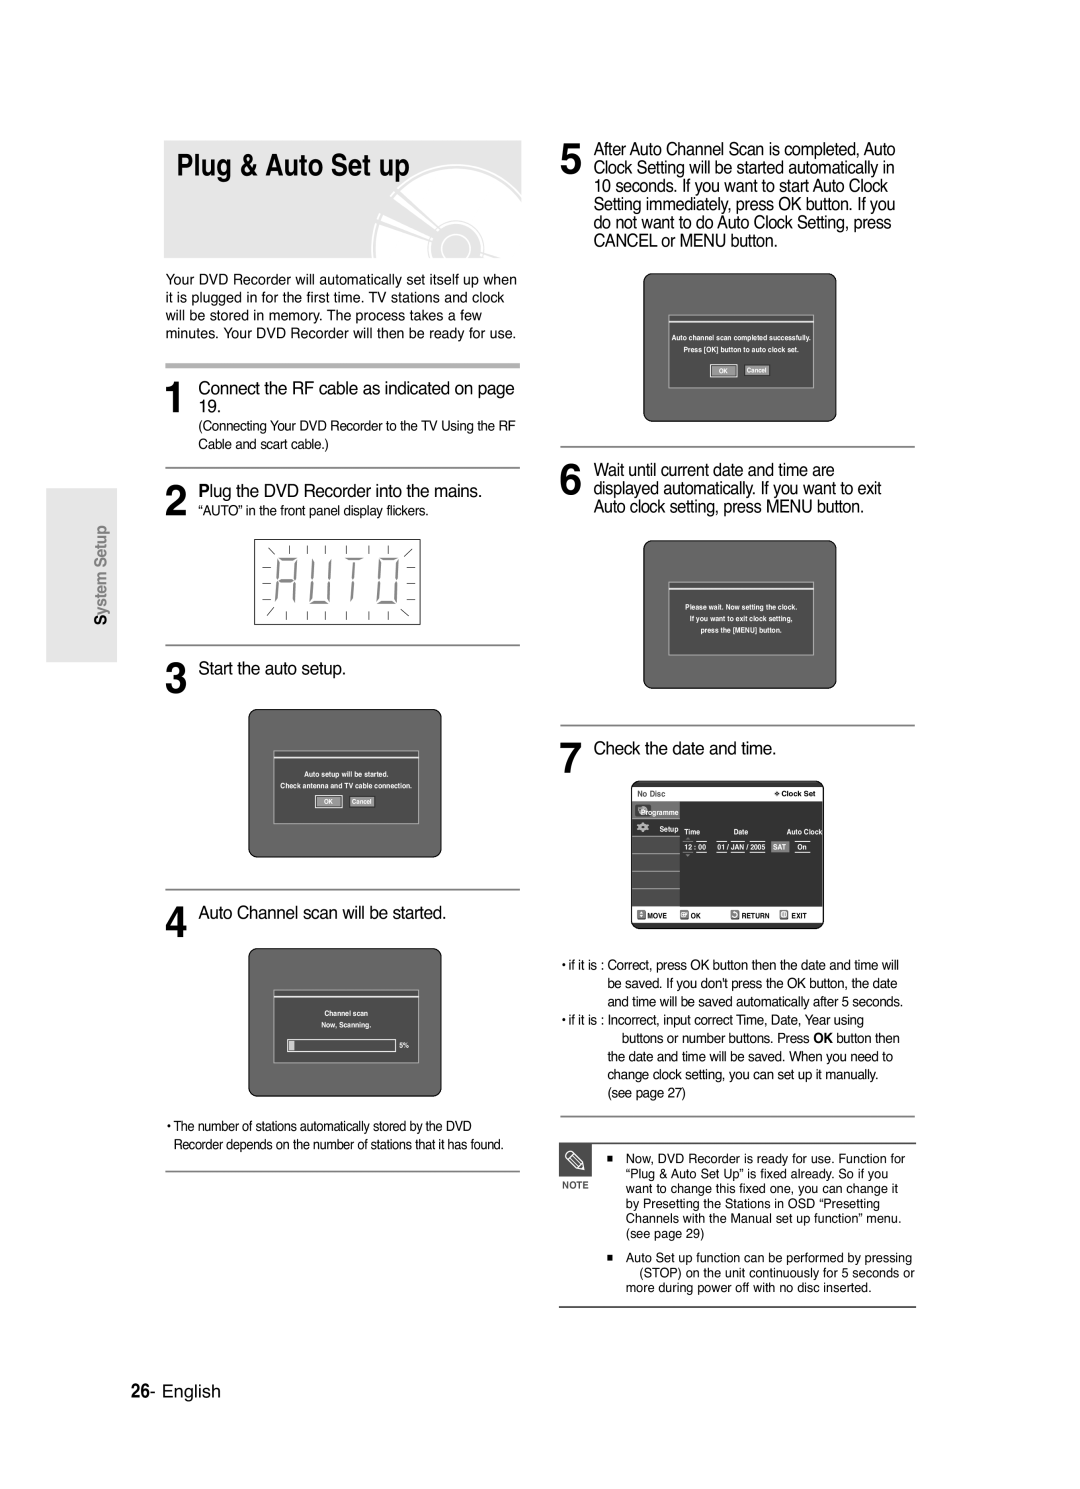
Plug & Auto Set up
Press the OK button, then the date and time will be saved
Setting the Clock
Press the …† buttons to select On for the Auto Clock
You must have the RF cable connected to
Press the OK button to stop the Auto Setup
Channel scan will be started
Presetting Channels with the Manual Setup function
To the previous menu
Setting up the Language Options
Language setup menu will be displayed
EP Mode Time Setting
System menu will be displayed
Then press the OK or √ button
Automatic Chapter
Creation
Press the œ √ buttons to select Yes and press the OK button
Adjust the brightness of the unit’s front panel display
Setting up the Front Display Options
With the unit in Stop mode/No Disc mode
Press the Menu button
Setting up Nicam Options
DivXR Registration
Digital Output
Setting up the Audio Options
Audio Options
Dynamic Compression
Component mode
Setting up Video Output Options
Video setup menu will be displayed
Available Video Output Jack
Scan
Setting up the Progressive
Message Video Output Mode Interlace Scan will appear
3D Noise Reduction motion adaptive noise reduction
Setting up DisplayVideo Options
DisplayVideo Options
If you forget your password
Press the Return or œ button to return
About the Rating Level
About the Change Password
Press the …† buttons to select Change Password
Press the …† buttons to select Rating Level
Compatibility between Samsung and Other Company’s Recorder
Before Recording
Recordable discs
Recording Formats
Recording Mode
Concerning Copy Control Signals
Unrecordable video
About Info Key
Programme you are
Watching
Press the OPEN/CLOSE button to close the disc tray
To stop recording
SP LP EP XP
Press the REC button
Do not use DVD-R authoring discs with this unit
PR Number AV1 AV2 AV3 DV
Recording from external equipment you are watching
To pause recording
Front panel display changes in the following sequence
Copying from a Camcorder only DVD- R120/DVD-R121
Press the Input button to select DV
Press the REC button to start recording
Timer counter decreases by
Making a One Touch Recording OTR
030 100 .. Off
Using the Menu button
Making a Timer Recording
With the unit in Stop mode, press the Timer button
Set timer recording option
Press the OK button
Flexible Recording For Timer recording only
If the timer settings overlap
Press the OK button to confirm the edited setting
Press the OK or √ button
Using the Video Plus+ Feature
√ button
With the unit in Stop mode, press the Menu button
Timer List
Video Plus+ Extended
Disc types that can be played
Before Playing
Region code DVD-Video only
Discs that cannot be played
Press the OPEN/CLOSE button
Playing a Disc
Press the Stop button to stop playback
Searching through a Chapter or Track
Using the Search Functions
Button on the remote control
Press the Title List button to move to the Title List
Step Motion Play
Moving to a scene directly using the Anykey
Slow Motion Play
About Anykey
Playing RepeatedlyRepeat Playback
Using the Repeat Function
Using the Repeat button
Press the …† buttons to select Time
Repeat is highlighted
Using the Anykey button
Press the Repeat button repeatedly to select Off
Press the Subtitle button during playback
Using the Subtitle button
Selecting the Subtitle
Repeat playback of the A-B section starts
Changing the Camera Angle
Using the Audio button
Selecting the Audio language
Normal size 2X 4X
Using Bookmarks
Zooming-In
Playing back a bookmark
Using Markers
Press the Cancel button to delete the selected bookmark
Clearing a bookmark
Playing an Audio CD/MP3
Playing an Audio CD CD-DA/MP3
Insert an MP3 Disc into the disc tray
Press the / button Fast Play X2, X4
Files of multiple types Topmost GUI
MP3 Screen Elements
Appears in a defined order
Menu screen Disc Navigation
Press the Play button to playback the playlist English
Play Option Mode To Programme Tracks
Press the œ √ buttons to select Play Option
Slide show screen will appear
Returns to the Album screen Unit enters slide show mode
Playing a Picture
Insert a Jpeg into the disc tray
Insert a MPEG4 Disc into the disc tray
When MPEG4 file is played, you can use following functions
Playing a MPEG4
MPEG4 Function Description
Playing the Title List
Using the Title List button
Using the Menu button
Play, Rename, Delete, Edit, Protection See pages 72~75
Title List Screen Elements
Press the …† buttons to select Title
Play List
Disc Manager
Title List
RenamingLabeling a Title
Using the Menu button
Basic Editing Title List
Press the Menu button
LockingProtecting a Title
Deleting a Title
Deleting a Section of a Title
Edit Title List Screen Elements
Press the OK button to select the Delete
Press œ √ buttons to select Yes, then press the OK button
Playback related buttons
Press the OK button at the start point
Creating a Playlist
Press the OK button at the end point
To make a new playlist
With the unit in Stop mode, press the Play List button
Playlist entries will be played VR mode
Playing Entries in the Playlist
Follow these instructions to play the playlist entries
Then press the OK or √ button
Enter the desired characters using the …† √ buttons
Renaming a Playlist Entry
Play List button
Editing a Scene for the Playlist
Playing a Selected Scene
Press the OK button at the end point of the scene
Modifying a Scene Replacing a Scene
Press the OK button at the start point of the scene
Selected scene is moved to the selected position
Adding a Scene
Press the OK button at the starting point of the scene
Deleting a Scene
Using the Play List button
Copying a Playlist Entry to the Playlist
Playlist that has been selected will be copied
You can create up to 999 scenes on one
Using the Playlist button
Deleting a Playlist Entry from the Playlist
Enter the desired characters press the …† √ buttons
Disc Manager
Editing the Disc Name
Disc Protection
Formatting a Disc
Delete All Title Lists
All title lists are deleted
Finalising a disc
Disc is finalised
Unfinalising a disc V/VR mode
DVD-RW can be finalised or unfinalised in VR mode
Did you set the DVD recorder channel settings correctly?
Troubleshooting
Power
Recording
Playback
Check the regional code of the DVD disc
Sound
Timer Recording
Video
Forget my password for parental supervision
Remote Control
Remote control doesnt work Other problems
Other
Specifications
Audio Output
United Kingdom Republic of Ireland
AK68-00687A-00