DVD-R125
Die gewerbliche Verwendung ist nicht gestattet
Hinweise zur Sicherheit
Deutsch
Umgang mit dem Gerät
Weitere wichtige Hinweise
Sicherheitsmaßnahmen
Pflege des Gehäuses
CD-R/RW verwenden
Aufbewahrung von Disks
Spezifikationen von Disks
MPEG4-Datenträger verwenden
DVD-RW VR-Modus
Nicht geeignete Disktypen
Schutz
DVD-RW Videomodus
Inhalt
Aufnahme auf Tastendruck
Hdmi High Definition Multimedia Interface
Überblick über die Gerätefunktionen
Qualitativ hochwertige Progressive Abtastung
DVD-Recorder verwenden
Hinweise zur
Bedienungsanleitung Überblick
Bei Verwendung einer DVD-R
Schritt 6 Fixieren und auf anderen DVD-Geräten wiedergeben
Bei Verwendung einer DVD-RW im VR-Modus
Fernbedienung vorbereiten
Auspacken
Zubehör
Fernbedienung einrichten
Steuerbare Fernseher-Codes
Display auf der Gerätevorderseite
Beschreibung
Frontseite
AV1TV Output SCART-Anschluss AV2EXT Input SCART-Anschluss
Rückseite
Lüfter
Eingang vom Antennenanschluss Ausgang zum Fernsehanschluss
Überblick zur Fernbedienung
Kurzübersicht
DVD-Modus
DVD-Recorder anschließen
Zusätzliche Anschlüsse
TV-Modus
Alternativen zum Anschließen des Videoausgangskabels
Wählen Sie eine der nachstehenden Anschlussmöglichkeiten aus
Fall 2 Anschließen an einen S-Video-Ausgang
Fall 1 Anschließen an einen Video Composite-Ausgang
Fall 1Anschließen an das Fernsehgerä t
Achten Sie auf die Farbkodierung
Rot weiß
HDMI-Eingang anschließen
HDMI-/DVI-Kabel an ein Fernsehgerät anschließe
Fall 1 An ein Fernsehgerä t mit
DVI-Eingang anschließen
Die AV 3 IN-Eingang wird automatisch
Fall 2 Einen Camcorder an den DV IN-Eingang anschließ en
Ausgewählt wird, drücken Sie auf die
Ausgewählt. Falls der Eingang nicht
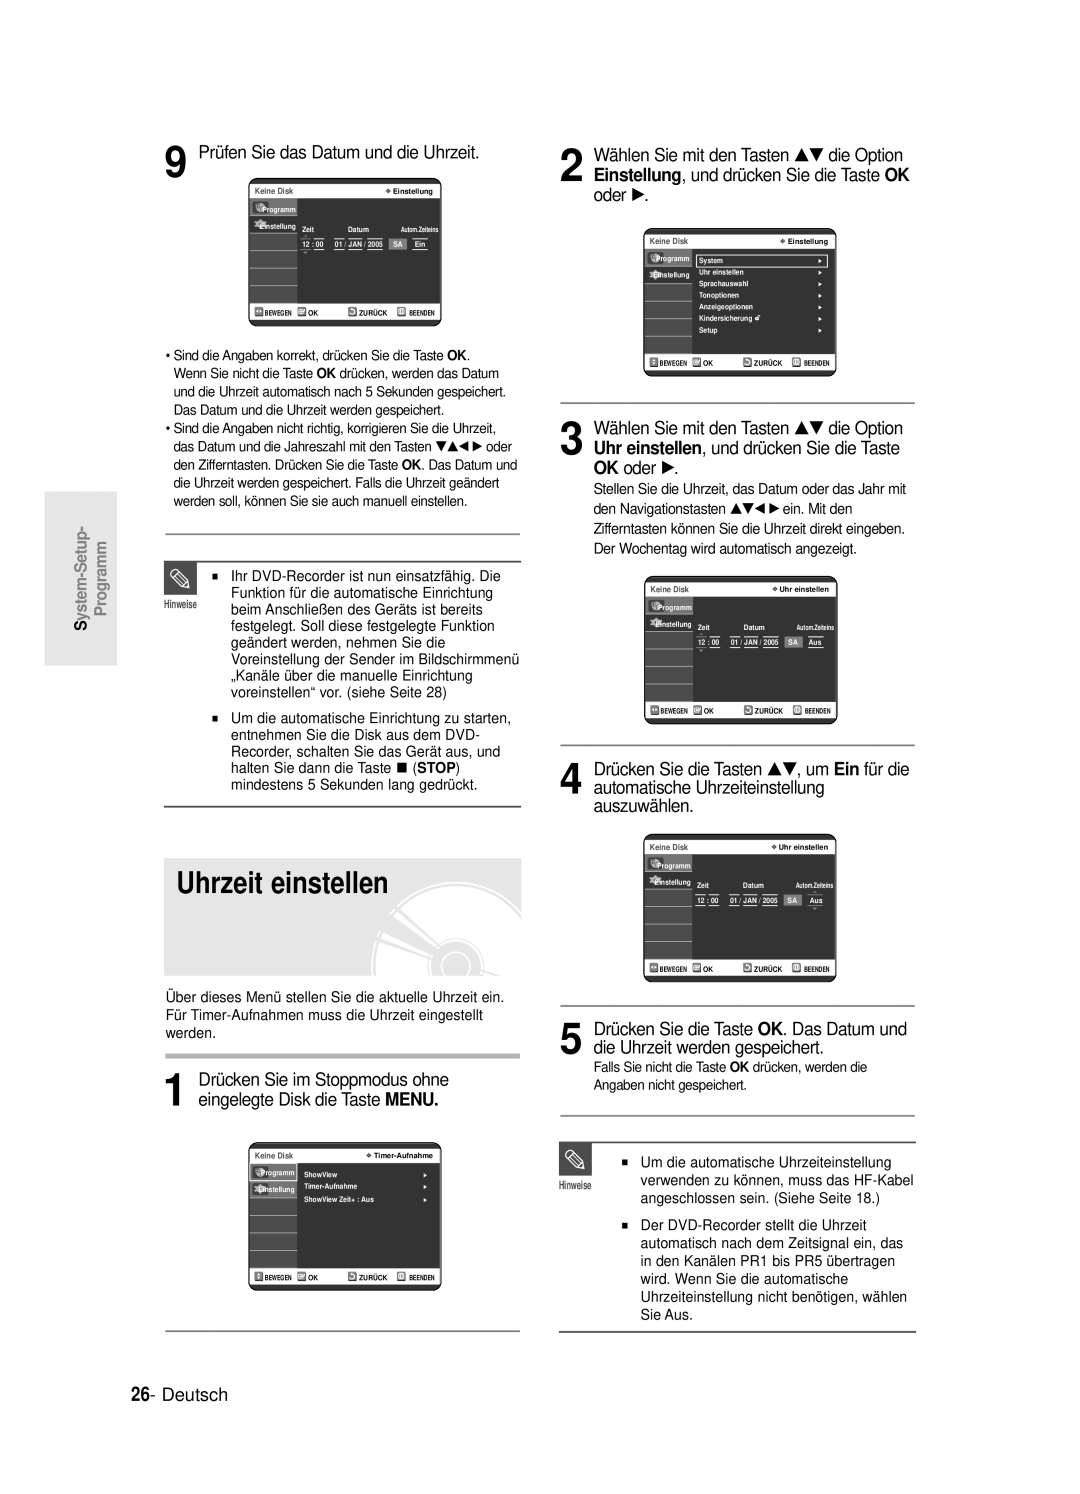
Uhrzeit einstellen
Navigation in den Bildschirmmenü s
Navigation in den Bildschirmmenüs
Einrichtung voreinstellen
Starten Sie die automatische Einrichtung
Anschließen und automatisches Einrichten
Wählen Sie mit den Zifferntasten die gewünschte Sprache aus
Uhrzeit einstellen
Prüfen Sie das Datum und die Uhrzeit
Kanäle ü ber die automatische Einrichtung voreinstellen
Kanäle ü ber die manuelle Einrichtung voreinstellen
Durch Drücken der Taste Return oder
Sprachoptionen einstellen
Das Menü für die Sprachauswahl wird geöffnet
Gelangen Sie zurück ins vorherige
Wählen Sie mit den Tasten …†die Option EP
Einstellung EP-Modus Automatische Zeit
Kapitelerstellung
Die automatische Kapitelerstellung
Drücken Sie die Taste STOP, um die Aufnahme zu beenden
Das Kapitelmenü wird geöffnet
NICAM-Optionen einstellen
Bertragung in einer anderen Sprache
Das Menü für die Audioeinstellungen wird geöffnet
DivXR-Registrierung
Tonwiedergabeoptionen einstellen
Ein NICAM-Modus
Digital-Ausgang
Optionen fü r Video Output einstellen
Tonwiedergabeoptionen
Dynamische Kompression
√ die Option Ja, und drücken Sie die Taste OK
Einstellung fü r Progressive Abtastung aktivieren
Verfü gbarer Videoausgang
Wenn das HDMI-Kabel angeschlossen ist
Fernsehgerät den Interlace Scan-Eingang. Zur
Einstellung fü r Progressive Abtastung deaktivieren
Anzeigeoptionen Video einstellen
Das Menü für die Anzeigeeinstellungen wird geöffnet
Aus Normal
Anzeigeoptionen Video
Einstellung der Wiedergabe
HDMI-/DVI-Auflö sun
Kindersicherung einstellen
Wählen Sie mit den Tasten …† die Option Passwort ändern
Informationen zu Sicherungsstufe
Wählen Sie mit den Tasten …† die Option Sicherungsstufe
Vor der Aufnahme
Beschreibbare Disks
Kopiergeschü tzte Videos
Aufnahmeformate
Aufnahmemodus
Im VR-Modus formatierte DVD-RW und DVD-RAM
Verfügbaren Disk-Speicherplatz prüfen Diskinformation
Laufendes Fernseh- programm aufnehmen
Taste Info verwenden
Bevor Sie beginnen
Während einer laufenden Aufnahme ist es
Das Symbol wird auf der Gerätevorderseite angezeigt
Drücken Sie die Taste REC
SP LP EP XP
Programmplatz AV1 AV2 AV3 DV
Von externen Geräten aufnehmen
Siehe Seite
Bis zu 99 Titel können auf eine Disk aufgenommen werden
Von einem Camcorder kopieren
Wählen Sie mit der Taste Input die Option DV
030 100 .. Aus
Drücken Sie die Taste REC, um die Aufnahme zu starten
Um die gewünschte Aufnahmezeit
Geöffnet
Optionen für Timeraufnahme einstellen
Drücken Sie im Stoppmodus die Taste
Aufnahmemodus
Drücken Sie die Taste OK
Flexible Aufnahme Nur für Timeraufnahmen
Standard-Timeraufnahme bearbeiten
Drücken Sie die Taste OK oder √
Timer-Übersicht löschen
Wollen Sie Nr löschen?
Gespeicherte Sender verwenden, blinkt der
Option ShowView, und drücken Sie die
Taste OK oder √
Drücken Sie im Stoppmodus die Taste Menu
Timeraufnahmen
Verlängern Ausführen
Während der Aufzeichnung wird die
Geeignete Disktypen
Vor der Wiedergabe
Ländercode nur bei DVD-Video
Nicht geeignete Disktypen
Drücken Sie die Stopptaste, um die Wiedergabe zu stoppen
Disk wiedergeben
Drücken Sie die Taste OPEN/CLOSE
Einem Kapitel oder Track suchen
Disk- und Titelmenü verwenden
Suchfunktionen verwenden
Titelliste der Disk aufzurufen
Kapitel oder Tracks ü berspringen
Wiedergabe in Zeitlupe
Wiedergabe in Einzelbildern
Drücken Sie während der Wiedergabe die Taste Anykey
Taste Repeat verwenden
Wiederholfunktion verwenden
Wiedergabe wiederholen
Zur normalen Wiedergabe zurückkehren
Taste Anykey verwenden
Bei MP3-Disks können Sie Track, Ordner oder Disk auswählen
Drücken der Taste Anykey oder Return aus
√ die Wiederholoption A-B
Bereich A-B festlegen und wiederholen
Taste Subtitle verwenden
Drücken Sie während der Wiedergabe die Taste Subtitle
Taste Audio verwenden
Wiedergabesprache wählen
Anderen Kamerawinkel wählen
Drücken Sie während der Wiedergabe die Taste Audio
Drücken Sie während der Wiedergabe die Taste Marker
Zoomfunktion verwenden
Lesezeichen verwenden
Bei Aufnahmen im EP-Modus wird die
Lesezeichen lö schen
Markierungsfunktion verwenden
Wiedergabe ab einem Lesezeichen
Audio-CD CD-DA wiedergeben
CD-DA/MP3 wiedergeben
Wiedergabe ab einer Marke
Marke löschen
MP3-Disk wiedergeben
Legen Sie eine MP3-Disk in das Diskfach ein
Die Wiedergabe des Tracks startet dann automatisch
Wiedergabeoption
Stoppt die Wiedergabe Startet bzw. pausiert die Wiedergabe
Aufbau des MP3-Menü s
Aktueller Track Musikstü ck Zeigt den Namen des
Der Wiederholmodus wird markiert
Wiedergabemodus wählen
Tracks programmieren
Gewünschte Wiedergabeoption aus
Zum Albumbildschirm Miniaturbilder zurückkehren
Legen Sie eine JPEG-Disk in das Diskfach ein
Aus
MPEG4 wiedergeben
MPEG4-Funktionsbeschreibung
Drücken Sie die Taste Menu
Taste Title List verwenden
Taste Menu verwenden
Aufbau der Titelliste
Sie können auch die Taste Anykey
Titelliste
Wiedergabeliste
Speichern, und drücken Sie OK
Titelliste bearbeiten
Titel umbenennen
Taste Menu verwenden
Titel sperren schützen
Titel löschen
Abschnitt in einem Titel löschen
Drücken Sie anschließend OK
Wählen Sie Löschen , und bestätigen Sie mit OK
Aufbau des Menüs Titelliste bearbeiten
Neue Szene für die Wiedergabeliste erstellen
Wiedergabeliste erstellen
Wählen Sie Erstel., und bestätigen Sie mit OK
Sie Start- und Endpunkt der Szene erreichen
Zum Anhalten der Wiedergabe drücken Sie die Stopptaste
Der gewählte Eintrag der Wiedergabeliste wird abgespielt
Angezeigt
Wählen Sie die gewünschten Buchstaben mit den …† œ √
VR-Modus Drücken Sie im Stoppmodus die Taste Play
Das Fenster zum Ändern des Namens wird angezeigt
Drücken Sie die Taste OK
Szene für die Wiedergabeliste bearbeiten
Ausgewählte Szene wiedergeben
Szene ändern Szene ersetzen
Schritte 1-3 siehe Seite
Bewegen, und drücken Sie anschließend OK
Szene hinzufügen
Wählen Sie mit den Tasten …† die Funktion
Wählen Sie mit den Tasten …† die Funktion
Szene löschen
Taste Play List verwenden
Hinzu, und drücken Sie anschließend
Drücken Sie im Stoppmodus die Taste Play List
Löschen , und drücken Sie anschließend OK
Sie können bis zu 999 Szenen auf einer
Der eingegebene Disk-Name wird zugewiesen
Disk-Manager
Disk-Namen bearbeiten
Das Fenster zur Änderung des Namens wird angezeigt
Disk-Manager, und drücken Sie anschließend
Disk-Schutz aktivieren
Disk formatieren
Disk
Alle Titellisten löschen
Alle Titellisten werden gelöscht
Disk fixieren
DVD-RV
Eine im Videomodus formatierte DVD-RW
Fixierung einer Disk aufheben V/VR-Modus
Die Fixierung der Disk wird aufgehoben
Aufnahme
Fehlersuche und Lösungsvorschläge
Stromversorgung
Achten Sie darauf, dass die
Wiedergabe
Bild
Wurden siehe Seiten 34~37
Aufnahmezeit und Ende
Timeraufnahme
Ton
Gründen unterbrochen wird
Halten Sie die Taste
Sonstiges
Fernbedienung
Technische Daten
Deutschland
DEU