DVD
This symbol indicates important
This Product Utilizes a Laser
Important Note
Important Safety Instructions
Precaution
Handling Cautions
Getting Started
HDD Hard Disk Drive
Maintenance of Cabinet
Disc Handling
Holding discs
Keep in a clean protection jacket
Disc Specifications
Disc Type
Title Copy Specifi cations Contents
Disc Copy
HDD € DVD DVD € HDD
Disc Format
Protection
Copy Protection
Many DVD discs are encoded with copy protection
Not all brands of discs will be compatible with this unit
Do not use the following discs
Others Product Vendor Brand
DSC Digital Still Camera Vendor Brand
General Features
Precaution
How to use the HDD & DVD Recorder
Tour of the Remote Control
Using the playback related buttons
Using the Disc Menu & Title Menu
Using the Info button
Using Markers
DivX Certification
General Features
Icons that will be used in manual
Before Reading the USER’S Manual
About the use of this user’s manual
Copyright
HOW to USE the HDD & DVD Recorder
Playing
Editing a recorded disc
Finalising & Playing on other DVD components
Preparing the Remote Control
Accessories
Batteries for Remote Control AAA Size
Unpacking
TV STANDBY/ON
Controllable TV Codes
Input SEL
TV Mute
Front Panel DVD-SH873M / 875M Front Panel DVD-SH876M
Description
Rear Panel
Open/Close indicator
Front Panel Display
Playback-related
Inside the compartment
Tour of the Remote Control
Connecting the HDD & DVD Recorder
Connecting & setting up
Additional Connections
Connecting & Setting UP
Other Types of Connections with the Video Output Cable
Case 1 Connecting to a Video Composite output jack
Case 2 Component Video output jacks
Case 1 Connecting to your TV
Other Types of Connections with the Audio Output Cable
If your TV has audio input jacks, use this connection
Case 2 Connecting to a stereo amplifier with AV output jacks
RearL
Case 1 Connecting to a TV with Hdmi Jack
Connecting HDMI/DVI to a TV
Case 2 Connecting to a TV with DVI Jack
Why does Samsung use HDMI?
Connecting to AV 3 IN, DV Input Jack
What is the HDCP?
Hdmi connection description
Case 2 Connecting a Camcorder to the DV in jack
Connecting to USB Devices
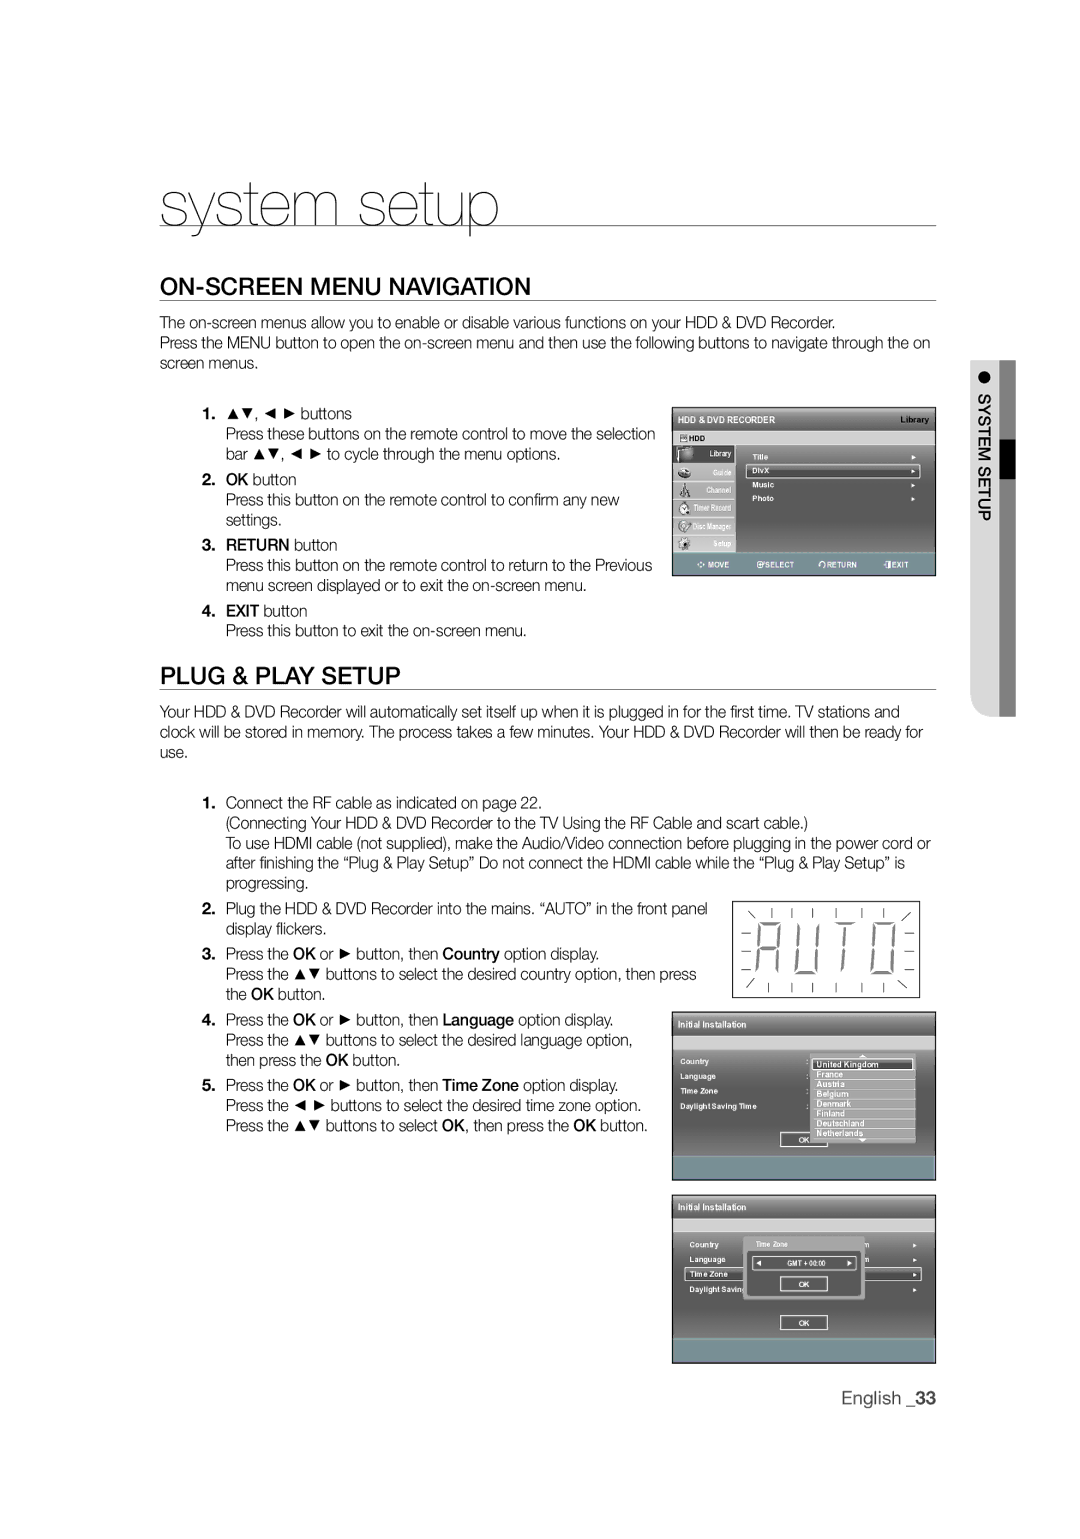
Plug & Play Setup
ON-SCREEN Menu Navigation
Exit button Press this button to exit the on-screen menu
Off Auto Scanning Digital 594.000MHz, BW8MHz, FFTAuto
Check the date and time
Clock SET
Setup
Time Zone
Manual clock set
All Receives signals including the scrambled signal
Auto Setup
Channel SET
Daylight Saving Time
Analogue Manual Setup
Digital Manual Setup
CH Tune the channel using buttons
Select Edit, Delete or Swap
Digital Favourite Channel
Digital Channel List
Setting UP the System Options
Auto Power Off Setting
Anynet+ Hdmi CEC
Off The function is cancelled
For using Anynet+ Hdmi CEC
DVB-T Auto Subtitle
DivXR Registration
Setting UP the Audio Options
Setting UP the Language Options
This is only active when a Dolby Digital signal is detected
On Nicam mode
Digital Output
Video setup menu will be displayed
Setting UP the Video Options
3D Noise Reduction motion adaptive noise reduction
Video Output
Setting mode
Hdmi Resolution
Output selection
Output jack
If you forgot your password
Setting UP the Parental Lock
Setting the Programme Grade
Component Output Progressive Scan
Setting the DVD Level
Setting UP the Recording Options
Changing the Password
Cvkl
EZ Record
EP Mode Time Setting
Mode Compatibility
Display Screen
Basic Functions
Banner Elements
Select Audio Track
Reda button Timer Record Setting the Timer Record
Using the digital text service
Guide
Changing the Subtitle Language
Target Media Select the media to record HDD or DVD
Guide Timer Recording
Logos of Discs That can be Played
Region Code DVD-VIDEO only
Disc Types That can be Played
Audio
Discs that cannot be played
VCD/SVCD/CVD/CD-ROM/CDV/CD-G/CD-I BD, HD-DVD
Playback
Sxcvkl
Using the Disc Menu & Title Menu
Playing a Disc
For DVD-VIDEO Disc
Szxcv KL
Using the Playback Related Buttons
Sxcv KL
Szxcvkld
Moving to a scene directly using the Info
Using the Info Button
Selecting the Subtitle Language
Step Motion Play
Selecting the Soundtracks & Audio Channels
Szxckld
Changing the Camera Angle
Repeat Play
Szxcvkl
ZOOMING-IN
Repeat A-B
Using Markers
Using the Bookmarks
Zcvkl
Playing back a bookmark
Playing AN Audio CD/MP3
Clearing a bookmark
Playing an Audio CDCD-DA
Playing an MP3 Disc
Audio CDCD-DA Screen Elements
MP3 Screen Elements
Repeat CD CD-DA & MP3
New Playlist
CD Import
Go To Playlist
Press the Greenb button in playlist mode
Delete the Playlist
Go To Edit Playlist
Using the Sort
Select Contents
Go To Music List
Viewing a Picture
MUSIC/PHOTO Simultaneous Playback
Slide Show
Press the GREENB, Stop or Return button
Zoom
Rotate
Go To Photo List
You can go to Photo List by pressing Yellowc button
DivX Function Description
Using the Menu button Insert a DivX disc into the disc tray
Menu is displayed
OK or Play Button
Press the Yellowc button in the fi le list
DivX Subtitle Encoding
Western
English, Greek
Compatibility between Samsung and Other Company’s Recorder
Recordable Discs
DVD-RW DVD+RW
Recording
Various editing options using a created Playlist
DVD-RAM/-RWVR mode
Recording Formats
DVD-RWV mode/-R
DVD-SH873M Recording Mode Recording Times
Recording Mode
Unrecordable Pictures
Concerning Copy Control Signals
DVD-R
DVD+RW HDD
Before you start
Recording Immediately
Recording the current TV programme you are watching
Recording from external equipment you are watching
Copying from a Camcorder
To stop recording
Do not use DVD-R authoring discs with this unit
Using the Play button
Making a ONE Touch Recording OTR
Simultaneous Recording and Playback
Stopping Playback / Recording
Time Shift Function AS a Live Signal
Buttons on the Remote Control used for Time Shift function
Using the Time Shift function
Time Shift Screen Elements
Press the Play button to resume watching the programme
Making a Timer Recording
You can set up to 12 Timer Recordings
Press the OK button to confi rm the edited setting
Editing the Scheduled List
Adding a Scheduled List
Deleting a Scheduled List
Using the Video PLUS+ Feature
Enter the correct digit
Press the OK button
GO to Recorded List
Video PLUS+ Extended
Press the Exit button after fi nishing the operation
Recorded List screen will disappear
Delete Recorded List
Information about Recorded List
Clear Recorded List
Go to Scheduled List
Basic Editing Title List
Playing the Title
Renaming Labeling a Title
Editing
Locking Protecting a Title
OK button. The key icon changes to the unlocked status Œ1
Press the buttons to select On, then press the OK button
Splitting a Section of a Title Split
Deleting a Title
VR mode
Using the playback-related buttons Play , Pause
Sxck
Deleting a Section of a Title Partial Delete
SXC
Using the Sort Function Title List
Navigation Menu
Time Navigation
Select Contents
Scene Navigation
An edited title may not display the exact search time
Creating a Playlist
Advanced Editing Playlist
Make Playlist screen is displayed
Press the OK button at the start point
Playing Entries in the Playlist
Renaming a Playlist Entry
Save Blued button Registers the character inputs
Editing a Scene for the Playlist
Playing a Selected Scene
Modifying a Scene Replacing a Scene
Moving a Scene Changing the Position of a Scene
To setup, follow steps 1 to 3 on
Adding a Scene
Deleting a Scene
Deleting a Playlist Entry from the Playlist
Using the Sort Playlist
About the Copy Screen
Copying from HDD to DVD or VICE-VERSA
Selection button
HDD ΠDVD DVD ΠHDD
DVD-Video Copy
Copying MP3, Jpeg or Divx
Folder Copy
File Copy
Available 236715MB
Changing the Name of MUSIC/PHOTO/DIVX File
Xcvkl
Disc Manager
Editing the Disc Name
XCV
Disc Protection
Delete All Title Lists
Delete All Title Lists/DivX Lists /Music Lists/Photo Lists
Formatting a Disc
HDD/DVD-RAM/+RW
Finalising a Disc
CVL
DVD-RW
DVD-VR Disc
Unfinalising a Disc V/VR mode
Troubleshooting
Reference
PAL-I, B/G, D/K, SECAM-L/L’, DVB-T
Specifications
MPEG-II
DVD-SH873M
United Kingdom Republic of Ireland
Warranty Conditions
North America
Region Country Customer Care Center Web Site
Code No. AK68-01582A-01