Basic troubleshooting
Contents
Settings
USER MANUAL
Health and safety information
Health and safety information
Health and safety information
Keep cards with magnetic strips away from the camera case
Outline of the User Manual
Settings
Basic functions
Extended functions
Indicators used in this manual
Icons used in this manual
Indicator
Safety warnings and precautions
Expressions used in this manual
Pressing the shutter
Subject, background, and composition
Subject
Basic troubleshooting
The subject’s eyes
appear red
Photos are blurred
Quick reference
Adjusting the exposure brightness
Capturing photos of people
Capturing photos at night or in the dark
Contents
Using the Intelligent Portrait mode
Charging the battery and turning on your camera
Using the Smart Scene Detection mode
Contents
Contents
Transferring files to your Windows OS computer
Transferring files to your Mac OS computer
Basic functions
Performing the initial setup ……………………
Inserting the battery and memory card ………
Camera layout ……………………………………
Unpacking
Optional accessories
Camera layout
Power button
Tripod mount Battery chamber cover
Flash
Camera layout
Status lamp
Zoom button In Shooting mode Zoom in or out
Attaching the strap
Camera layout
Button
Description
Button
Inserting the battery and memory card
Slide the lock up to release the battery
Insert the battery with the Samsung logo facing up
Removing the battery and memory card
Charging the battery and turning on your camera
Charging the battery
Turning on your camera
Turning on your camera in Playback mode
Performing the initial setup
1 Press t “ c to select Time Zone, and then press t or o
2 Press F/t to select a time zone, and then press o
3 Press D/c to select Date/Time Set, and then press t or o
6 Press D/c to select Date Type, and then press t or o
Learning icons
Icon
Icon
Description
Using MENU
Selecting options or menus
Using Fn
7 Press o to save your settings
5 Press D/c to select White Balance, and then press t or o
6 Press F/t to select a White Balance option
6 Press o to save your settings
4 Press D/c to scroll to
5 Press F/t to select a White Balance option
Selecting options or menus
Setting the display and sound
Setting the display type
Setting the sound
1 In Shooting or Playback mode, press m 2 Select O “ Beep Sound
Capturing photos
Zooming
Capturing photos
Digital zoom p s
Setting Intelli zoom
1 In Shooting mode, press m
2 Select a “ Intelli Zoom
Intelli zoom S p s
Reducing camera shake DIS p s
1 In Shooting mode, press m 2 Select a “ DIS 3 Select an option
Capturing photos
Icon
When is displayed
Holding your camera correctly
Half-pressing the shutter button
Reducing camera shake
Preventing your subject from being out of focus
Using the focus lock
Extended functions
Using the Smart Auto mode
In Shooting mode, press M
Select S
Align your subject in the frame
Using the Smart Auto mode
Half-press Shutter to focus Press Shutter to capture the photo
Using the Program mode
In Shooting mode, press M Select p Set the desired options
5 Press Shutter to capture the photo
Using the Live Panorama mode
Using the Live Panorama mode
Using the Picture-in-Picture mode
7 Press o to save the setting
1 In Shooting mode, press M 2 Select d
4 Press o to set the photo as a background image
Using the Scene mode
1 In Shooting mode, press M 2 Select s 3 Select a scene
Press Shutter to capture the photo
Align your subject in the frame, and then half-press Shutter to focus
Using the Magic Frame mode
Using the Beauty Shot mode
2 Select s “ Magic Frame
2 Select s “ Beauty Shot
Using the Intelligent Portrait mode
7 Select a “ Face Retouch
8 Select an option
10 Press Shutter to capture the photo
Using the Funny Face mode
1 In Shooting mode, press M 2 Select s “ Funny Face
3 Aim the camera at the subjects face
4 Press m 5 Select a “ Funny Effect “ a funny effect
Using the Night mode
7 Select a “ Distortion Level
4 Select a “ Long Time Shutter
6 Select an option
Using the Scene mode
Align your subject in the frame, and then half-press Shutter to focus
Press Shutter to capture the photo
Using the Movie mode
1 In Shooting mode, press M 2 Select 3 Press m
4 Select v “ Frame Rate
5 Select a frame rate the number of frames per second
Using the Smart Scene Detection mode
Using the Movie mode
4 Select v “ Smart Scene Detection “ On
5 Align your subject in the frame
Press Shutter to start recording
Press Shutter again to stop recording
Using the Movie mode
Icon
Shooting options
Using the timer …………………………………
Using Face Detection ……………………………
Adjusting brightness and color …………………
Selecting a resolution and quality
Selecting a resolution
Setting the photo resolution S p s
1 In Shooting mode, press m 2 Select a “ Photo Size
Selecting a resolution and quality
Setting the photo quality p d s
Selecting an image quality
1 In Shooting mode, press m 2 Select a “ Quality 3 Select an option
Using the timer S p d s
3 Press Shutter to start the timer
1 In Shooting mode, press t
2 Select an option
Using the flash S p d s
Shooting in the dark
Preventing red-eye p s
1 In Shooting mode, press F
Shooting in the dark
Icon
Icon
Description
Adjusting the ISO sensitivity p
In Shooting mode, press m Select a “ ISO Select an option
Shooting in the dark
Using macro p s
Using auto focus S p s
Changing the camera’s focus
1 In Shooting mode, press c
Adjusting the focus area
1 In Shooting mode, press m 2 Select a “ Focus Area
Changing the camera’s focus
2 Select an option
Using tracking auto focus p
2 Select a “ Focus Area “ Tracking AF
3 Focus on the subject you want to track, and then press o
1 In Shooting mode, press m
Using Face Detection p s
4 When you hear a quick beep, press Shutter
Detecting faces
Capturing a self portrait shot
Using Face Detection
Capturing a smile shot
Detecting eye blinking
2 Select a “ Face Detection “ Smile Shot
Tips for detecting faces
Using Face Detection
Adjusting brightness and color
Adjusting the exposure manually EV p
3 Select a value to adjust the exposure
4 Press o to save your settings
Adjusting brightness and color
Compensating for backlighting ACB p
1 In Shooting mode, press m 2 Select a “ ACB
3 Select an option
Changing the metering option p
1 In Shooting mode, press m 2 Select a or v “ Metering
Adjusting brightness and color
3 Select an option
Selecting a White Balance setting p
In Shooting mode, press m Select a or v “ White Balance
Select an option
Adjusting brightness and color
In Shooting mode, press m
Select a or v “ White Balance “ Measure Shutter
Aim the lens at a piece of white paper, and then press Shutter
Defining your own White Balance
Using burst modes p
In Shooting mode, press m Select a “ Drive Select an option
Icon
Description
Applying effects/Adjusting images
Applying Smart Filter effects p
1 In Shooting mode, press m 2 Select a or v “ Smart Filter
3 Select an effect
Applying effects/Adjusting images
Available filters while recording a video
Icon
Description
Adjusting images p
2 Select a “ Image Adjust
4 Press F/t to adjust each value
5 Press o to save your settings
Playback/Editing
Using programs on a computer ………………
Editing a photo …………………………………
Viewing photos or videos in Playback mode
Starting Playback mode
1 Press P
2 Press F/t to scroll through files
Viewing photos or videos in Playback mode
Video file information
Viewing files as thumbnails
Icon
1 In Playback mode, press - “ m 2 Select a category
3 Press F/t to scroll through the files
4 Press o to return to the normal view
Viewing files by category
2 When the pop-up message appears, select Yes
1 In Playback mode, press m
2 Select u “ Protect “ Select
3 Scroll to the file you want to protect, and then press o
2 Select u “ Copy to Card
Copying files to a memory card
Viewing photos
Enlarging a photo
Viewing photos or videos in Playback mode
Description
1 In Playback mode, press F/t to scroll to a desired panoramic photo
2 Press o
3 Press m to return to Playback mode
1 In Playback mode, press m 2 Select C
Playing a video
4 Select Start “ Play
5 View the slide show
1 In Playback mode, select a video, and then press o 2 View the video
Press c
Capturing an image from video
Viewing photos or videos in Playback mode
Editing a photo
Resizing photos
1 In Playback mode, select a photo, and then press m
2 Select e “ Resize 3 Select an option
Rotating a photo
Creating a close-up portrait
2 Select e “ Intelligent Portrait
Applying Smart Filter effects
2 Select e “ Smart Filter
4 Press o to save your settings
1 In Playback mode, select a photo, and then press m
Adjusting your photos
2 Select e “ Image Adjust “ ACB
2 Select e “ Image Adjust “ Red-eye Fix
2 Select e “ Image Adjust “ Face Retouch
2 Select e “ Image Adjust
2 Select e “ Image Adjust “ Add Noise
Adjusting brightness, contrast, or saturation
Adding noise to the photo
Transferring files to the computer
Transferring files to your Windows OS computer
1 In Shooting or Playback mode, press m
2 Select n “ i-Launcher “ Off
Disconnecting the camera for Windows XP
Transferring files to your Mac OS computer
1 If the status lamp on your camera is blinking, wait until it stops
3 Click the pop-up message
3 Turn on the camera
4 Open the removable disk 5 Drag or save files to your computer
Transferring files to the computer
Using programs on a computer
Installing i-Launcher
7 Follow the on-screen instructions to complete the installation
2 Select n “ i-Launcher “ On
Using i-Launcher
Using programs on a computer
Available programs when using i-Launcher
Firmware Upgrade
Windows OS Requirements
Mac OS requirements
Opening i-Launcher
Using programs on a computer
Using Multimedia Viewer
Using programs on a computer
Viewing photos
Updating the firmware
Using programs on a computer
Viewing videos
Description
Settings
Accessing the settings menu …………………………………
Settings menu
Accessing the settings menu
1 In Shooting or Playback mode, press m 2 Select a menu
Select an item
Settings menu
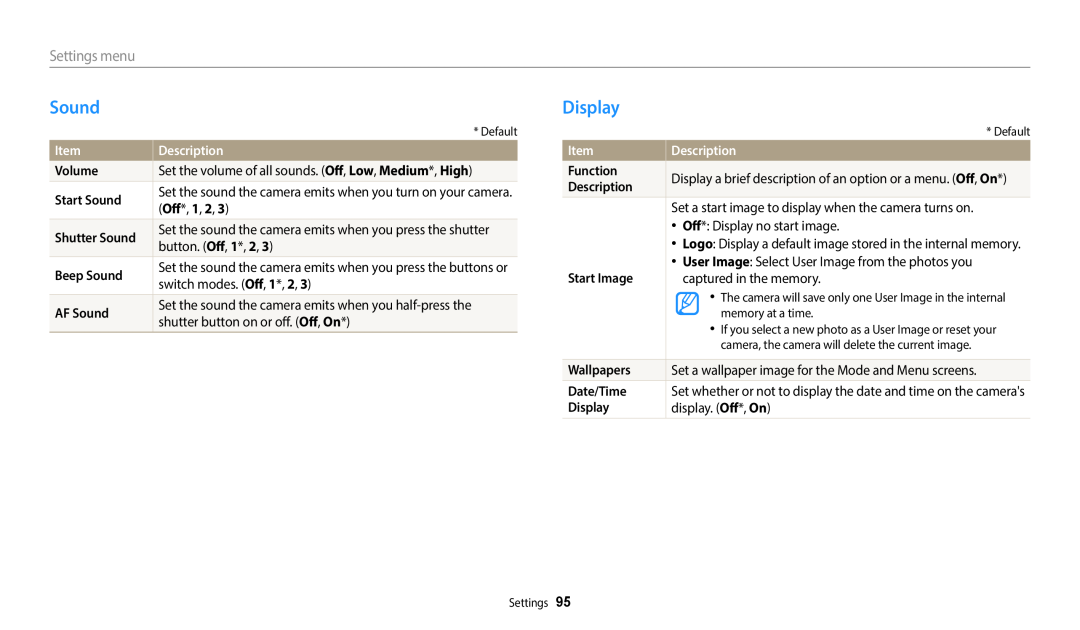
Sound
Display
Description
Settings
Settings menu
Adjust the brightness of the screen
settings will not be reset. Yes, No
Settings menu
Specify how to name files
Description
Set a time format. 12 Hr, 24 Hr
Appendixes
Before contacting a service center ……………………………
Camera specifications ……………………………………………
Error messages
Error message
Error message
Suggested remedies
Camera maintenance
Cleaning your camera
Camera lens and display
Camera body
Using or storing the camera
Camera maintenance
Using on beaches or shores
Using the camera with caution in humid environments
About memory cards
Supported memory cards
Camera maintenance
Memory card capacity
Camera maintenance
Size
Super Fine
Cautions when using memory cards
Camera maintenance
About the battery
Battery specifications
Battery life
Camera maintenance
Low battery message
Notes about using the battery
Cautions about using the battery
Notes about charging the battery
Notes about charging with a computer connected
Handle and dispose of batteries and chargers with care
Camera maintenance
Camera maintenance
Guidelines for charging the battery
Disposal guidelines
Before contacting a service center
Situation
Suggested remedies
Situation
Before contacting a service center
Situation
Suggested remedies
Situation
Before contacting a service center
Make sure that you are using a supported operating
Situation
Suggested remedies
Camera specifications
Normal AF
Macro
Auto Macro
Camera specifications
Green, Blue Sky, Sunset, Macro, Macro text, Macro Color
Camera specifications
Playback
Storage
Camera specifications
Power source
Dimensions W X H X D
Weight
Glossary
Glossary
Resolution
Glossary
JPEG Joint Photographic Experts Group
LCD Liquid Crystal Display
Glossary
A reduction of an image’s brightness or saturation at the periphery outer edges compared to the center of the image. Vignetting can draw interest to subjects positioned in the center of an image
Correct Disposal of This Product
Correct disposal of batteries in this product
Waste Electrical & Electronic Equipment
Applicable in countries with separate collection systems
Index
Index
Image Adjustment
Language settings 96 Live Panorama mode
Open source licenses 97 Optional accessories
Index
Index
Video
Viewing files
White Balance
Please refer to the warranty that came with your product or