Q35
Contents
System Management
Connecting to the Internet
Customizing your computer
System Specifications
Recovering the Computer
Using Magic Doctor
Appendix
Getting Started
Introducing The Computer
Front View
Right View
Left View
Rear View
Bottom View
Turning Off
Turning the Computer On and Off
Turning On
Select Turn Off Computer
Registering a new user
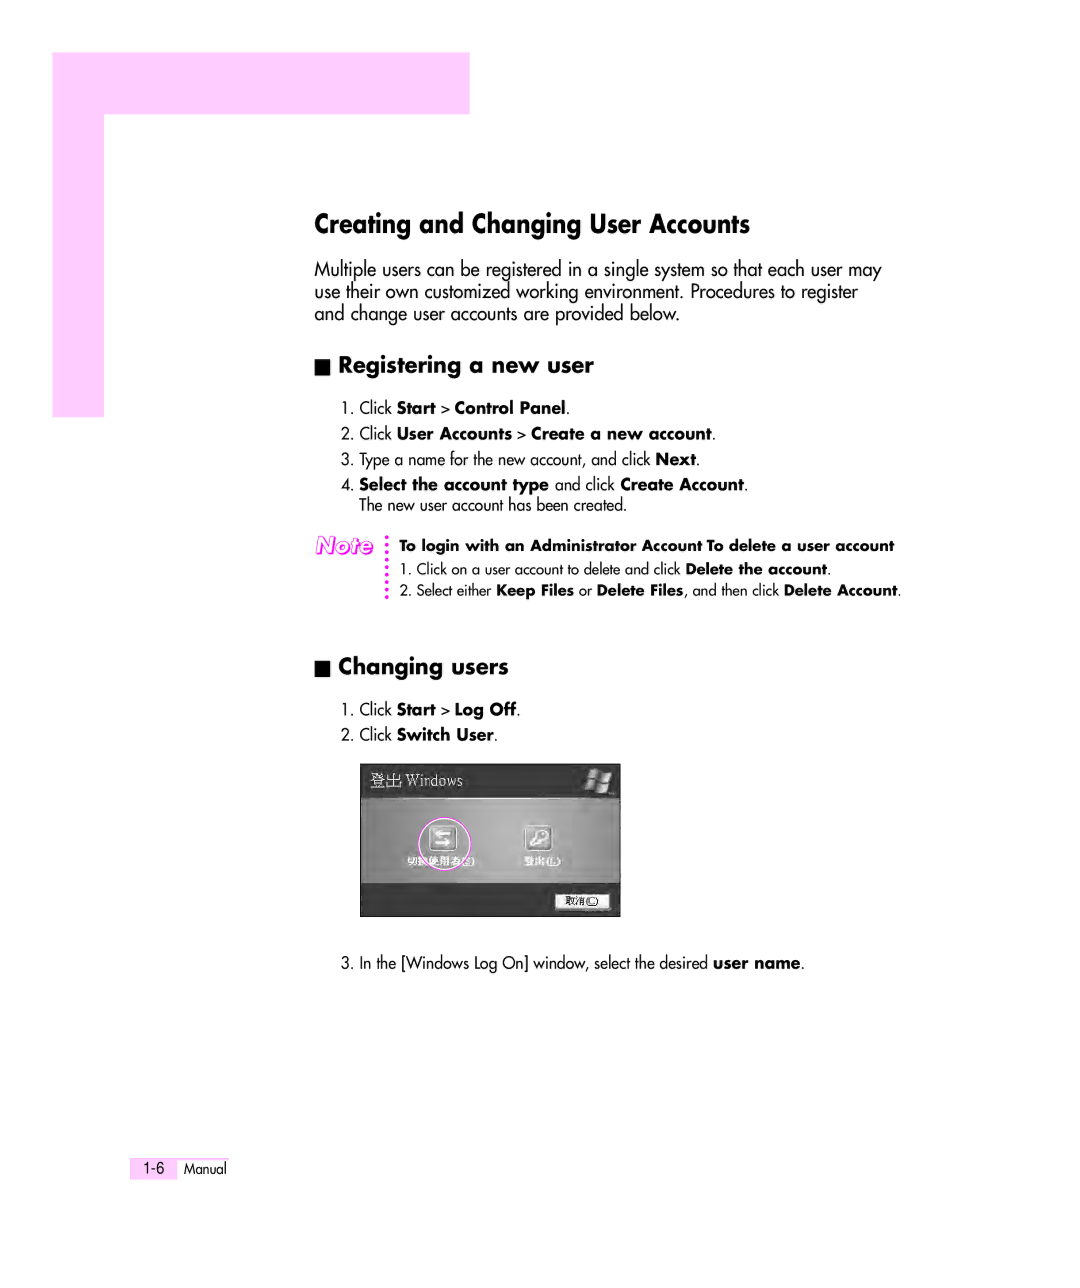
Click Start Log Off Click Switch User
Creating and Changing User Accounts
Changing users
Click Select Function
Touchpad
Double-click Run Function
Drag and drop a part to the required place
Using the Touchpad Scroll Function
Drag Move / Select
This button is held down
Using the Keyboard
Key Name Function
Function
Key
Status Indicators
Icon Name Description
Adjusting the brightness using the Battery Manager
Adjusting LCD Brightness
To adjust using keyboard
There are 8 levels of LCD brightness 1Dimmest~8Brightest
Using the Volume Control Program
Adjusting the Volume
Press Fn+ or Fn+ from the keyboard
Proper Seating Posture During Computer Use
Seating Posture
Introducing Windows
Windows XP Tour
Windows XP Basics
Tour of the elementary functions provided by Windows XP
Understanding the Desktop
Understanding the Start Menu
Click Start My Computer
Understanding a Window
To view the entire structure of the drive
Help and Support Center
Click Start Help and Support
Creating a New Document
Click Start All Programs Accessories WordPad
Document Operations
Saving a Document
Opening a Document
Printing a Document
Using The Computer
Using the CD-ROM Drive
Push the CD tray in gently. The CD will run automatically
Using the Windows Media Player
Help Windows Media Player Help
To Play an Audio CD
To Play a Video CD
To Write Data in CD
To Burn an Audio CD
Enjoying Home Theater
Connect 5.1 channel speaker system to your computer
Enable S/PDIF on the DVD program
Setting the Sound to Digital Sound Output on the Computer
To insert and use a memory card
Using the Multi Card Slot
Restrictions on Using Memory Cards
Insert a memory card into the Multi Card Slot
To remove a memory card
To format a memory card
Using the PC Card Slot Optional
Double-click the EasyBox icon on the desktop
Using EasyBox
Learn about EasyBox
Or select Start All Programs Samsung EasyBox EasyBox
Configuring Firewall
Using EasyBox
Click Start All Programs Samsung EasyBox EasyBox
Using Samsung Update Plus
To Update Samsung Software and Drivers
Automatic update items display
Using AVStation premium
Start and Screen Layout
Music Station
Launch AVStation premium and click Music on the Station Bar
Playing an Audio CD
Playing a Music File
Adding Music Files to the Library
Viewing an Image
Photo Station
Launch AVStation premium and click Photo on the Station Bar
Viewing an Image in Full Screen or through a SlideShow
Setting an Image as the Background
Viewing an Image not registered to the Library
Watching a SlideShow while Listening to Music
Editing an Image
Adding Images to the Library
Movie Station
Playing a DVD
Playing a Video File in Full Screen
Playing a MovieVideo File
Playing a Video File not Registered to the Library
Double-click on the current playback screen
Adding Videos to the Library
Using AVStation now / AVStation premium Viewer
Starting
Start / Exit AVStation now
Start / Exit AVStation premium Viewer
Exiting
Screen Layout
32Manual
Playing an Audio CD
Selected image is zoomed in on
Playing a Movie File
36Manual
Connecting to Internet
Connecting to the Internet
Option 4 Connecting using a wireless LAN
Connecting to the Internet Using a Modem
For more account information, please contact your ISP
Connect the network LAN cable to the LAN port of the system
Click Start Control Panel
Install button
Using Both Dhcp and Static IP Simultaneously
Computer-to-computer ad hoc
Access Point
This is also called a peer-to-peer network
Connecting to an Access Point AP
Network Connection icon on
Setting up a computer-to-computer network
Connecting to computer-to-computer networks
Click Change the order of Preferred Networks
On the Wireless Networks tab, click Advanced
Connecting to the Internet
Connecting to the configured computer
Wireless Network Setup Using the Wireless LAN Setup Program
Done window appears, click OK
You can easily share Internet Access
Using Samsung Network Manager
Using the Network
Setting Up a Network
Setting up the IP Address
When the Printer Setting window appears, click Finish
Select Internet direct connection and click the Next button
Available AP Connect
Sharing Internet Access
Using the network after moving location
Setting Up a Sharing Server
To Share Internet Access through a Wireless LAN
Setting Up the Sharing Client
Client
Network Status Diagnosis
Configuring Network Environment Settings
Using Network Services
Sharing files or folders
Configuring Sharing
Select ‘Just enable file sharing’, and click OK
Using Shared Files or Folders
Click Other Places Microsoft Windows Network
Configuring Printer Sharing
Sharing Printers
Adding and Using a Shared Printer
26Manual
Using Bluetooth Devices Optional
Bluetooth Functions
Bluetooth Software Setup
Click the Next button to start setting up
Connecting to the Internet
Using Bluetooth
Bluetooth Help
Exchanging Files between Bluetooth computers
Page
Connecting Keyboard, Mouse, Joystick and Headset devices
Stopping a Bluetooth device
Use Instructions
System Management
Managing Power
Specifying Power Save Time
Using the Power button
You can configure the function of the power button
Using the Battery
Ejecting and Attaching Battery
To view on the battery
Monitoring the Battery Charge
Using the shortcut key to view
To view through the Control Panel
Using the Battery Manager
Extending the battery use time
Decreasing the LCD Brightness
When Running a Game or Multimedia Application
Use Battery Calibration
Select the Start Control Panel Performance and Maintenance
Turning Off Unnecessary Devices Turning off
Upgrading Memory
Adding a memory module
Page
Using the Security Lock
Traveling with the Computer
12Manual
Customizing your computer
Using System Setup
To enter System Setup
System Setup Navigation Keys
System Setup Menus
Menu Items Description
Configuring the Password
Setting the Supervisor Password
Activating the Booting Password
Setting the User Password
Deactivating the Password
Changing Booting Priority
Configuring Resolution and Color Depth
When you have completed configuration, click Apply
Using External Display Devices
Switching Display Devices Using the Shortcut Key
Using Dual View to View an Extended Screen
Deactivating Dual View Mode
Select Start All Programs Norton AntiVirus Norton AntiVirus
Checking for Viruses
Click Scan Virus, select drive to inspect, and click Scan
12Manual
Recovering Computer
When the computer is not operating properly
Using Magic Doctor
Select ‘Create a restore point’, and than click Next
Creating a Restore Point
Restoring the System
Procedures to undo a restoration are described below
Returning your computer to an earlier restore point
Undoing the last restoration
Reinstalling Software
Running the system software media
Installing drivers and programs
Re-Installing Windows
When using a partitioned hard disk drive
8Manual
When Start Microsoft Windows appears, click the Next button
If the System Software Media consists of 2 CDs
Q1The system does not shutdown properly
Windows Related
Q2The system freezes during program operation
Display Related
Q1 The LCD screen is too dark or too bright
Q9 I cannot set up Dual View properly
Q1 How to install and uninstall the sound driver
Sound Related
Have updated the Hotfix from the Microsoft web site
Modem Related
Q2 I cannot make a call using an extension line
Using an AT command
Q1 I cannot hear the modem sound
Q3 How do I use my modem when dialing from overseas?
Dialing Rules tab, click Edit
Wired LAN Related
Q1 Wake On LAN Function
Wireless LAN Related
Check the AP Settings
Q4 I cannot connect to the AP Check the Computer Settings
Q3 I cannot share an Internet connection
A6 Check the network key settings encryption key
Recovering the Computer
22Manual
Recovering the Computer
Q3 Running speed of a game is too slow or fast
Change the setting of Power Schemes to Always On
Game/Program Related
Q5 The game screen is displayed small
Q7 Game play is not displayed smoothly on the screen
Security Center
Recovering the Computer
Page
Appendix
System Specifications
Specification Comment
RF Specifications
Wireless LAN Specifications Optional
Specifications
Copyright
Registered Trademarks
Set up the system on a stable work surface
Safety Instructions
Instructions for Setup
Use standard power voltage
Instructions for careful handling
Cases when the hard disk and data may be damaged
There is a danger of electric shocks
Use authorized service centers as the system may be damaged
Samsung Notebook Computer Global Warranty
Customer Service Center
Web Site