AD68-01227G
Owner’s Instruction Book
ENGLISH
Auto Focus Charge Coupled Device Liquid Crystal Display
Setting the Wireless Remote Control Acceptance Remote
Contents
Searching quickly for a desired scene Setting the ZERO
Self Record using the Remote Control Setting the Self
ENGLISH
Contents
Recording Copying a TV Programme or Video Tape onto a
Camcorder Tape VP-D371i/D371Wi/D372WHi/D375Wi
Maintenance
Contents
Troubleshooting
Specifications
Notes regarding the Video Head Cleaning
Notes and Safety Instructions
Notes regarding the Rotation of the LCD Screen
Notes regarding the LCD Screen, Viewfinder, Lens
Notes regarding Camcorder
Servicing & Replacement Parts
Notices regarding Copyright
Notes and Safety Instructions
High Power Zoom Lens
Features
Getting to Know Your Camcorder
Digital Data Transfer Function with IEEE1394
Accessories Supplied with Camcorder
Basic Accessories
Getting to Know Your Camcorder
ENGLISH
Front & Left View
3. Light VP-D372WHi/D375Wi/D975Wi only 4. TAPE EJECT Switch
1. Lens 2. Remote Sensor VP-D375Wi/D975Wi only
5. EASY.Q Button page
Left Side View
6. Mode Switch CARD/TAPE VP-D375Wi/D975Wi only
1. Q.MENU Button page 2. / W / T Button
3. OK Button 4. Viewfinder 5. Speaker
Jacks
6. Power Switch CAMERA or PLAYER
Right & Top View
Zoom Lever
5. Battery Release Switch
1. Lithium Battery Cover 2. Charging Indicator
@ $ %
Usable Memory Cards
1. PHOTO Button page 2. START/STOP Button 3. SELF TIMER Button page
Remote Control VP-D375Wi/D975Wi only
4. ZERO MEMORY Button page 5. PHOTO SEARCH Button
6. A.DUB Button page 7. √√ FF Button 8. œœ REW Button
Installing the Lens Cover after Operation
Adjusting the Hand Strap
Using the Hand Strap & Lens Cover
Preparation
Precaution regarding the Lithium Battery
Lithium Battery Installation for the Internal Clock
Lithium Battery Installation
Preparation
Charging, Recording Times based on Model and Battery Type
Charging the Lithium Ion Battery Pack
Using the Lithium Ion Battery Pack
Preparation
Battery Pack Management
Battery Level Display
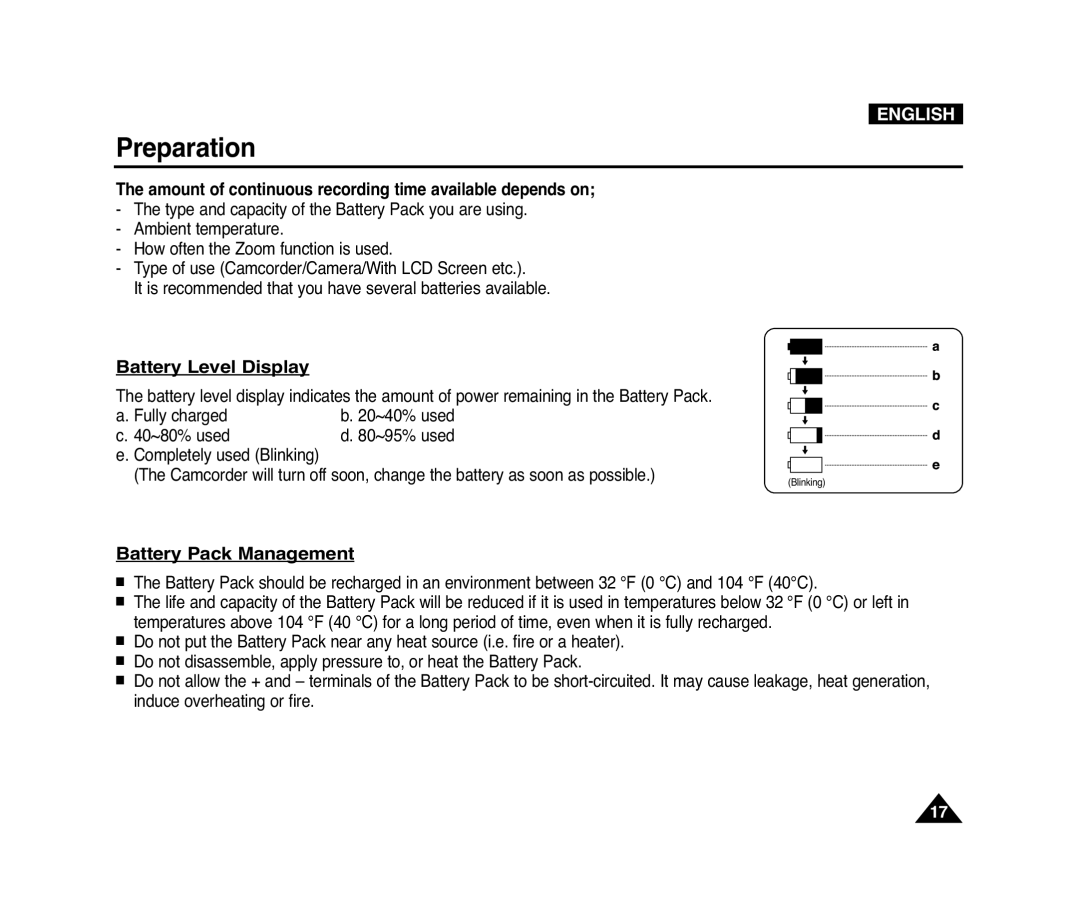
The amount of continuous recording time available depends on
Preparation
Do not drop the Battery Pack. Dropping the Battery Pack may damage it
Notes regarding the Battery Pack
Preparation
ENGLISH
Connecting a Power Source
Using a Household Power Source
Power Switch Mode Switch VP-D375Wi/ D975Wi only
About the Operating Modes
Using the QUICK MENU
For example Setting the White Balance
Camera Mode
M.Cam Mode VP-D375Wi/D975Wi only
23. Operating Mode 24. Self Timer page VP-D375Wi/D975Wi only
1. Battery Level page 2. Visual Effects Mode page 52 EASY.Q page
29. Volume Control page 30. Message Line page
31 Warning Indicator page
4. Image Recording and Loading Indicator
1. Photo Quality page 2. CARD Memory Card Indicator
5. Erase Protection Indicator page 6. Print Mark page
Turning OSD On/Off
Setting the Clock Clock Set
Initial Setting System Menu Setting
1. Set the Power switch to CAMERA or PLAYER
Displays in this manual
ENGLISH
Initial Setting System Menu Setting
1. Set the Power switch to CAMERA or PLAYER
Initial Setting System Menu Setting
Setting the Beep Sound Beep Sound
1. Set the Power switch to CAMERA or PLAYER
ENGLISH
Initial Setting System Menu Setting
Setting the Shutter Sound Shutter Sound VP-D375Wi/D975Wi only
1. Set the Power switch to CAMERA or PLAYER
ENGLISH
ENGLISH
Selecting the OSD Language Language
Initial Setting System Menu Setting
Viewing the Demonstration Demonstration
ENGLISH
Demonstration
Adjusting the LCD Screen LCD Bright/LCD Colour
Initial Setting Display Menu Setting
outdoors for example, you can adjust - LCD Bright LCD Colour
LCD Colour, then press the OK button
Initial Setting Display Menu Setting
Displaying the Date/Time Date/Time
1. Set the Power switch to CAMERA or PLAYER
ENGLISH
ENGLISH
Setting the TV Display TV Display
Initial Setting Display Menu Setting
Using the Viewfinder
Adjusting the Focus
Basic Recording
Inserting / Ejecting a Cassette
1. General recording 2. Downward recording
Various Recording Techniques
3. Upward recording
4. Self recording
ENGLISH
Making your First Recording
Basic Recording
Recording with Ease for Beginners EASY.Q Mode
Unavailable buttons during operation
Basic Recording
ENGLISH
Record Search REC SEARCH
Reviewing and Searching a Recording REC SEARCH
Basic Recording
ENGLISH
ENGLISH
œœ REW button
Basic Recording
ENGLISH
The SELF TIMER function works only in Camera mode. page
Basic Recording
ENGLISH
Zooming In and Out
Basic Recording
To Start Recording
Using the Fade In and Out
To Stop Recording
Basic Recording
Please disable 169 Wide mode to use the COLOUR NITE function. page
Using the COLOUR NITE COLOUR NITE
√ Color N. 1/25, Color N. 1/13 and OFF. VP-D371i/D371Wi only
Basic Recording
Please disable 169 Wide mode to use this function. page
Using the LIGHT VP-D372WHi/D375Wi/D975Wi only
Basic Recording
ENGLISH
Selecting the Record Mode & Audio Mode
Advanced Recording
1. Set the Power switch to CAMERA or PLAYER
ENGLISH
1. Set the Power switch to CAMERA or PLAYER
Cutting Off Wind Noise WindCut Plus
Advanced Recording
ENGLISH
ENGLISH
Selecting the Real Stereo Function
Advanced Recording
Adjusting the Exposure When Recording
Recommended Shutter Speeds when Recording
Setting the Shutter Speed & Exposure
Advanced Recording
Manual Focus
Auto Focus
Auto Focus / Manual Focus
Advanced Recording
Auto balance between the subject and the background
Programmed Automatic Exposure Modes Program AE
Sports mode
Portrait mode
ENGLISH
Setting the Program AE
Advanced Recording
Advanced Recording
Setting the White Balance
ENGLISH
MENU
The OSD will disappear and the Custom WB icon c will be displayed
Advanced Recording
ENGLISH
1. Art mode
Applying Visual Effects
2. Mosaic mode
3. Sepia mode
Advanced Recording
Selecting the Visual Effects
ENGLISH
Mirror
The selected icon is displayed
Setting the 169 Wide mode
Advanced Recording
ENGLISH
ENGLISH
Using the Tele Macro Macro
Advanced Recording
Advanced Recording
Setting the Digital Image Stabilizer DIS
ENGLISH
169 WWiiddee
Advanced Recording
Using Back Light Compensation Mode BLC
ENGLISH
BLC Off
Zooming In and Out with Digital Zoom Digital Zoom
Selecting the Digital Zoom
6. Press the … / † button to select the desired zoom value Off, 100x
400x or 1200x, then press the OK button
Still Image Recording
Searching for a still image
Please disable 169 Wide mode to use this function. page
Advanced Recording
Adjusting the Volume
Adjusting the LCD Bright/LCD Colour during Playback
Playback
Playing Back a Tape on the LCD Screen
Playback Pause
œ œ œ
Picture Search Forward/Reverse
Slow Playback Forward/Reverse VP-D375Wi/D975Wi only
X2 Playback Forward/Reverse VP-D375Wi/D975Wi only
Frame Advance To play back frame by frame VP-D375Wi/D975Wi only
Reverse Playback VP-D375Wi/D975Wi only
Forward frame advance
ENGLISH
Audio Dubbing VP-D375Wi/D975Wi only
Playback
button
Dubbed Audio Playback
Sound1 Plays the original sound
Sound2 Plays the dubbed sound
Playing back on a TV Monitor
Connecting to a TV which has Audio/Video Input Jacks
Tape Playback on TV Screen
Playback
Playback
Connecting to a TV which has no Audio/Video Input Jacks
Playback
ENGLISH
device, you can transfer the voice sound incoming from the internal
VOICE + Function
Playback
ENGLISH
ENGLISH
Audio Effect
Playback
ENGLISH
Setting the AV In/Out VP-D371i/D371Wi/D372WHi/D375Wi/D975Wi only
Playback
Connection
When Copying is Complete
Copying a Camcorder Tape onto a Video Tape
Set the AV In/Out to Out before copying to an external device. page
Recording Copying onto a Camcorder Tape
When Recording Copying is Complete
To record from a VCR
To record from a TV
Digital Still Camera Mode VP-D375Wi/D975Wi only
Using a Memory Card Usable Memory Card not supplied
Memory Card Functions
Inserting a Memory Card
Structure of Folders and Files on the Memory Card
Image Format
Photo Image
Moving Image
Number of Images on the Memory Card
Select the Image Quality
Selecting the Photo Quality
1. Set the Power switch to CAMERA or PLAYER
Press the MENU button
Selecting the recording Photo Size VP-D975Wi only
The menu list will appear
Press the … / † button to select Memory, then press the OK button
ENGLISH
Setting the File Number
Digital Still Camera Mode VP-D375Wi/D975Wi only
Taking a Photo Image JPEG on the Memory Card
ENGLISH
1min
To view a Slide Show
To view a Single Image
To view the Multi Display
Viewing Photo Images JPEG
ENGLISH
Protection from accidental Erasure
Digital Still Camera Mode VP-D375Wi/D975Wi only
6. Press the … / † button to select Delete, then press the OK button
Deleting Photo Images and Moving Images
A message Do you want to delete? is displayed
Digital Still Camera Mode VP-D375Wi/D975Wi only
A message Do you want to delete all? is displayed
Deleting All Images at Once
Digital Still Camera Mode VP-D375Wi/D975Wi only
ENGLISH
1. Set the Power switch to PLAYER
Formatting a Memory Card
2. Set the Mode switch to CARD
Digital Still Camera Mode VP-D375Wi/D975Wi only
Recording time available on the Memory Card
Saving Moving Images onto a Memory Card
Recording Moving Images MPEG on a Memory Card
Digital Still Camera Mode VP-D375Wi/D975Wi only
Up tp 2000 MPEG files can be stored on a memory card
Digital Still Camera Mode VP-D375Wi/D975Wi only
ENGLISH
Digital Still Camera Mode VP-D375Wi/D975Wi only
Playing the Moving Images MPEG on a Memory Card M.Play Select
ENGLISH
9. Press the √ PLAY/STILL button
is displayed
Recording Photo Image from a Cassette
Digital Still Camera Mode VP-D375Wi/D975Wi only
ENGLISH
ENGLISH
Copying Still Images from a Cassette to a Memory Card Photo Copy
Digital Still Camera Mode VP-D375Wi/D975Wi only
Marking Images for Printing Print Mark
Removing the Print Mark
5. Press the … / † button to select Memory, then press the OK button
Digital Still Camera Mode VP-D375Wi/D975Wi only
Printing Your Pictures - Using the PictBridgeTM
Connecting To a Printer
PictBridgeTM VP-D375Wi/D975Wi only
ENGLISH
Setting the Date/Time Imprint Option
Setting the Number of Prints
Canceling the Printing
Selecting Images
Connecting to a PC
Connecting to a DV Device DVD Recorder, Camcorder, etc
IEEE 1394 Data Transfer
System Requirements
ENGLISH
IEEE 1394 Data Transfer
USB Interface VP-D375Wi/D975Wi only
Using USB Interface
Transferring a Digital Image through a USB Connection
USB Connection Speed depending on the System
Press the … / † button to select System, then press the OK button
Selecting the USB Device USB Connect
USB Interface VP-D375Wi/D975Wi only
ENGLISH
Installing DV Media PRO Program
Program Installation
USB Interface VP-D375Wi/D975Wi only
ENGLISH
Connecting to a PC
Disconnecting the USB Cable
USB Interface VP-D375Wi/D975Wi only
ENGLISH
ENGLISH
Using the PC Camera Function
USB Interface VP-D375Wi/D975Wi only
Using the removable Disk Function
Using the USB Streaming Function
USB Interface VP-D375Wi/D975Wi only
ENGLISH
After Finishing a Recording
Maintenance
Usable Cassette Tapes
a SAVE b REC
Cleaning and Maintaining the Camcorder
Cleaning the Video Heads
Maintenance
ENGLISH
Using Your Camcorder Abroad
Power sources
Colour system
PAL-compatible Countries/Regions
Troubleshooting
Troubleshooting
Self Diagnosis Display
Moisture Condensation
ENGLISH
Self Diagnosis Display in M.Cam/M.Player Modes VP-D375Wi/D975Wi only
Troubleshooting
Symptom
Troubleshooting
Explanation/Solution
ENGLISH
Troubleshooting
Setting menu items
ENGLISH
VP-D375Wi/D975Wi only @ VP-D371i/D371Wi/D372WHi/D375Wi/D975Wi only
ENGLISH
Models with a ‘i’ suffix do feature DVIEEE1394/AVAnalog In
Troubleshooting
ENGLISH
Specifications
Model Name VP-D371i/D371Wi/D372WHi/D375Wi/D975Wi
ENGLISH
Index
80~81
25~26
ENGLISH
Power Sources United Kingdom Only
Tel 0870 SAMSUNG 7267864, Fax 0870 United Kingdom
Customer Care Centre PO Box Edinburgh, EH11 4YB United Kingdom
Tel 0818 717 100, Fax +44 0870 Republic of Ireland
UNITED KINGDOM
FOURLIS TRADE A.E.B.E
ELLAS GREECE
FOURLIS TRADE A.E.B.E
Contact SAMSUNG WORLD WIDE
ENGLISH
Region Country
Customer
ENGLISH
RoHS compliant
THIS CAMCORDER IS MANUFACTURED BY