VIDEO/AUDIO CONNECTIONS
![]() Prior to making any connections to your TV set, be sure to turn the POWER off.
Prior to making any connections to your TV set, be sure to turn the POWER off.
For a more detailed understanding of each connection, it is recommended that you read the instruction manual for each connected component.
![]() If you use video or audio equipment placed near the TV, picture and/or sound may become distorted due to interference between these components.
If you use video or audio equipment placed near the TV, picture and/or sound may become distorted due to interference between these components.
In such case, separate each piece of equipment at a sufficient distance. ![]() The following shows examples for connecting external equipment.
The following shows examples for connecting external equipment.
Do not connect another audio source to the same speaker to which the TV set is connected, otherwise it may damage the amplifier of the TV set or that of the other audio source.
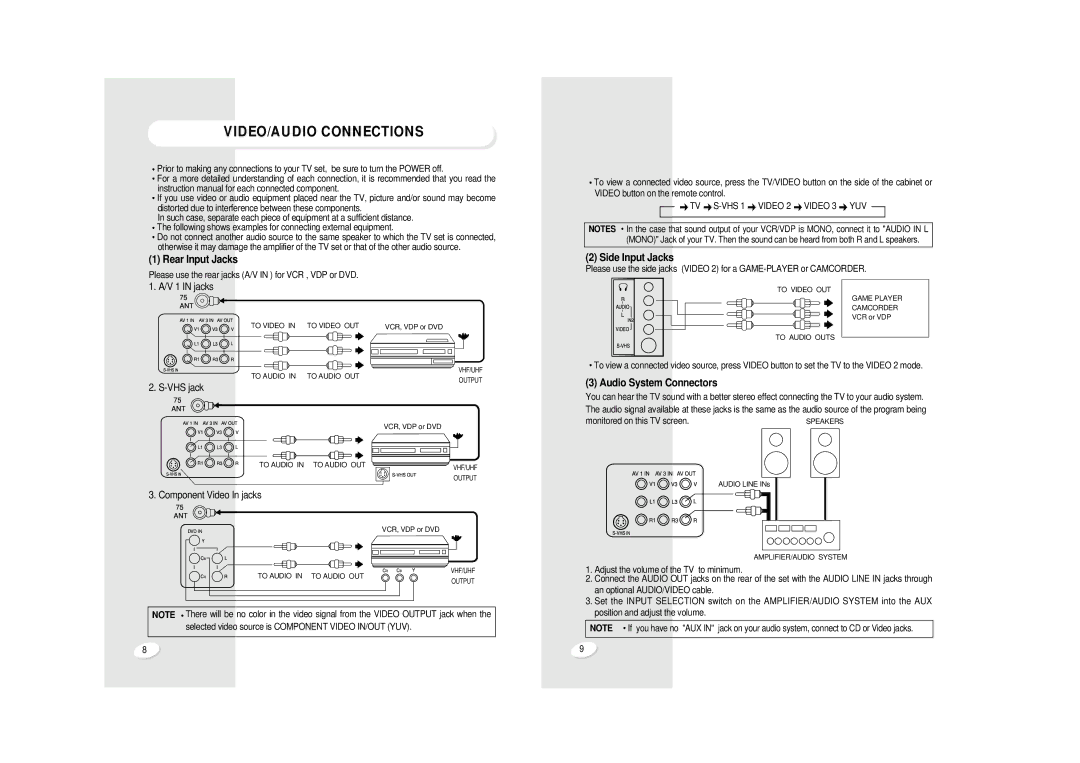
(1) Rear Input Jacks
Please use the rear jacks (A/V IN ) for VCR , VDP or DVD.
1. A/V 1 IN jacks
TO VIDEO IN | TO VIDEO OUT | VCR, VDP or DVD | |
TO AUDIO IN | TO AUDIO OUT | VHF/UHF | |
OUTPUT | |||
2. |
| ||
|
| ||
|
| VCR, VDP or DVD | |
TO AUDIO IN | TO AUDIO OUT | VHF/UHF | |
|
| ||
|
| OUTPUT |
3. Component Video In jacks
| VCR, VDP or DVD |
TO AUDIO IN | VHF/UHF |
TO AUDIO OUT | |
| OUTPUT |
NOTE There will be no color in the video signal from the VIDEO OUTPUT jack when the selected video source is COMPONENT VIDEO IN/OUT (YUV).
8
To view a connected video source, press the TV/VIDEO button on the side of the cabinet or |
| ||||
VIDEO button on the remote control. |
|
|
|
| |
| TV |
| VIDEO 2 | VIDEO 3 | YUV |
NOTES | In the case that sound output of your VCR/VDP is MONO, connect it to "AUDIO IN L |
| |||
| (MONO)" Jack of your TV. Then the sound can be heard from both R and L speakers. |
| |||
(2) Side Input Jacks |
|
|
|
| |
Please use the side jacks (VIDEO 2) for a |
|
| |||
|
|
| TO VIDEO OUT |
| |
|
|
|
|
| GAME PLAYER |
|
|
|
|
| CAMCORDER |
|
|
|
|
| VCR or VDP |
|
|
| TO AUDIO OUTS |
| |
To view a connected video source, press VIDEO button to set the TV to the VIDEO 2 mode.
(3) Audio System Connectors
You can hear the TV sound with a better stereo effect connecting the TV to your audio system. |
|
The audio signal available at these jacks is the same as the audio source of the program being |
|
monitored on this TV screen. | SPEAKERS |
AUDIO LINE INs
AMPLIFIER/AUDIO SYSTEM
1.Adjust the volume of the TV to minimum.
2.Connect the AUDIO OUT jacks on the rear of the set with the AUDIO LINE IN jacks through
an optional AUDIO/VIDEO cable.
3.Set the INPUT SELECTION switch on the AMPLIFIER/AUDIO SYSTEM into the AUX position and adjust the volume.
NOTE | If you have no "AUX IN" jack on your audio system, connect to CD or Video jacks. |
|
|
9