Installation
Positioning the Projector
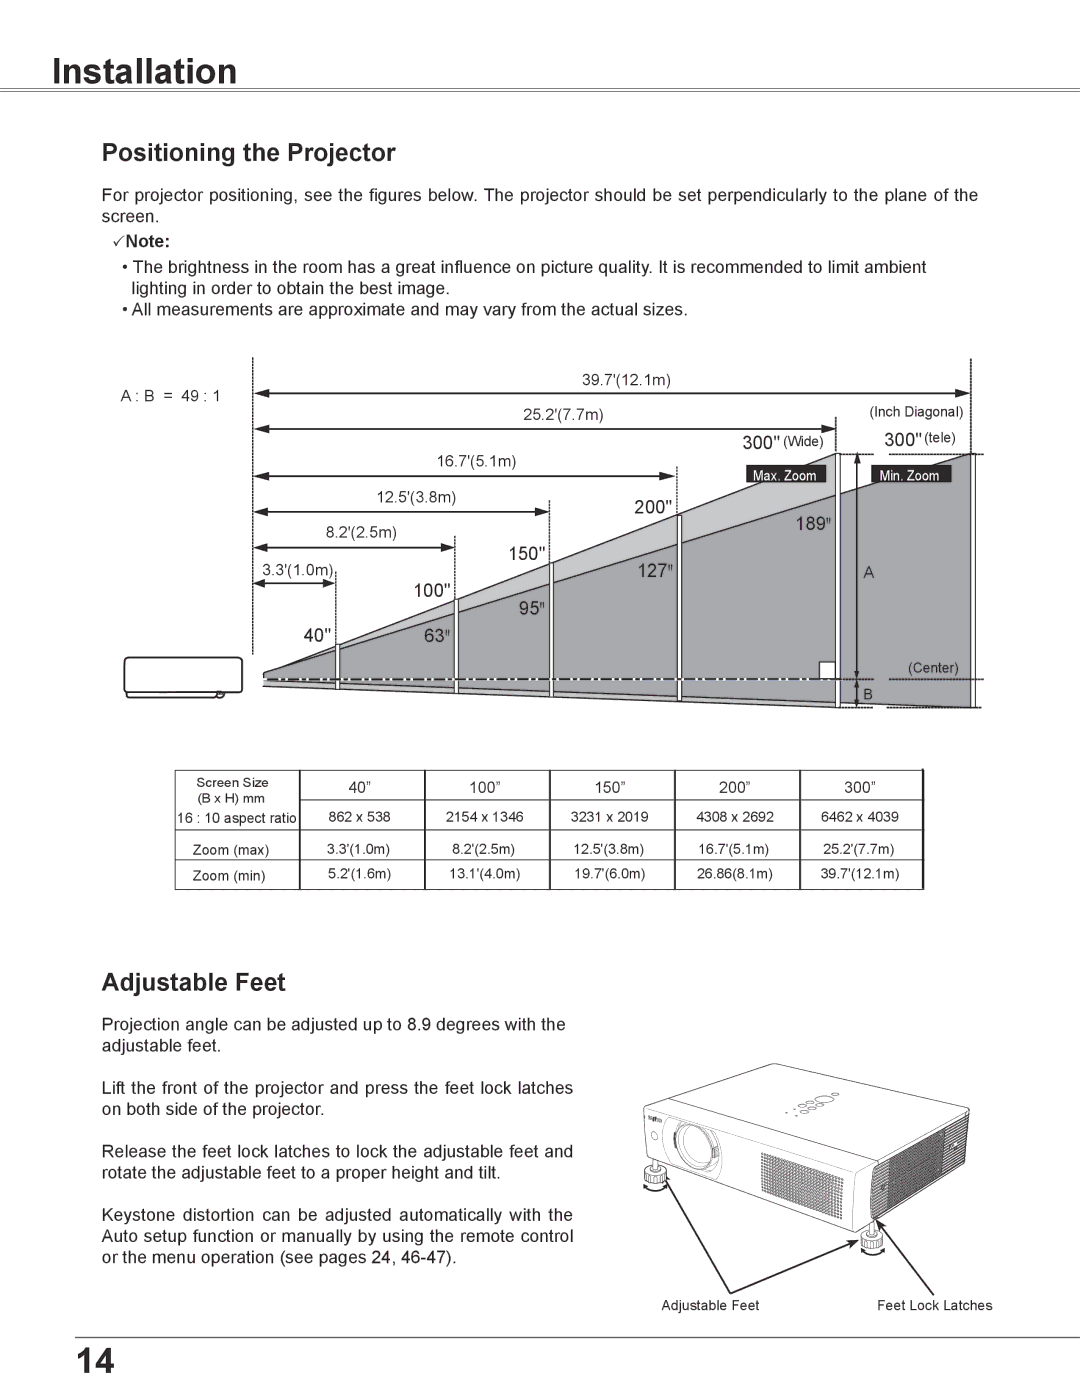
For projector positioning, see the figures below. The projector should be set perpendicularly to the plane of the screen.
PNote:
•The brightness in the room has a great influence on picture quality. It is recommended to limit ambient lighting in order to obtain the best image.
•All measurements are approximate and may vary from the actual sizes.
A : B = 49 : 1 |
| 39.7'(12.1m) |
|
|
|
|
| (Inch Diagonal) | |
|
| 25.2'(7.7m) |
| |
| 16.7'(5.1m) | 300" (Wide) | 300" (tele) | |
| Max. Zoom | Min. Zoom | ||
|
|
| ||
| 12.5'(3.8m) | 200" |
|
|
|
| 189 |
| |
8.2'(2.5m) |
|
| ||
|
|
| ||
|
| 150" |
|
|
3.3'(1.0m) | 100" | 127 |
| A |
| 95 |
|
| |
|
|
|
| |
40" | 63 |
|
|
|
|
|
|
| (Center) |
|
|
|
| B |
Screen Size |
|
|
|
|
|
|
40” |
| 100” | 150” | 200” | 300” | |
(B x H) mm |
|
|
|
|
|
|
|
|
|
|
|
| |
|
|
|
|
|
| |
862 x 538 |
| 2154 x 1346 | 3231 x 2019 | 4308 x 2692 | 6462 x 4039 | |
16 : 10 aspect ratio |
| |||||
|
|
|
|
|
|
|
Zoom (max) | 3.3'(1.0m) |
| 8.2'(2.5m) | 12.5'(3.8m) | 16.7'(5.1m) | 25.2'(7.7m) |
|
|
|
|
|
|
|
Zoom (min) | 5.2'(1.6m) |
| 13.1'(4.0m) | 19.7'(6.0m) | 26.86(8.1m) | 39.7'(12.1m) |
|
|
|
|
|
|
|
|
|
|
|
|
|
|
Adjustable Feet
Projection angle can be adjusted up to 8.9 degrees with the adjustable feet.
Lift the front of the projector and press the feet lock latches on both side of the projector.
Release the feet lock latches to lock the adjustable feet and rotate the adjustable feet to a proper height and tilt.
Keystone distortion can be adjusted automatically with the Auto setup function or manually by using the remote control or the menu operation (see pages 24,
Adjustable Feet | Feet Lock Latches |
14