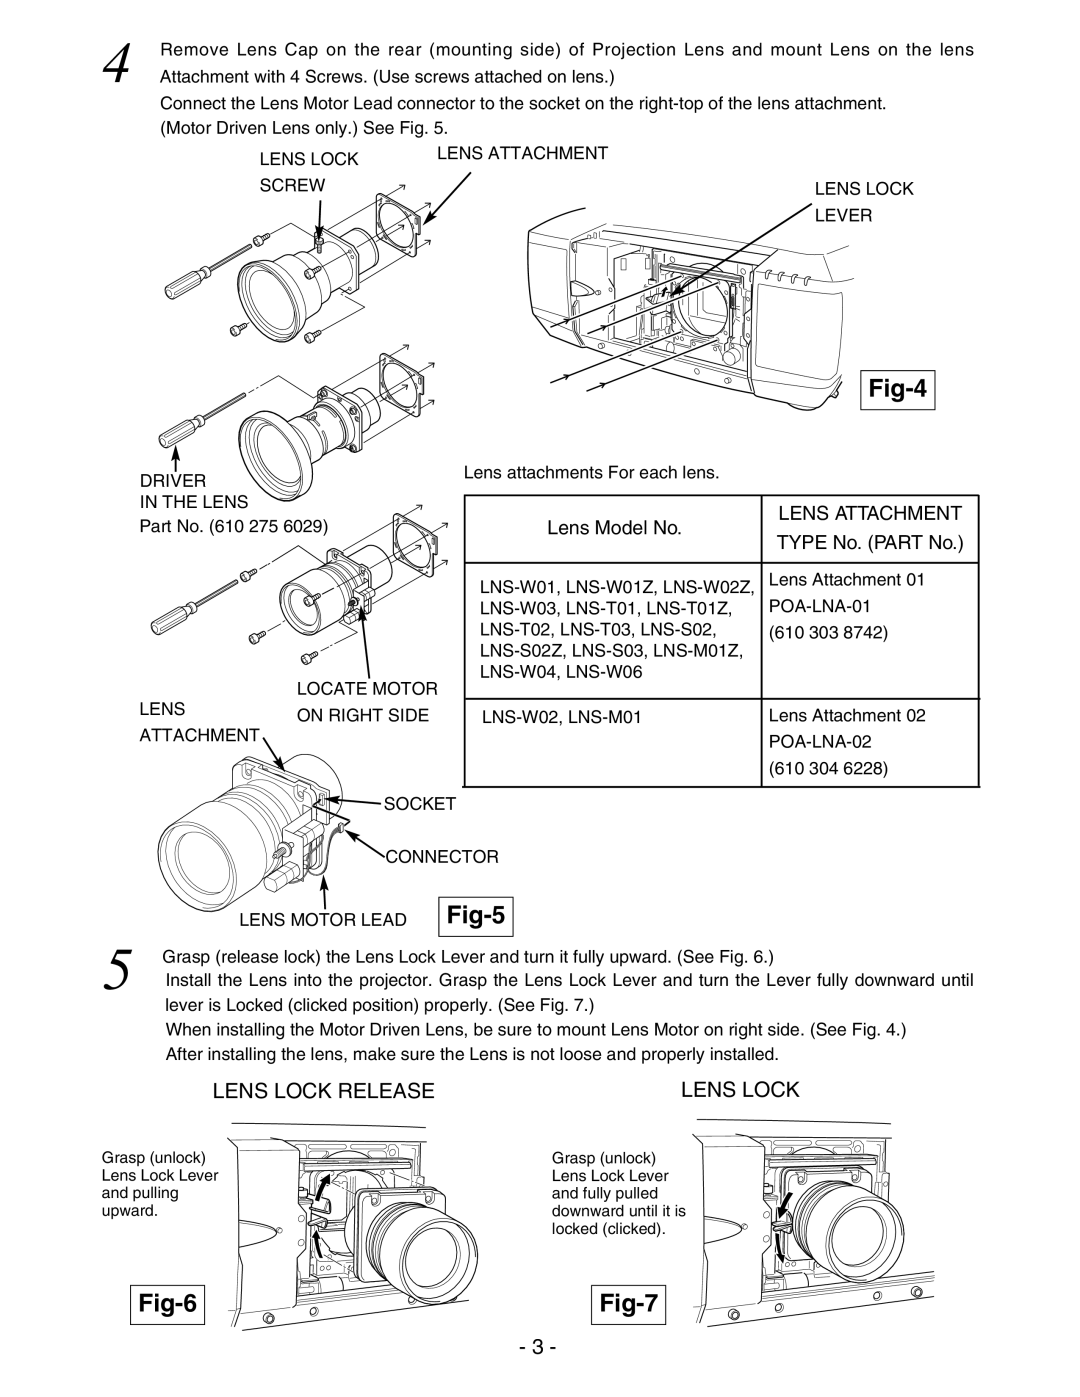
4 | Remove Lens Cap on the rear (mounting side) of Projection Lens and mount Lens on the lens |
Attachment with 4 Screws. (Use screws attached on lens.) | |
| Connect the Lens Motor Lead connector to the socket on the |
| (Motor Driven Lens only.) See Fig. 5. |
LENS LOCK | LENS ATTACHMENT |
| |
SCREW | LENS LOCK |
| LEVER |
Fig-4
DRIVER
IN THE LENS
Part No. (610 275 6029)
LOCATE MOTOR
LENSON RIGHT SIDE ATTACHMENT
![]()
![]() SOCKET
SOCKET
Lens attachments For each lens.
|
|
|
|
|
|
|
| Lens Model No. |
| LENS ATTACHMENT |
| ||
|
| TYPE No. (PART No.) |
| |||
|
|
|
|
| ||
|
|
|
|
|
|
|
|
|
|
|
|
|
|
|
| Lens Attachment 01 | ||||
|
|
| ||||
| (610 303 8742) |
|
| |||
|
|
|
|
| ||
|
|
|
|
| ||
|
|
|
|
|
|
|
|
|
|
|
|
| |
|
|
| Lens Attachment 02 |
|
| |
|
|
|
|
|
| |
|
|
| ||||
|
|
|
| (610 304 6228) |
|
|
|
|
|
|
|
|
|
|
|
|
|
|
|
|
![]() CONNECTOR
CONNECTOR
LENS MOTOR LEAD
Fig-5
5 | Grasp (release lock) the Lens Lock Lever and turn it fully upward. (See Fig. 6.) | |
| ||
| Install the Lens into the projector. Grasp the Lens Lock Lever and turn the Lever fully downward until | |
| lever is Locked (clicked position) properly. (See Fig. 7.) |
|
| When installing the Motor Driven Lens, be sure to mount Lens Motor on right side. (See Fig. 4.) | |
| After installing the lens, make sure the Lens is not loose and properly installed. | |
| LENS LOCK RELEASE | LENS LOCK |
Grasp (unlock) Lens Lock Lever and pulling upward.
Grasp (unlock) Lens Lock Lever and fully pulled downward until it is locked (clicked).
Fig-6
Fig-7
- 3 -