DR300 Quick Guide | Pg 2 |
| DR300 Quick Guide | Pg 31 |
|
|
|
|
|
What You Get |
|
|
|
|
|
|
| ||
The DR300 printer comes packed in a protective carton. |
|
|
| |
|
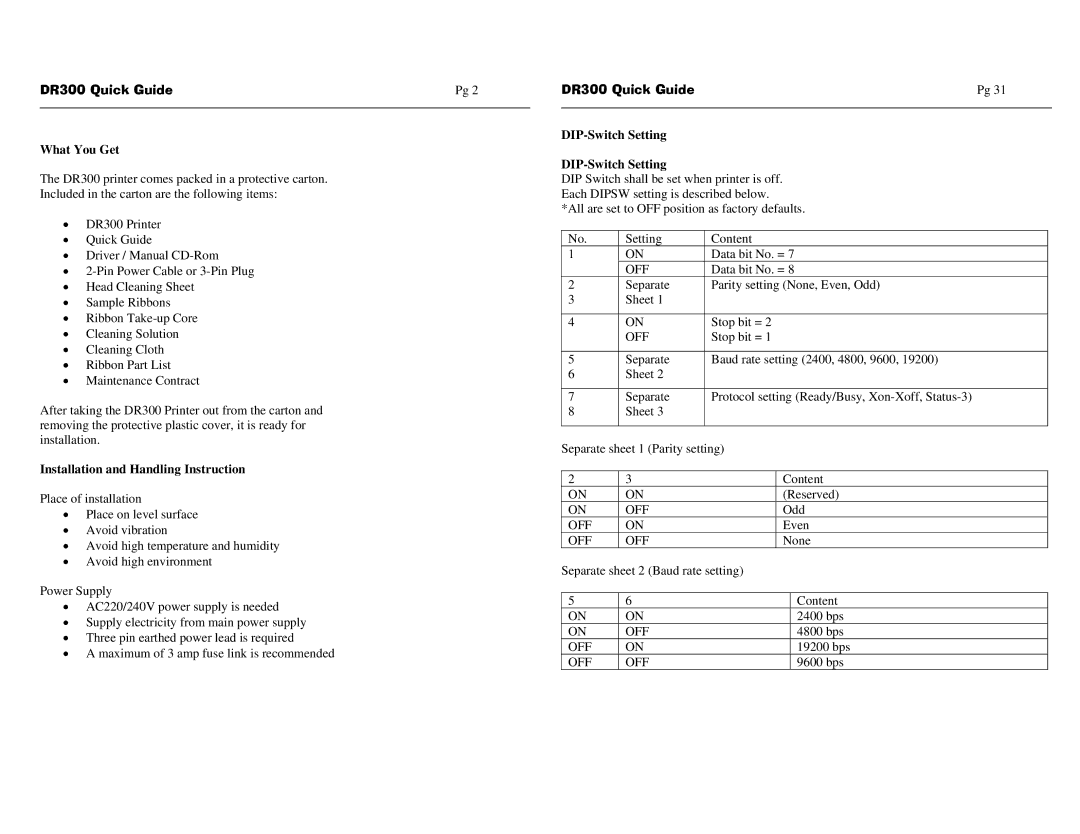
| DIP Switch shall be set when printer is off. |
| |
Included in the carton are the following items: |
|
| Each DIPSW setting is described below. |
|
|
|
| *All are set to OFF position as factory defaults. |
|
• | DR300 Printer |
|
|
|
|
| |
• | Quick Guide | No. | Setting | Content | |||
• | Driver / Manual | 1 | ON | Data bit No. = 7 | |||
• |
| OFF | Data bit No. = 8 | ||||
• | Head Cleaning Sheet | 2 | Separate | Parity setting (None, Even, Odd) | |||
• | Sample Ribbons | 3 | Sheet 1 |
|
|
| |
• | Ribbon |
|
|
|
|
| |
4 | ON | Stop bit = 2 | |||||
• | Cleaning Solution |
| OFF | Stop bit = 1 | |||
• | Cleaning Cloth |
|
|
|
|
| |
5 | Separate | Baud rate setting (2400, 4800, 9600, 19200) | |||||
• | Ribbon Part List | ||||||
6 | Sheet 2 |
|
|
| |||
• | Maintenance Contract |
|
|
| |||
|
|
|
|
| |||
After taking the DR300 Printer out from the carton and | 7 | Separate | Protocol setting (Ready/Busy, | ||||
8 | Sheet 3 |
|
|
| |||
removing the protective plastic cover, it is ready for |
|
|
|
|
| ||
|
|
|
|
| |||
installation. | Separate sheet 1 (Parity setting) | ||||||
|
| ||||||
Installation and Handling Instruction |
|
|
|
|
| ||
2 | 3 |
| Content | ||||
|
|
| |||||
Place of installation | ON | ON |
| (Reserved) | |||
ON | OFF |
| Odd | ||||
• | Place on level surface |
| |||||
OFF | ON |
| Even | ||||
• | Avoid vibration |
| |||||
OFF | OFF |
| None | ||||
• | Avoid high temperature and humidity |
| |||||
|
|
|
|
| |||
• | Avoid high environment | Separate sheet 2 (Baud rate setting) | |||||
|
| ||||||
Power Supply |
|
|
|
|
| ||
• | AC220/240V power supply is needed | 5 | 6 |
|
| Content | |
ON | ON |
|
| 2400 bps | |||
• | Supply electricity from main power supply |
|
| ||||
ON | OFF |
|
| 4800 bps | |||
• | Three pin earthed power lead is required |
|
| ||||
OFF | ON |
|
| 19200 bps | |||
• | A maximum of 3 amp fuse link is recommended |
|
| ||||
OFF | OFF |
|
| 9600 bps | |||
|
|
|
| ||||