BATTERY SIZE/RATING |
|
| CHARGE RATE*/CHARGING TIME - HOURS** | |||||||
|
|
|
| 2 AMP | 10 AMP | 30 AMP | 35 AMP | 50 AMP | 60 AMP | |
|
|
|
|
|
|
|
|
|
| |
SMALL | Motorcycle, Garden |
| 6 - 12 AH | 1.5 to 3 | NR | NR | NR | NR | NR | |
BATTERIES | Tractor, etc. |
|
|
|
|
|
|
|
|
|
| 12 - 32 AH | 3 to | 8 |
|
|
|
|
| ||
|
|
|
|
|
|
| ||||
|
|
|
|
|
|
|
| |||
|
|
|
|
|
|
|
|
|
| |
CAR/TRUCKS | 200 - 315 CCA |
| 40 - 60 RC | 11 to 15 | 2.5 to 3 | .75 to 1 | .5 to .75 | NR | NR | |
|
|
|
|
|
|
|
|
|
|
|
| 315 - 550 CCA |
| 60 - 85 RC | 15 to | 18 | 3 to 4 | 1 to 1.5 | .75 to 1 | .5 to .75 | .5 to .63 |
|
|
|
|
|
|
|
|
|
|
|
| 550 - 875 CCA |
| 85 - 125 RC | 18 to | 25 | 4 to 5 | 1.5 to 1.7 | 1 to 1.5 | .75 to 1 | .63 to .75 |
|
|
|
|
|
|
|
|
|
|
|
MARINE/ |
|
| 55 MC | 15 |
| 4 | NR | NR | NR | NR |
DEEP CYCLE |
|
|
|
|
|
|
|
|
|
|
|
| 80 MC | 19 |
| 5 | 2 | 1.75 | NR | NR | |
|
|
|
| |||||||
|
|
|
|
|
|
|
|
|
|
|
|
|
| 105 MC | 23 |
| 6 | 2.5 | 2 | NR | NR |
|
|
|
|
|
|
|
|
|
|
|
*Charge Rates for this model are listed on the front panel.
**Based on battery at 50% charge.
AH Ampere Hours
NR Not Recommended
CCA Cold Cranking Amps
RC Reserve Capacity
MC Marine Capacity
L. | ASSEMBLY INSTRUCTIONS |
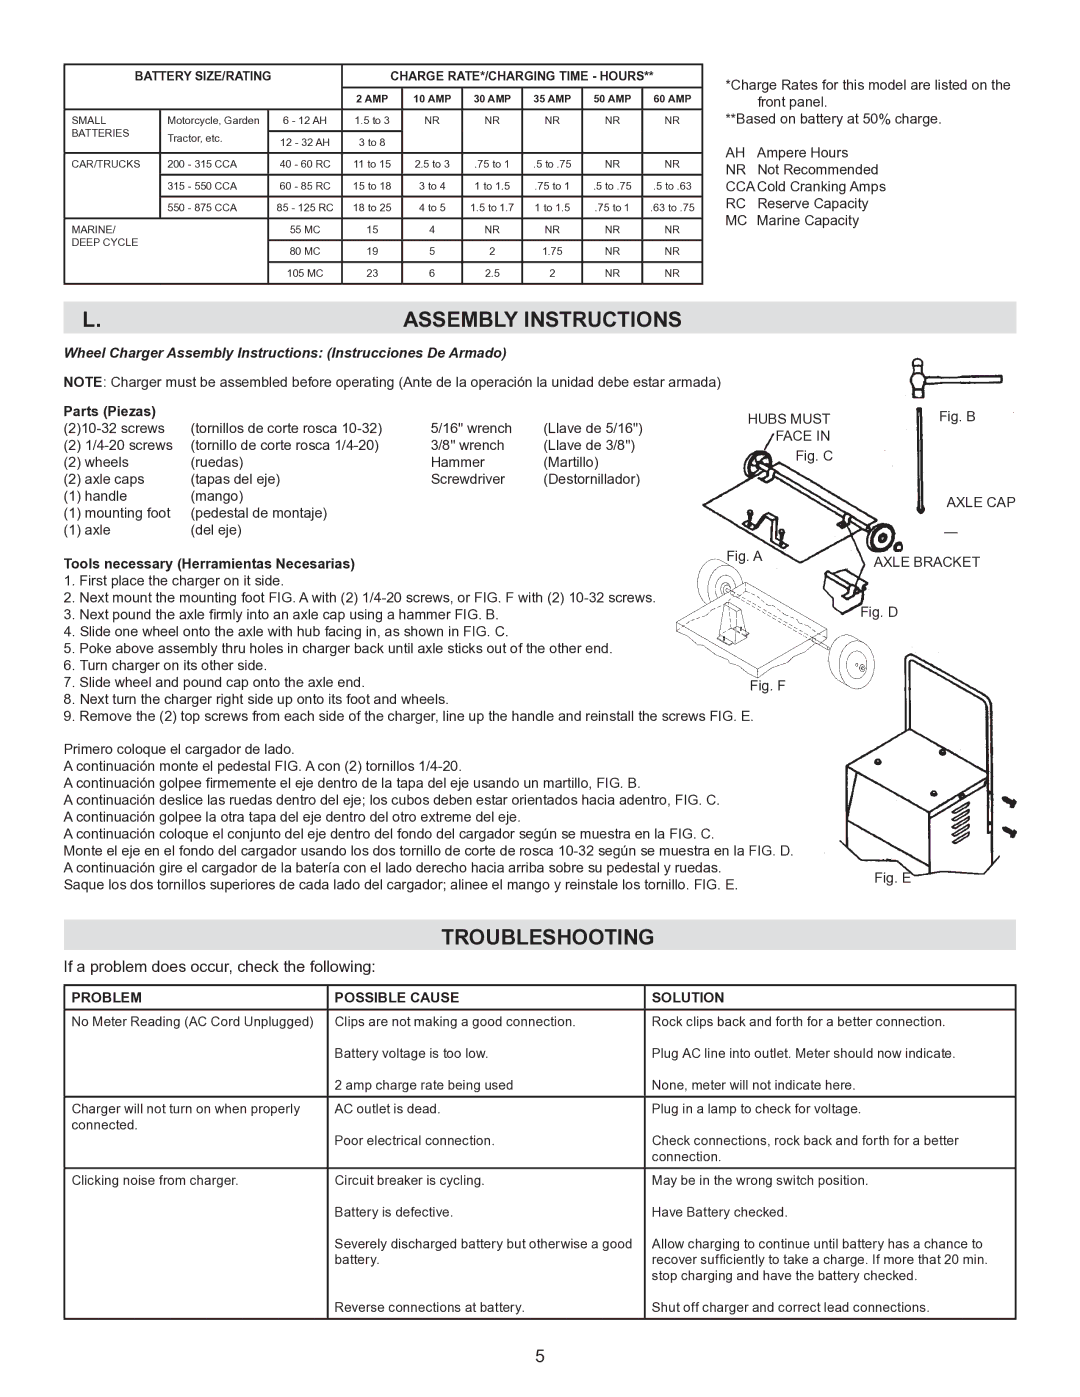
Wheel Charger Assembly Instructions: (Instrucciones De Armado)
NOTE: Charger must be assembled before operating (Ante de la operación la unidad debe estar armada)
Parts (Piezas) |
|
|
| HUBS MUST | |
(tornillos de corte rosca | 5/16" wrench | (Llave de 5/16") | |||
FACE IN | |||||
(2) | (tornillo de corte rosca | 3/8" wrench | (Llave de 3/8") | ||
Fig. C | |||||
(2) wheels | (ruedas) | Hammer | (Martillo) | ||
| |||||
(2) axle caps | (tapas del eje) | Screwdriver | (Destornillador) |
| |
(1) handle | (mango) |
|
|
| |
(1) mounting foot | (pedestal de montaje) |
|
|
| |
(1) axle | (del eje) |
|
|
|
Tools necessary (Herramientas Necesarias) | Fig. A |
|
1.First place the charger on it side.
2.Next mount the mounting foot FIG. A with (2)
3.Next pound the axle firmly into an axle cap using a hammer FIG. B.
4.slide one wheel onto the axle with hub facing in, as shown in FIG. C.
5.Poke above assembly thru holes in charger back until axle sticks out of the other end.
6.Turn charger on its other side.
7. | Slide wheel and pound cap onto the axle end. | Fig. F |
8. | Next turn the charger right side up onto its foot and wheels. |
|
9. | Remove the (2) top screws from each side of the charger, line up the handle and reinstall the screws FIG. E. | |
Primero coloque el cargador de lado.
A continuación monte el pedestal FIG. A con (2) tornillos
A continuación golpee firmemente el eje dentro de la tapa del eje usando un martillo, FIG. B.
A continuación deslice las ruedas dentro del eje; los cubos deben estar orientados hacia adentro, FIG. C. A continuación golpee la otra tapa del eje dentro del otro extreme del eje.
A continuación coloque el conjunto del eje dentro del fondo del cargador según se muestra en la FIG. C.
Monte el eje en el fondo del cargador usando los dos tornillo de corte de rosca
Saque los dos tornillos superiores de cada lado del cargador; alinee el mango y reinstale los tornillo. FIG. E.
Fig. B
AXLE CAP
AXLE BRACKET
Fig. D
Fig. E
TROUBLESHOOTING
If a problem does occur, check the following:
PROBLEM | POSSIBLE CAUSE | SOLUTION |
No Meter Reading (AC Cord Unplugged) | Clips are not making a good connection. | Rock clips back and forth for a better connection. |
| Battery voltage is too low. | Plug AC line into outlet. Meter should now indicate. |
| 2 amp charge rate being used | None, meter will not indicate here. |
Charger will not turn on when properly | AC outlet is dead. | Plug in a lamp to check for voltage. |
connected. | Poor electrical connection. | Check connections, rock back and forth for a better |
| ||
|
| connection. |
Clicking noise from charger. | Circuit breaker is cycling. | May be in the wrong switch position. |
| Battery is defective. | Have Battery checked. |
| Severely discharged battery but otherwise a good | Allow charging to continue until battery has a chance to |
| battery. | recover sufficiently to take a charge. If more that 20 min. |
|
| stop charging and have the battery checked. |
| Reverse connections at battery. | Shut off charger and correct lead connections. |
5