I WARNING: To avoid,injury from accidental starting, l always turn switch' OFF"and unplug power cord
• • | i _ |
lfrom outlet before removing or,replacing the blade.
OTE: Saw comes set up, for pin end blades. For plain =end blades, the blade clamp needs to be reinstalled with
the flat surface placed against the blade holder.
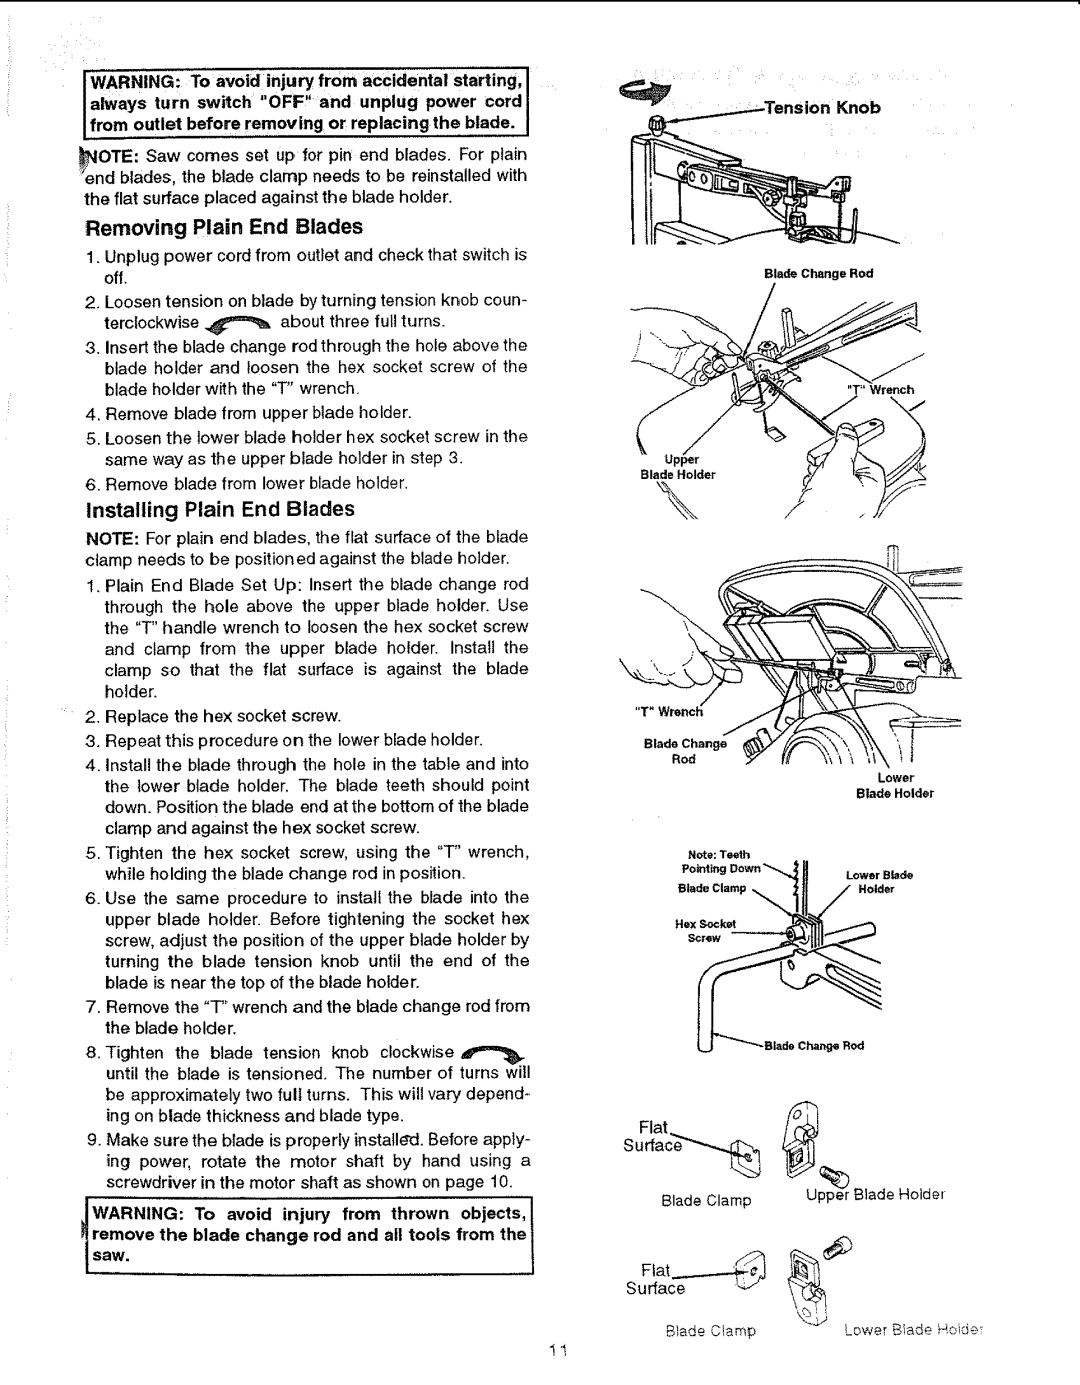
Removing Plain End Blades
1.Unplug power cord from outlet and check that switch is off.
2.Loosen tension on blade by turning tension knob coun-
terclockwise _ | about three full turns. |
3.Insert the blade change rod through the hole above the blade holder and loosen the hex socket screw of the blade holder with the "T" wrench.
4.Remove blade from upper blade holder.
5.Loosen the lower blade holder hex socket screw in the same way as the upper blade ho]der in step 3.
6.Remove blade from lower blade holder.
Installing Plain End Blades
:NOTE: For plain end blades, the flat surface of the blade ctamp needs to be positioned against the blade holder.
1.Plain End Blade Set Up: insert the blade change rod through the hole above the upper blade holder. Use the "T" handle wrench to loosen the hex socket screw and clamp from the upper blade holder. Install the clamp so that the flat surface is against the blade holder.
.... 2. Replace the he>(socket screw.
3.Repeat this procedure on the lower blade holder.
4.Install the blade through the hole in the table and into the lower blade holder. The blade teeth should point down. Position the blade end at the bottom of the blade clamp and against the hex socket screw.
5.Tighten the hex socket screw, using the "T" wrench, while holding the blade change rod in position.
6.Use the same procedure to install the blade into the upper blade holder. Before tightening the socket hex screw, adjust the position of the upper blade holder by turning the blade tension knob until the end of the blade is near the top of the blade holder.
7.Remove the "T" wrench and the blade change rod from the blade holder.
8.Tighten the blade tension knob clockwise
until the blade is tensioned. The number of turns will be approximately two full turns. This will vary depend- ing on blade thickness and blade type.
9.Make sure the blade is properly installed. Before apply- ing power, rotate the motor shaft by hand using a screwdriver in the motor shaft as shown on page 10.
JWARNING: To avoid injury from thrown objects,! PIremove the blade change rod and all tools from the
l saw. | I |
|
ion Knob
Blade Change Rod
"T" Wrencl_ |
|
Blade Change | l |
Rod | |
Lower | |
Blade | Holder |
Lower Birdie
Holder
BRod
Blade Clamp | Upper Blade Holder |
|
Surface
Blade C!am£ | Lower B!_de _.o!de_ |
11