SECTION | 2. PREPARE YOUR | MACHINE FOR SEWING |
|
|
Set Up the | Machine (Continued) |
|
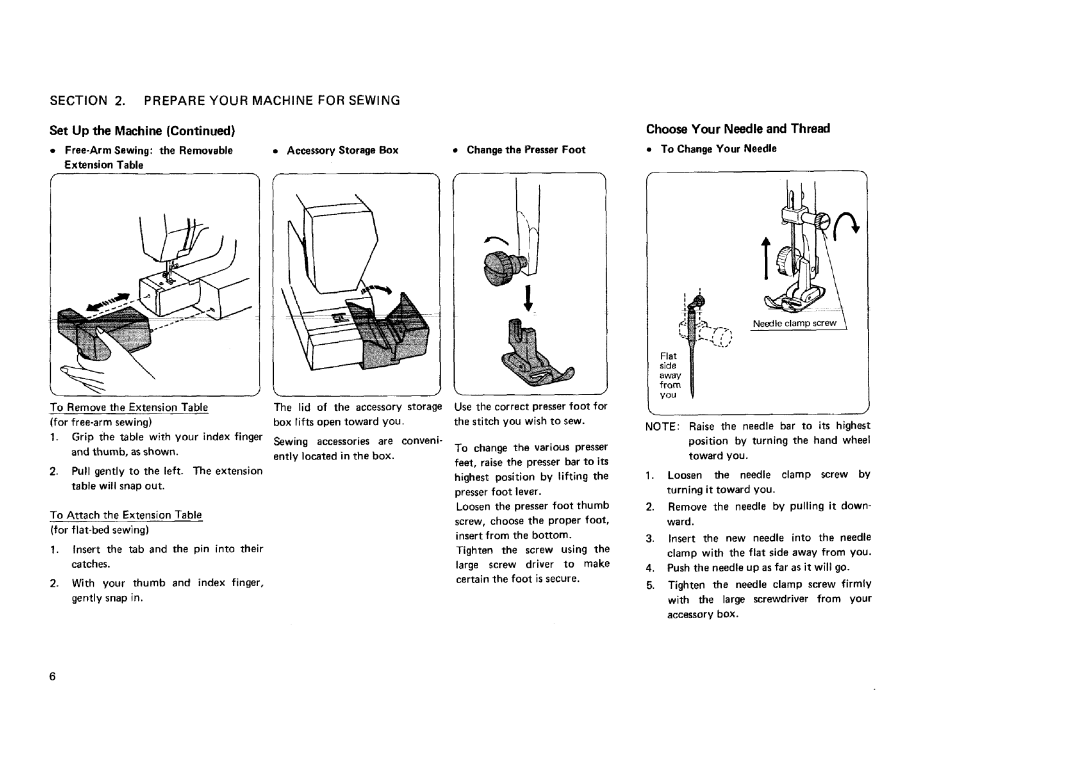
| Choose Your Needle and Thread |
• | = AccessoryStorageBox | • Change the PresserFoot | • To Change Your Needle | |
ExtensionTable |
|
|
| |
!
To | Remove | the | Extension Table | The | lid | of the accessory | storage Use | the | correct | presser | foot | for | |||
(for | sewing) | box | lifts | open | toward | you. | the | stitch | you | wish to | sew. |
| |||
1. | Grip the table with your index finger | Sewing | accessories | are | conveni- |
|
|
|
|
| |||||
|
|
|
|
|
| ||||||||||
| and | thumb, | as shown, | ently | located | in the | box. | To change the various presser | |||||||
| feet, raise the presser bar to its | ||||||||||||||
| Pull | gently | to the left. The extension |
|
|
|
|
| |||||||
2, |
|
|
|
|
| highest position by lifting the | |||||||||
| table | will snap out. |
|
|
|
|
| ||||||||
|
|
|
|
|
| presserfoot lever. |
|
| |||||||
|
|
|
|
|
|
|
|
|
|
|
| ||||
To Attach the Extension Table |
|
|
|
|
| Loosen the presser foot thumb | |||||||||
|
|
|
|
| screw, choose the proper foot, | ||||||||||
(for |
|
|
|
|
| ||||||||||
|
|
|
|
| insert from the bottom. |
| |||||||||
|
|
|
|
|
|
|
|
|
|
| |||||
1. | Insert | the | tab and the pin into their |
|
|
|
|
| Tighten | the | screw | using | the | ||
| catches. |
|
|
|
|
|
| large screw driver to make | |||||||
2. With your thumb and index finger, |
|
|
|
|
| certain the foot is secure. |
| ||||||||
|
|
|
|
|
|
|
|
|
|
| |||||
gently snap in.
| ' _. | _ | Needle clamp screw |
| ;/ I ' 7" |
| |
side | _ | 'J | J |
away | II | ||
from |
| ||
you |
|
|
|
%. |
|
| . J |
NOTE: Raise the needle bar to its highest position by turning the hand wheel toward you.
1. Loosen the needle clamp screw by turning it toward you.
2.Remove the needle by pulling it down- ward.
3.Insert the new needle into the needle clamp with the flat side away from you.
4.Push the needle up as far as it will go.
5.Tighten the needle clamp screw firmly
with the large screwdriver from your accessory box.