Contents
Sewing Machine
SEARS, Roebuck and CO
Kenmore Sewing Machine
Important Safety Instructions
Operating Instructions
Table of Contents
Face Cover Plate
Portable Case or Cabinet is Available
Locate and Identify the Parts
Identify the Accessories
AutoClutchKnob
Foot Control Use
Children
Several
Setting Spool Pin
Adjust the Presser Foot Lever Thread Cutter
Section Prepare Your Machine for Sewing
ExtensionTable
Fabric, Needle, Thread and Stitch Length Chart
Ttmd
Green For
Check Your Needle
To Remove the Bobbin Case from the Machine
Wind the Bobbin
Pull 3 to Latch Bobbin as shown
Bobbin
Thread Your Needle
Bring bobbin thread up by pulling
Top thread
OoI!t
Loose
Prepareyourmachineforsewing
Top tension Too Tight Too Loose Just Right
Stitch Length Control
Prepare Your Machine for Sewing
Stitch Selector
Releaseto sew forward again
Adjusting Stretch Stitch Balance
Reverse Stitch Control
StartingTo Sew
Now that you are familiar Kenmore sewing machine
Turn a Square Corner
Learn the Stitches
Use the Seam Guides
Straight Stitches Usethe DarningPlate
Be usedo et! f= csand
Darning
Straight Stretch
Zigzag Stitches BasicZigzag
Satin Stitch
Heres How
Sew 4 to 6 zigzag stitches
Zigzag Stitches Applique
Bar Tacking
Sew a Button
To strengthen the shank, cut
This zigzag variation is very useful
Section Learn Stitches
Zigzag Stitches Overcasting Stitch Rick-Rack Stretch
HeresHow
Place the fabric under the presser
Foot so that the stitches are made
Overcast Stretch Stitching Models 12781, 12681
Zigzag Stitches
Lace Work Models 12781, 12681
Three-Step Zigzag
Stitch and Its Uses
Blind Hemming Models
12681
Stjtch
That Be*wcon exteRded=ede
Top thread tension Stitch length contro control 1 to5
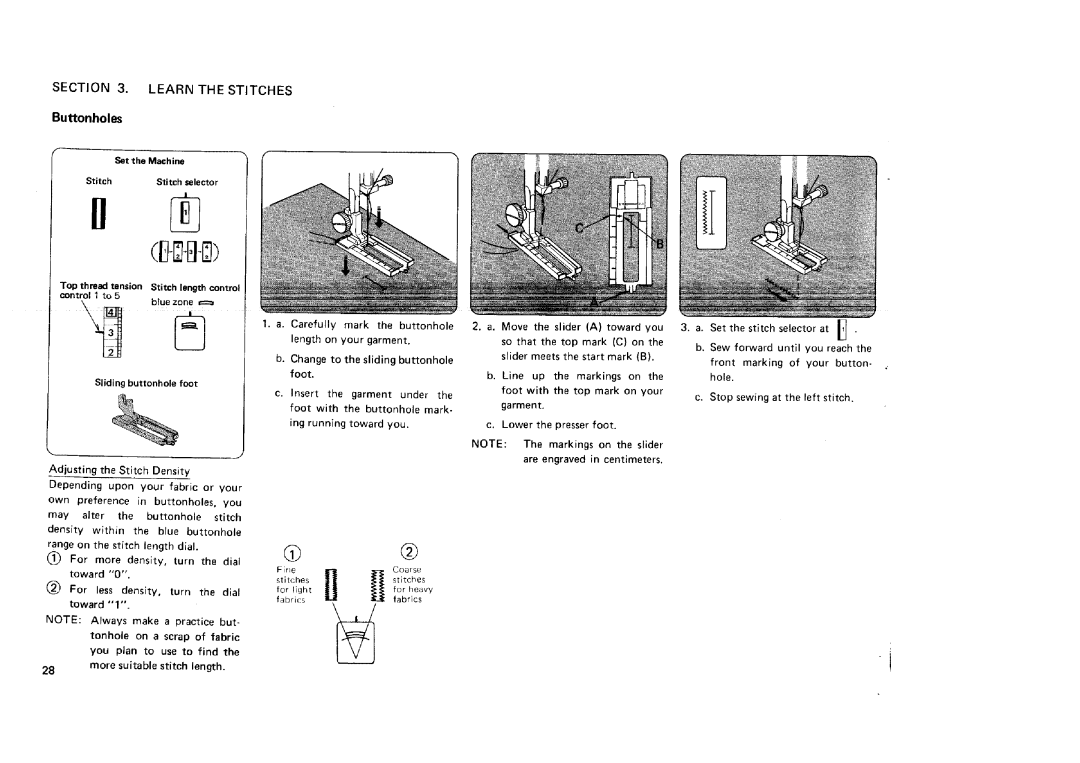
Buttonholes
Stitch selector
Set the stitch selector at b. Sew 4 to 6 stitches
Sew in a Zipper
Per, set the zipper foot
Right side of the needle
Stitch across and below
Tom of the zipper
Shell Stitching Models 12781 Smocking
Set the Machine Stitch Stitch selector
Top thread tension Stitch length Control 3 to Control 1to
Set the stitch length as you desire
Elastic Stretch Stitch Model 12781 only
Box Stitching Model 12781 only
Position
Top thread tension Stitch Length Control 1 to
What to Do When
Check bobbin case threading Clean bobbin caseand shuttle
What to Do When
Skipping Stitches Breaking Upper Thread
Fabric not Moving
Cleaning the Machine
Care for Your
Replacing the Light Bulb
Machine
About every three months
Clean the Shuttle Race
Occasional tangled thread. Clean the shuttle race area
Oiling the Machine
Oil points in illustration
Parts List
Ref. No
Shuttle
Instructions
Zipper application 3031
Index
Extension
Memo
Memo
Warranty
SEARS, Roebuck and CO., D/817 WA, Hoffman Estates, IL