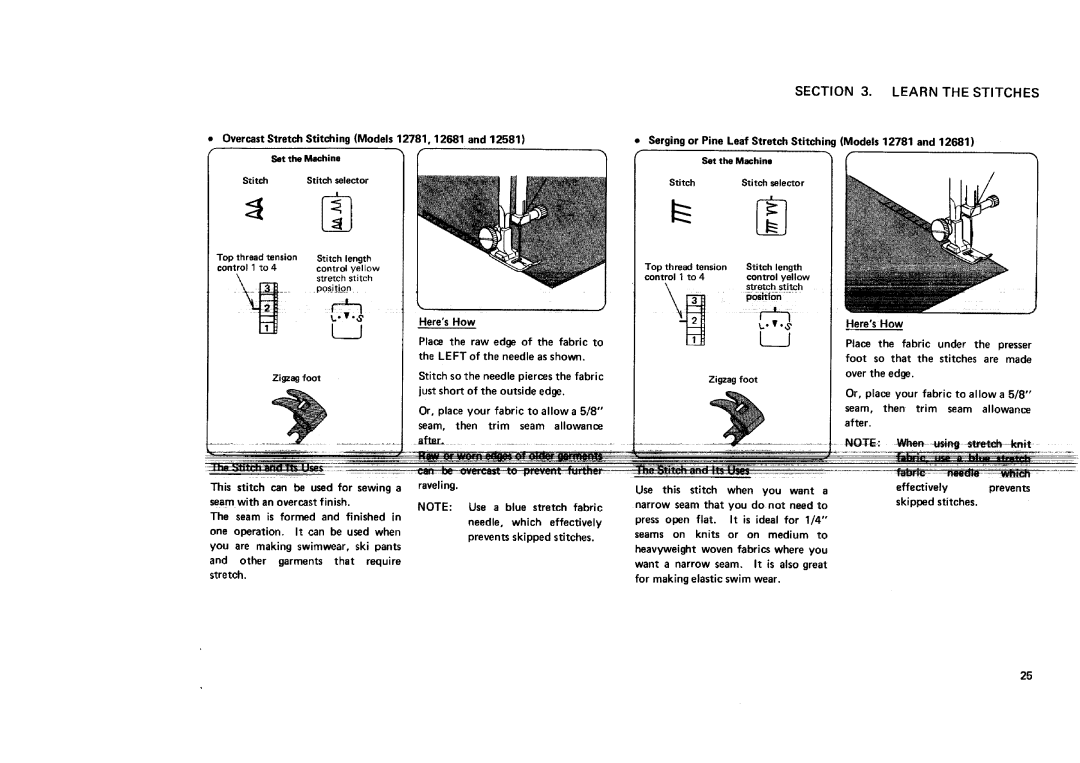
SEWING MACHINE
Kenmore Sewing Machine
SEARS, ROEBUCK AND CO
Model No. 385.Serial No Retain these numbers for future reference
THIS MODEL IS A CENTER NEEDLE, LOW BAR SEWING MACHINE
SAVE THESE INSTRUCTIONS
IMPORTANT SAFETY INSTRUCTIONS
OPERATING INSTRUCTIONS
Sew in a Zipper
TABLE OF CONTENTS
Locate and Identify the Parts
SECTION 1. KNOW YOUR MACHINE
A Portable Case or Cabinet is Available
ArmCoverPlate
Identify the Accessories
HandWheel
AutoClutchKnob
Set Up the Machine Plug in the Machine and Switch on the Power
SECTION 2. PREPARE YOUR MACHINE FOR SEWING
Check your outlet to be sure it is a 110 to 120 Volt AC outlet
SECTION 2. PREPARE YOUR MACHINE FOR SEWING
= AccessoryStorageBox
Set Up the
SECTION
2. PREPARE YOUR
Blue
ttmd
1. Look for barbed or blunt point
SECTION 2. PREPARE YOUR MACHINE FOR SEWING
2. PREPARE YOUR MACHINE
SECTION
FOR SEWING
Prepare
inches of thread from
SECTION 2. PREPARE YOUR MACHINE FOR SEWING
as shown above
Thread Your Needle
SECTION 2. PREPARE YOUR MACHINE FOR SEWING Prepare Your Top Thread
top thread
SECTION 2. PREPARE YOUR MACHINE FOR SEWING
2. Bring bobbin thread up by pulling
ooI!t
Adjust the Top Thread Tension
SECTION 2. PREPARE YOUR MACHINE FOR SEWING
loose
For Zigzag Stitch
SECTION2. PREPAREYOURMACHINEFORSEWING
tension
excessive
SECTION2. PREPARE YOUR MACHINE FOR SEWING Stitch Selector
Buttonhole Settings are blue
Stitch Length Control
stitch you select, but also regulates the stitch width for
k I I l l
Adjusting Stretch Stitch Balance
Reverse Stitch Control
oL, ,2,34s
SECTION 2. PREPARE YOUR MACHINE FOR SEWING
9. When turning the hand wheel manually, always turn it toward you
StartingTo Sew
Turn a Square Corner
SECTION 3. LEARN THE STITCHES Use the Seam Guides
Raisethepresser
its highest
Straight Stitches Continued
SECTION 3. LEARN THE STITCHES
Usethe DarningPlate
Stitch selector
Straight Stretch
Darning
be usedo et! f= csand
SECTION 3. LEARN THE STITCHES
Zigzag Stitches BasicZigzag
SECTION 3. LEARN THE STITCHES
The Satin stitch isespecially attractive in applique
Satin Stitch
SECTION 3. LEARN THE STITCHES
Draw the thread to the bottom side and knot
SECTION 3. LEARN THE STITCHES
To strengthen the shank, cut the
THE STITCHES
LEARN
SECTION
Zigzag Stitches
Overcast Stretch Stitching Models 12781, 12681 and
SECTION 3. LEARN THE STITCHES
Lace Work Models 12781, 12681 and
Zigzag Stitches Continued
SECTION 3. LEARN THE STITCHES
sewing patches smoothly and securely repairing straight tears
SECTION 3. LEARN THE STITCHES 12681 and
Blind Hemming Models
SECTION 3. LEARN THE STITCHES
Buttonholes
7. Remove the fabric and cut the hole open with the buttonhole opener
SECTION 3. LEARN THE STITCHES
4. a. Set the stitch selector at b. Sew 4 to 6 stitches
51 al Set the Stitch iect0r at
of the needle
SECTION 3. LEARN THE STITCHES Sew in a Zipper
the bot
SECTION 3, LEARN THE STITCHES
INVISIBLE ZIPPER AND CORDING
SECTION 3. LEARN THE STITCHES
Shell Stitching Models 12781 and
Smocking
SECTION 3. LEARN THE STITCHES Box Stitching Model 12781 only
Elastic Stretch Stitch Model 12781 only
CHART
PROBLEMS
Reset presser foot
SECTION
SECTION 4. PERFORMANCE PROBLEMS CHART
SECTION 5, CARE FOR YOUR Replacing the Light Bulb
MACHINE Cleaning the Machine
1. Unplug the machine and open the face cover
Protect
SECTION 5. CARE FOR YOUR MACHINE
To Replace Shuttle Assembly
SECTION 5. CARE FOR YOUR MACHINE
Oiling the Machine
cover
remove bottom cover
PARTS
bbin case
LIST
6st0
Lace work
INDEX
Replacing bobbin
Zigzag foot
MEMO
MEMO
ne-sa #er prep
WARRANTY
of he
e........n