1.,Turn the main fuel adjusting needle out (counter- clockwise) from the prefiminary setting until the engine speed decreases (rich).
2,.Now turn the adjusting needle in (clockwise),,
The engine speed may increase, then it will decrease as the needle is turned in (lean),
3.,Now set the adjusting needle midway between the rich and lean settings,,
eJ Idle Speed Settin_":g Place the throttle control into the "idle"or "slow 'position° Set the iclle speed to
1200 rpm adjusting screw in or out.,
Idle Fuel Needle Setting: Place the throttle into the "idle" or "slow" position.
1_Tum. the idle fuel adjusting needle out (counter- clockwise) from the prefiminary setting until the engine speed decreases (rich),
2,,Now tum the adjusting needle in (clockwise). The engine speed may increase, then it will decrease as the needle is turned in (lean).,
3,,Set the adjusting needle midway between the rich and lean settings,,
4, Recheck the idle speed. Readjust the speed as necessary,,
4, Fuse Replacement
Repface with 3O amp automotive4ype plug in fuse Fuses can be purchased at all Sears Service Centers and most retail stores. Fuse is located directly behind dash.
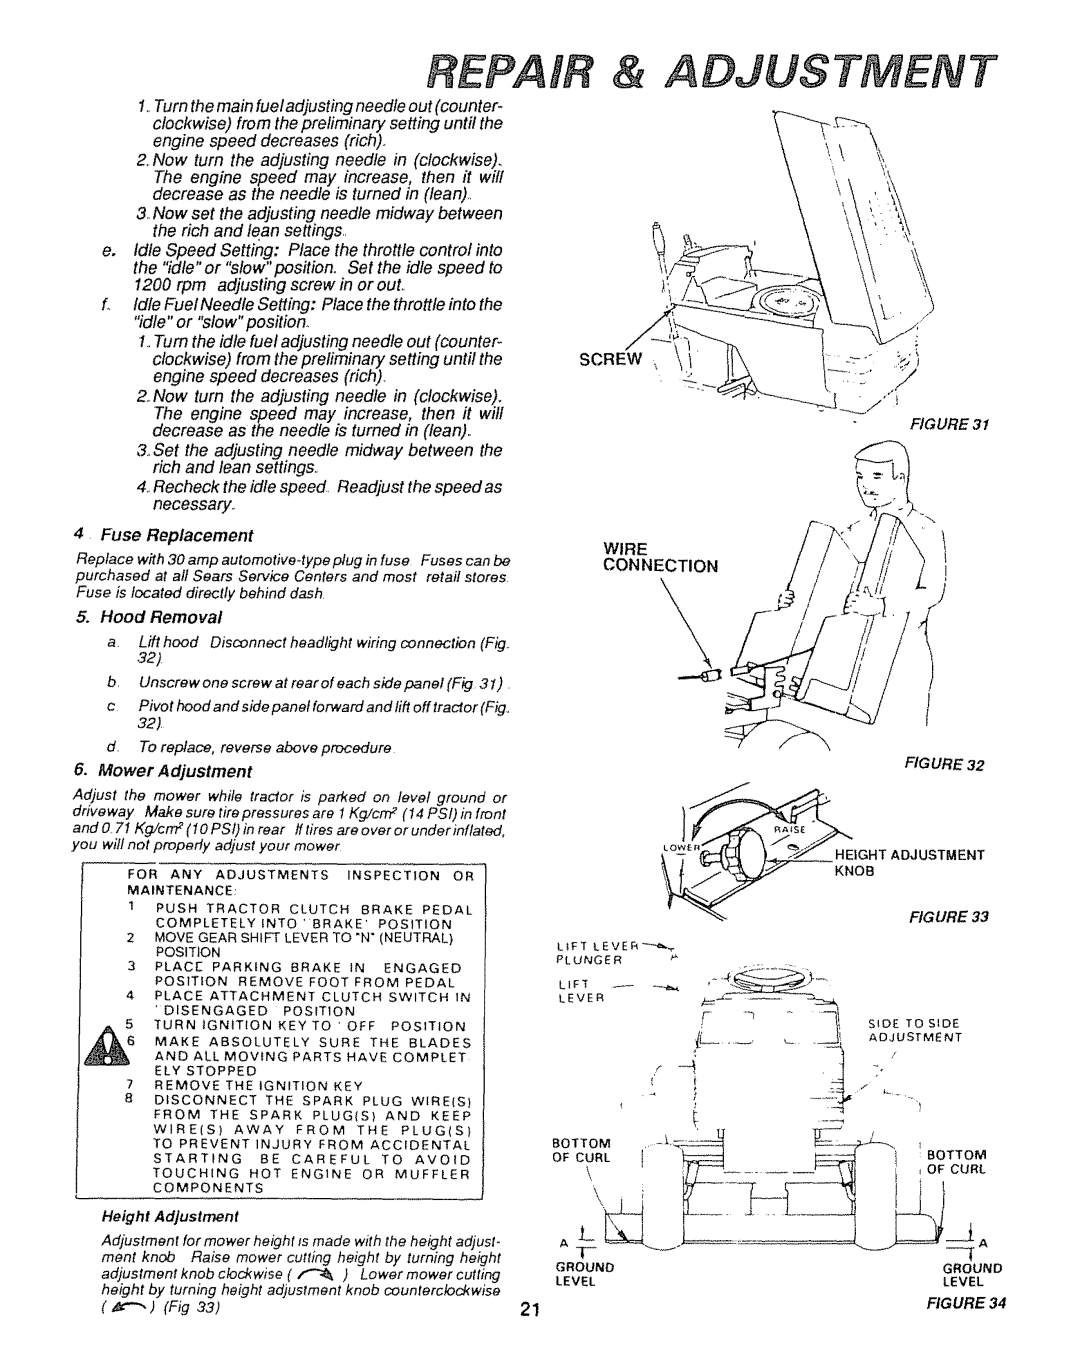
5.Hood Removal
a.Lift hood Disconnect headlight wiring connection (Fig,.
32).
b, Unscrew one screw at rear of each side panel (Fig 31) ,
cPivothoodandsidepanefforwardandliftofftractor(Fig,,
32)
d, To replace, reverse above procedure
6. Mower Adjustment
Adjust the mower while tractor is parked on level ground or driveway Make sure tire pressures are I Kg!cm 2 (I4 PSI) in front and O.7I Kg/cn'P (I0 PSI) in rear ff tires are o vet or under inflated, you wilt not properly adjust your mower
FOR ANY ADJUSTMENTSINSPECTION OR MAINTENANCE:
t PUSH TRACTOR CLUTCH BRAKE PEDAL
COMPLETELY INTO "BRAKE' POSITION
2MOVE GEAR SHIFT LEVER TO "N" (NEUTRAL)
POSITION
3 | PLACE | PARKING | BRAKE | 1N | ENGAGED | |||||
| POSITION | REMOVE |
| FOOT | FROM | PEDAL | ||||
4, | PLACE | ATTACHMENT |
| CLUTCH | SWITCH | 1N | ||||
| 'DISENGAGED | POSIT1ON |
|
|
|
| ||||
5 | TURN | IGNITION | KEY | TO ' | OFF | POSITION | ||||
6 | MAKE |
| ABSOLUTELY |
| SURE | THE | BLADES | |||
| AND | ALL MOVING | PARTSHAVE | COMPLET | ||||||
| ELY | STOPPED |
|
|
|
|
|
|
| |
7 | REMOVE | THE | IGNITION | KEY |
|
|
| |||
8 | DISCONNECT | THE | SPARK | PLUG | WIRE(S) | |||||
| FROM |
| THE | SPARK |
| PLUG(S) | AND | KEEP | ||
| WIRE(S) | AWAY | FROM | THE |
| PLUG(S} | ||||
| TO PREVENT | INJURY | FROM ACCIDENTAL | |||||||
| STARTING |
| BE | CAREFUL |
| TO | AVOID | |||
| TOUCHING |
| HOT | ENGINE | OR | MUFFLER | ||||
| COMPONENTS |
|
|
|
|
|
|
| ||
Height Adjustment
Adjustment for mower height ts made with the height adjust-
ment knob Raise mower cutting height by turning height
adjustment knob clockwise ( _ ) Lower mower cutting height by turning height adjustment knob counterclockwise
&ADJUSTMENT
\
/
:. ,k
SCREW
.=./
FIGURE 31
WIRE
CONNECTION
L
FIG URE 32
HEIGHT ADJUSTMENT
KNOB
FIGURE 33
LIFT L E V E R
PLUNGER
LIF]' _
LEVER
SIDE TO SIDE
ADJUSTMENT
i
GROUND | GROUND |
LEVEL | LEVEL |
(_) | (Fig 33) | 21 | FIGURE 34 |
|