La operación de cualquier tractor puede hacer que salten objetos extraños dentro de sus ojos, lo que puede producir daños graves en éstos. Siempre use anteojos de seguridad o protecciones para los ojos mientras opere su tractor o cuando haga ajustes o reparaciones. Recomendamos gafas de seguridad o una máscara de visión amplia de seguridad usada sobre las gafas.
TO LEVEL MOWER
Ensure tires are properly inflated to the PSI shown on tires. If tires are over or under inflated, it may affect the appearance of your lawn and lead you to think the mower is not adjusted properly.
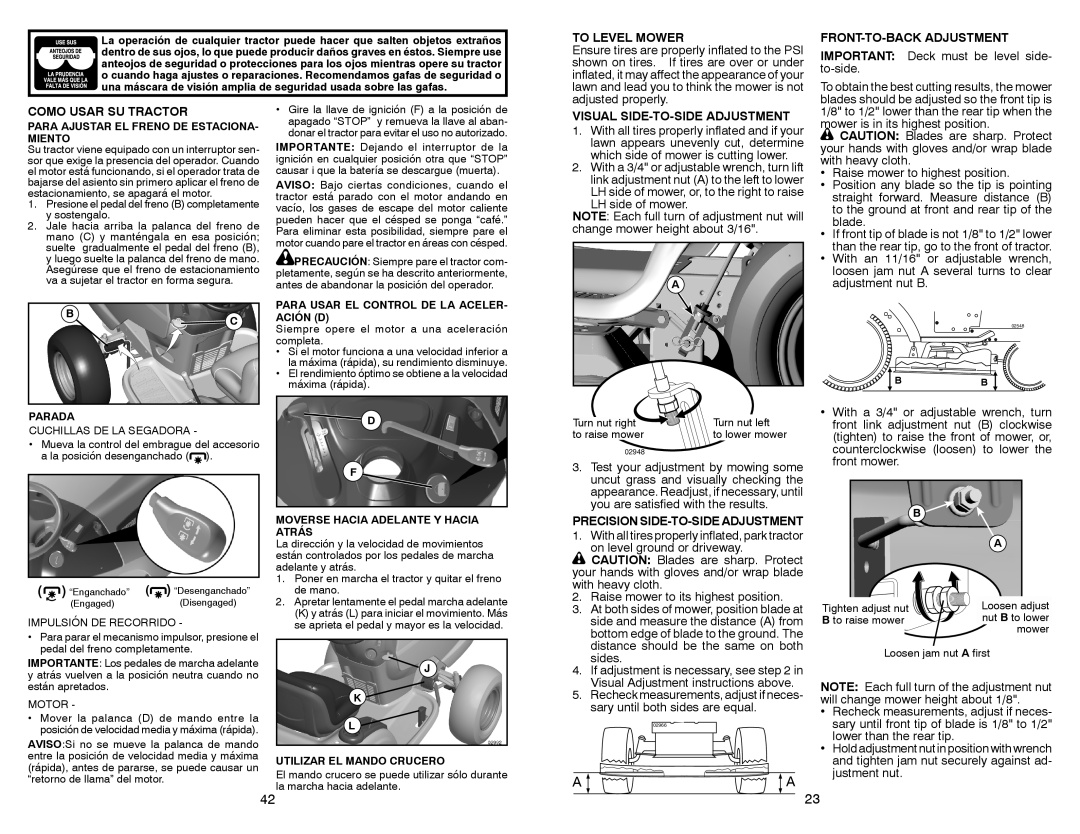
FRONT-TO-BACK ADJUSTMENT
IMPORTANT: Deck must be level side- to-side.
To obtain the best cutting results, the mower blades should be adjusted so the front tip is
COMO USAR SU TRACTOR
PARA AJUSTAR EL FRENO DE ESTACIONA- MIENTO
Su tractor viene equipado con un interruptor sen- sor que exige la presencia del operador. Cuando el motor está funcionando, si el operador trata de bajarse del asiento sin primero aplicar el freno de estacionamiento, se apagará el motor.
1.Presione el pedal del freno (B) completamente y sostengalo.
2.Jale hacia arriba la palanca del freno de mano (C) y manténgala en esa posición; suelte gradualmente el pedal del freno (B), y luego suelte la palanca del freno de mano. Asegúrese que el freno de estacionamiento va a sujetar el tractor en forma segura.
BC
•Gire la llave de ignición (F) a la posición de apagado “STOP” y remueva la llave al aban- donar el tractor para evitar el uso no autorizado.
IMPORTANTE: Dejando el interruptor de la ignición en cualquier posición otra que “STOP” causar i que la batería se descargue (muerta).
AVISO: Bajo ciertas condiciones, cuando el tractor está parado con el motor andando en vacío, los gases de escape del motor caliente pueden hacer que el césped se ponga “café.” Para eliminar esta posibilidad, siempre pare el motor cuando pare el tractor en áreas con césped.
![]() PRECAUCIÓN: Siempre pare el tractor com- pletamente, según se ha descrito anteriormente, antes de abandonar la posición del operador.
PRECAUCIÓN: Siempre pare el tractor com- pletamente, según se ha descrito anteriormente, antes de abandonar la posición del operador.
PARA USAR EL CONTROL DE LA ACELER- ACIÓN (D)
Siempre opere el motor a una aceleración completa.
•Si el motor funciona a una velocidad inferior a la máxima (rápida), su rendimiento disminuye.
•El rendimiento óptimo se obtiene a la velocidad máxima (rápida).
VISUAL SIDE-TO-SIDE ADJUSTMENT
1.With all tires properly inflated and if your lawn appears unevenly cut, determine which side of mower is cutting lower.
2.With a 3/4" or adjustable wrench, turn lift link adjustment nut (A) to the left to lower LH side of mower, or, to the right to raise LH side of mower.
NOTE: Each full turn of adjustment nut will change mower height about 3/16".
A
1/8" to 1/2" lower than the rear tip when the mower is in its highest position.
![]() CAUTION: Blades are sharp. Protect your hands with gloves and/or wrap blade with heavy cloth.
CAUTION: Blades are sharp. Protect your hands with gloves and/or wrap blade with heavy cloth.
•Raise mower to highest position.
•Position any blade so the tip is pointing straight forward. Measure distance (B) to the ground at front and rear tip of the blade.
•If front tip of blade is not 1/8" to 1/2" lower than the rear tip, go to the front of tractor.
•With an 11/16" or adjustable wrench, loosen jam nut A several turns to clear adjustment nut B.
02548
BB
PARADA
CUCHILLAS DE LA SEGADORA -
•Mueva la control del embrague del accesorio a la posición desenganchado (![]()
![]() ).
).
( ![]() ) “Enganchado” (
) “Enganchado” ( ![]() ) “Desenganchado”
) “Desenganchado”
(Engaged)(Disengaged)
IMPULSIÓN DE RECORRIDO -
•Para parar el mecanismo impulsor, presione el pedal del freno completamente.
IMPORTANTE: Los pedales de marcha adelante y atrás vuelven a la posición neutra cuando no están apretados.
MOTOR -
•Mover la palanca (D) de mando entre la posición de velocidad media y máxima (rápida).
AVISO:Si no se mueve la palanca de mando entre la posición de velocidad media y máxima (rápida), antes de pararse, se puede causar un “retorno de llama” del motor.
D |
F
MOVERSE HACIA ADELANTE Y HACIA ATRÁS
La dirección y la velocidad de movimientos están controlados por los pedales de marcha adelante y atrás.
1.Poner en marcha el tractor y quitar el freno de mano.
2.Apretar lentamente el pedal marcha adelante
(K) y atrás (L) para iniciar el movimiento. Más se aprieta el pedal y mayor es la velocidad.
![]() J
J
K ![]()
L ![]()
UTILIZAR EL MANDO CRUCERO
El mando crucero se puede utilizar sólo durante la marcha hacia adelante.
Turn nut right | Turn nut left |
to raise mower | to lower mower |
02948
3.Test your adjustment by mowing some uncut grass and visually checking the appearance. Readjust, if necessary, until you are satisfied with the results.
PRECISION SIDE-TO-SIDE ADJUSTMENT
1. With all tires properly inflated, park tractor on level ground or driveway. ![]() CAUTION: Blades are sharp. Protect
CAUTION: Blades are sharp. Protect
your hands with gloves and/or wrap blade with heavy cloth.
2.Raise mower to its highest position.
3.At both sides of mower, position blade at side and measure the distance (A) from bottom edge of blade to the ground. The distance should be the same on both sides.
4.If adjustment is necessary, see step 2 in Visual Adjustment instructions above.
5.Recheck measurements, adjust if neces- sary until both sides are equal.
02966
A ![]()
![]()
![]() A
A
•With a 3/4" or adjustable wrench, turn front link adjustment nut (B) clockwise (tighten) to raise the front of mower, or, counterclockwise (loosen) to lower the front mower.
| B |
| A |
Tighten adjust nut | Loosen adjust |
B to raise mower | nut B to lower |
02950 | mower |
Loosen jam nut A first | |
NOTE: Each full turn of the adjustment nut will change mower height about 1/8".
•Recheck measurements, adjust if neces- sary until front tip of blade is 1/8" to 1/2" lower than the rear tip.
•Hold adjustment nut in position with wrench and tighten jam nut securely against ad- justment nut.
42 | 23 |