This unit is
Region number for
Power Cord Protection
Precautions
Supplied Accessory
Nonuse Periods
Location and Handling
Precautions cont’d
Copyright
Copy Protection
Cleaning Discs
Cleaning the Cabinet
Auto Head Cleaning
Servicing
Table of contents
Symbol Description
Features
Playback
Compatibility
8* 9*10 13 14 16 17*18 19 20
Functional overview
Remote Control
Functional overview cont’d
Rear Panel
VCR mode
CLEAR/C-RESET button VCR / DVD DVD mode
REV E / r button VCR / DVD DVD mode
Audio button VCR / DVD DVD mode
Installing batteries in the remote control
About the remote control
Child Lock function
VCR Mode
VCR/DVD recorder Switching
DVD Mode
Guide to On-Screen Displays
Required Setting
Setup menus
Playback
Display
Front Panel Display Guide
Display message
VCR functions Others
Basic TV connection
Connecting to a TV
14 EN
VCR and Basic DVD Connection
Connecting to external equipment
Connecting to a TV cont’d
Editing Setup menu
AV3 Front
16 EN
Connecting to an Audio System
Easy DVD recording
Turn on the unit Select the DVD mode Open the disc tray
This unit can record on the following type of discs
Ing, select the rewritable DVD-RW type disc
Easy DVD recording cont’d
Mode Channel
Auto Tuning
Channel setting
Manual Tuning
Channel setting cont’d
Select Manual Tuning using Cursor K / L, then press Enter
After completion, press Setup to exit
To skip a Preset channel
To select a channel
Move
Clock Setting
Setting the clock
Select Clock Setting using Cursor K / L, then press Enter
Default date will appear
Enter
Information on DVD recording
Recording mode
Type of discs
Recordable discs
Information on copy control
Information on DVD recording cont’d
Making discs playable in other DVD players Finalise
Usable discs
Formatting a disc
Select Format Mode using Cursor K / L, then press Enter
Choosing the recording format of a brand-new DVD-RW disc
Formatting is completed
Formatting a disc cont’d
Setting Auto Chapter
Recording Audio Select XP
PCM
If you want to cancel formatting, select No
Insert a recordable disc Stop mode, press Setup
Reformatting a disc manually
Popup window will appear and prompt you to confirm
Setting Bilingual Recording Audio
Setting External Input Audio
Basic recording / One-touch Timer Recording OTR
Timer Recording
Timer Recording cont’d
To stop the timer recording in progress
If the timer programming did not complete correctly
Priority of overlapped settings
Hints for Timer Recording
If the starting time is same
If the recording time is partially overlapped
Satellite Link
Select Satellite Link using Cursor K / L, then press Enter
Preparation on this unit
Press Enter
Settings for external equipment
Satellite Link cont’d
Recording from external equipment
Guide to DV and On-Screen Display
DV dubbing
DV dubbing cont’d
Select Dubbing Mode using Cursor K / L, then press Enter
Dubbing Mode
Recording menu will appear
Option window will appear
Select DVD VCR using Cursor K / L, then press Enter
Select VCR DVD using Cursor K / L, then press Enter
Press Dubbing
Press Stop C to stop the recording
Select Finalise using Cursor K / L, then press Enter
To cancel the disc protect
Finalising discs
40 EN
Auto finalise
FinalisingXXXXdiscscont’dcont’d
You start Connections
Getting started Recording
Playable discs
Information on playing back DVDs
Colour systems
Region codes
Hint for DVD playback
Playing back a DVD-RW / DVD-R / DVD+RW / DVD+R disc
Press Stop C to stop play- back
Basic playback cont’d
Playing back a DVD-Video / CD / Video CD
Playing back an MP3 / Jpeg
Playing back a DivX
DivX Official DivX Certified product
Hint
Select an item using Cursor
Playing back discs using the Disc menu
Press Menu List
B, then press Disc menu
Playing back a disc using the Title menu
Playing back a Video CD using the Title menu
PBC function for Video CDs
PBC function for Video CDs cont’d
Cancelling and Recalling the PBC function
Special playback
Resume playback
Fast forward / Fast reverse
Special playback cont’d
Skipping TV commercials during playback
CM Skip
Rapid Play
Pause
During playback, press Pause F
Press Play B to resume play- back
Slow forward / Slow reverse playback
Step by step playback
52 EN
Pause
Select the icon using Cursor / B, then press Enter
Marker Setup
Zoom
During playback, press Display
Title / Chapter search
Search
Track search
Display
Search cont’d
Direct Search
Time search
Repeat playback
Repeat/Random/Programme playback / Slide Show
Select Random Play using Cursor K / L, then press Enter
CD Playback Mode menu will appear Audio CD
Repeat/Random/Programme playback / Slide Show cont’d
Random playback
Slide Show
Programme playback
Select DivX VOD using
Switching subtitles
Select Playback using Cursor
DivX VOD
Switching audio soundtrack
Switching virtual surround system
Selecting the format of audio and video cont’d
Icon using
Switching camera angles
Reducing block noise
Select Cursor / B, then press
Information on disc editing
Original and Playlist VR mode
Guide to a title list
Edit the recorded disc
Editing discs
Information on disc editing cont’d
DVD-RW
DVD-R
Editing discs
Select Title Delete using Cursor K / L, then press Enter
Deleting titles
Press Return or Stop C to exit
Editing discs cont’d
Select Edit Title Name using Cursor K / L, then press Enter
Editing title names
Press Return and then Return or Stop C to exit
Abc 123
Guide to edit title name
Adding or deleting chapter marks
Select Chapter Mark using Cursor K / L, then press Enter
Confirmation window will appear. e.g. Add
Delete
Chapter mark is added
Adding a chapter mark
Deleting a chapter mark
Chapter mark is deleted
Picture is set as the thumbnail
Setting pictures for thumbnails
Deleting a part of a title
Select Scene Delete using Cursor K / L, then press Enter
Select Delete using Cursor K / L, then press Enter
Part of the title is deleted
Or Playlist is more than
You can divide a title into two new titles Press first
Dividing a title
Combining titles
Select Title Combining using Cursor K / L, then press Enter
You can combine two titles into a single title Press first
If either one of the two
Follow the on page 64 to display the Playlist
Adding titles to a Playlist
Erasing all Playlist
Select Yes using Cursor s / B, then press Enter
Playlist is deleted
Deleting a Playlist will Not increase the available
Select Protect using Cursor K / L, then press Enter
Setting or releasing the title protection
To protect a whole disc DVD-RW VR mode Only
Confirm the indication OFF ON. Press Enter again
Chapter marks are added
Setting or clearing all chapter marks in one title
You cannot select a chapter
Mark interval that exceeds
78 EN
Tour of the Setup menu
Select a setting using Cursor
Language setting
Audio Default Original
Subtitle Default OFF
Language setting cont’d
Display setting
Angle Icon Default on
Audio setting
Display setting cont’d
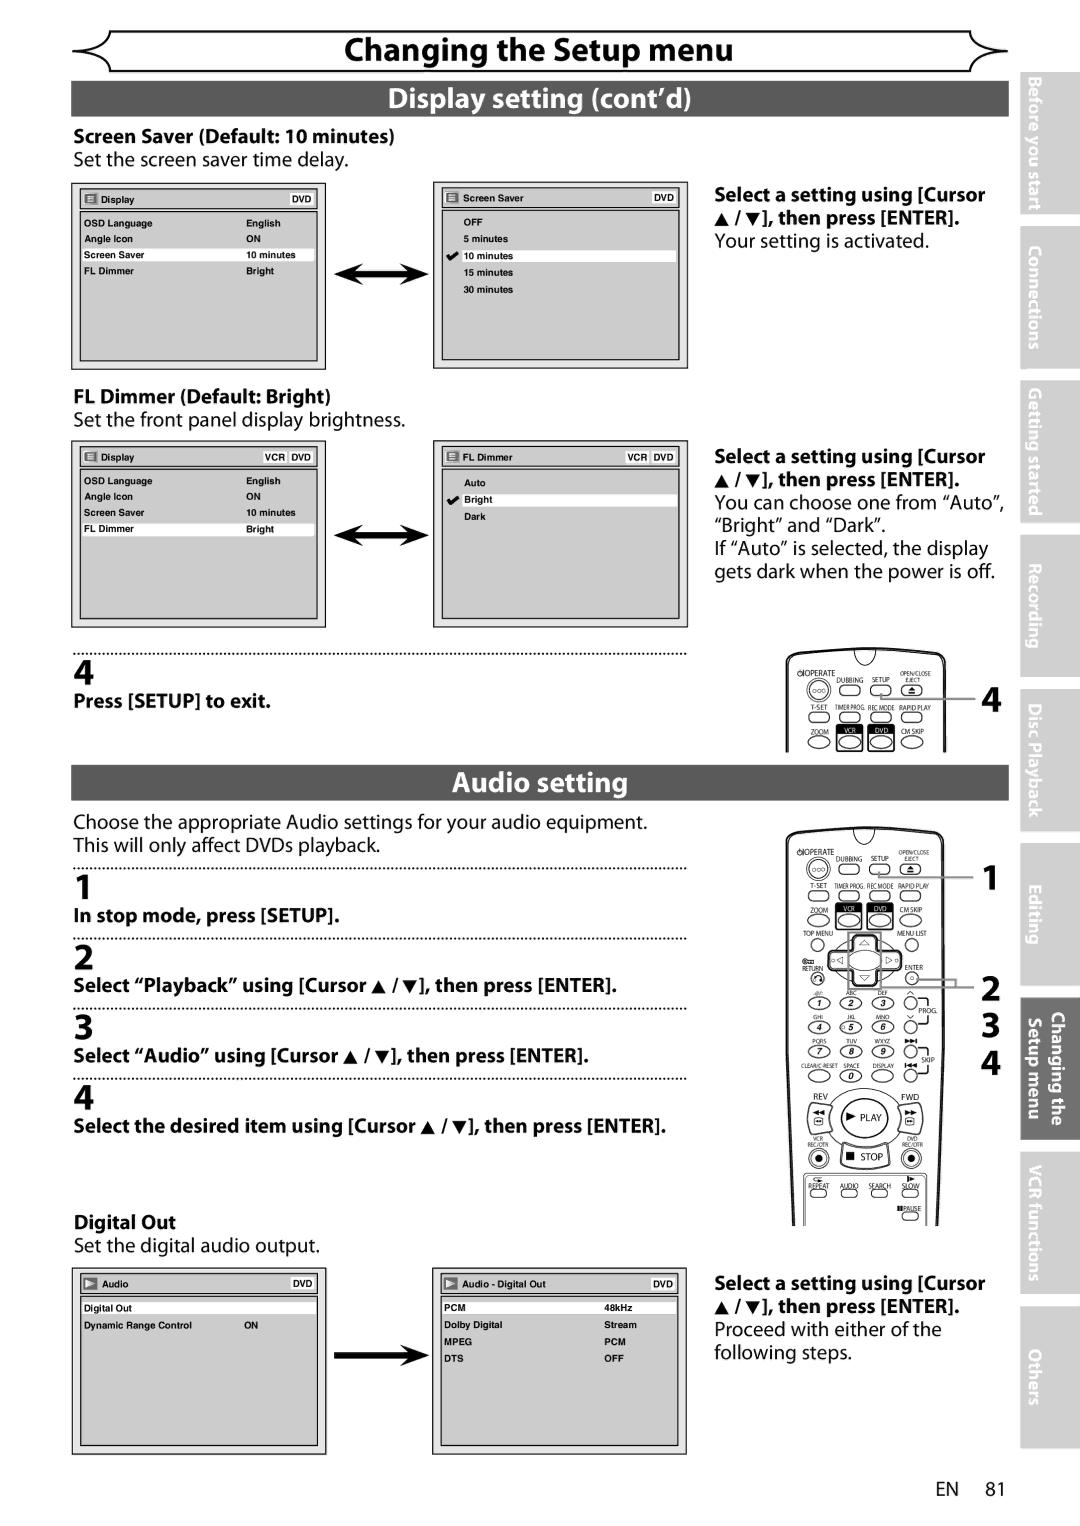
Screen Saver Default 10 minutes
FL Dimmer Default Bright
Select a setting using Cursor K / L, then press Enter
Audio setting cont’d
Dynamic Range Control Default on
Video setting
TV System Default PAL Set the TV system
Video setting cont’d
Video Out Default Scartrgb
Select Yes using Cursor
DVD-Videos Parental Lock level
Select Parental Lock using Cursor K / L, then press Enter
Proceed with either of the following steps
All
Change the password
Your setting is activated If you select No, proceed to step
DVD-Videos Parental Lock level cont’d
Yes
Playback
One-touch Timer Recording
Recording and One-touch Timer Recording OTR cont’d
Select the recording mode using REC MODE. See
Turn on the unit and insert a recordable tape
Index search
Mode Audio output Display on
Selecting the Sound Mode
Other operations
Hi-Fi Stereo Sound System
Troubleshooting
VCR / DVD
SET
92 EN
DVD
VCR
Process is cancelled, the disc MAY not work
Error message Cause Solution
Troubleshooting cont’d
Language Code
Language code
Cprm
Glossary
DTS
Jpeg
Video recording format
Specifications
Audio recording format
Receivable channels
Page
1300 135
1VMN23152
Congratulations on Your Purchase