LC-46SV49U LC-32SV29U LC-26SV490U
Page
LC-46SV49U LC-32SV29U LC-26SV490U
Important Information
Trademarks
This equipment
Important Safety Instructions
Dear Sharp Customer
Antenna is connected to the television
Precautions when transporting the TV
Caring for the Cabinet
Caring for the Liquid Crystal panel
Child Safety
Attaching/Detaching the Stand
Supplied Accessories
Quick Reference
Quick Reference
Detaching the stand neck for wall mounting
Quick Installation Tips
Using the Remote Control Unit
Important Favorite CH
Antennas
Connecting Antenna Cable
Preparation
Installing Batteries in the Remote Control Unit
Preparation
Contents
Part Names
TV Front TV Side/Rear
Remote Control Unit
Part Names
Introduction to Connections
Experiencing HD Images
Connecting to External Equipment
Example
Connecting to External Equipment
When using Hdmi cable Input 1, 2, or
When using Component cable Input
When using coaxial cable
Connecting an AV Amplifier
Connecting a PC
Initial Setup
Turning On/Off the Power
Initial Setup
Language setting
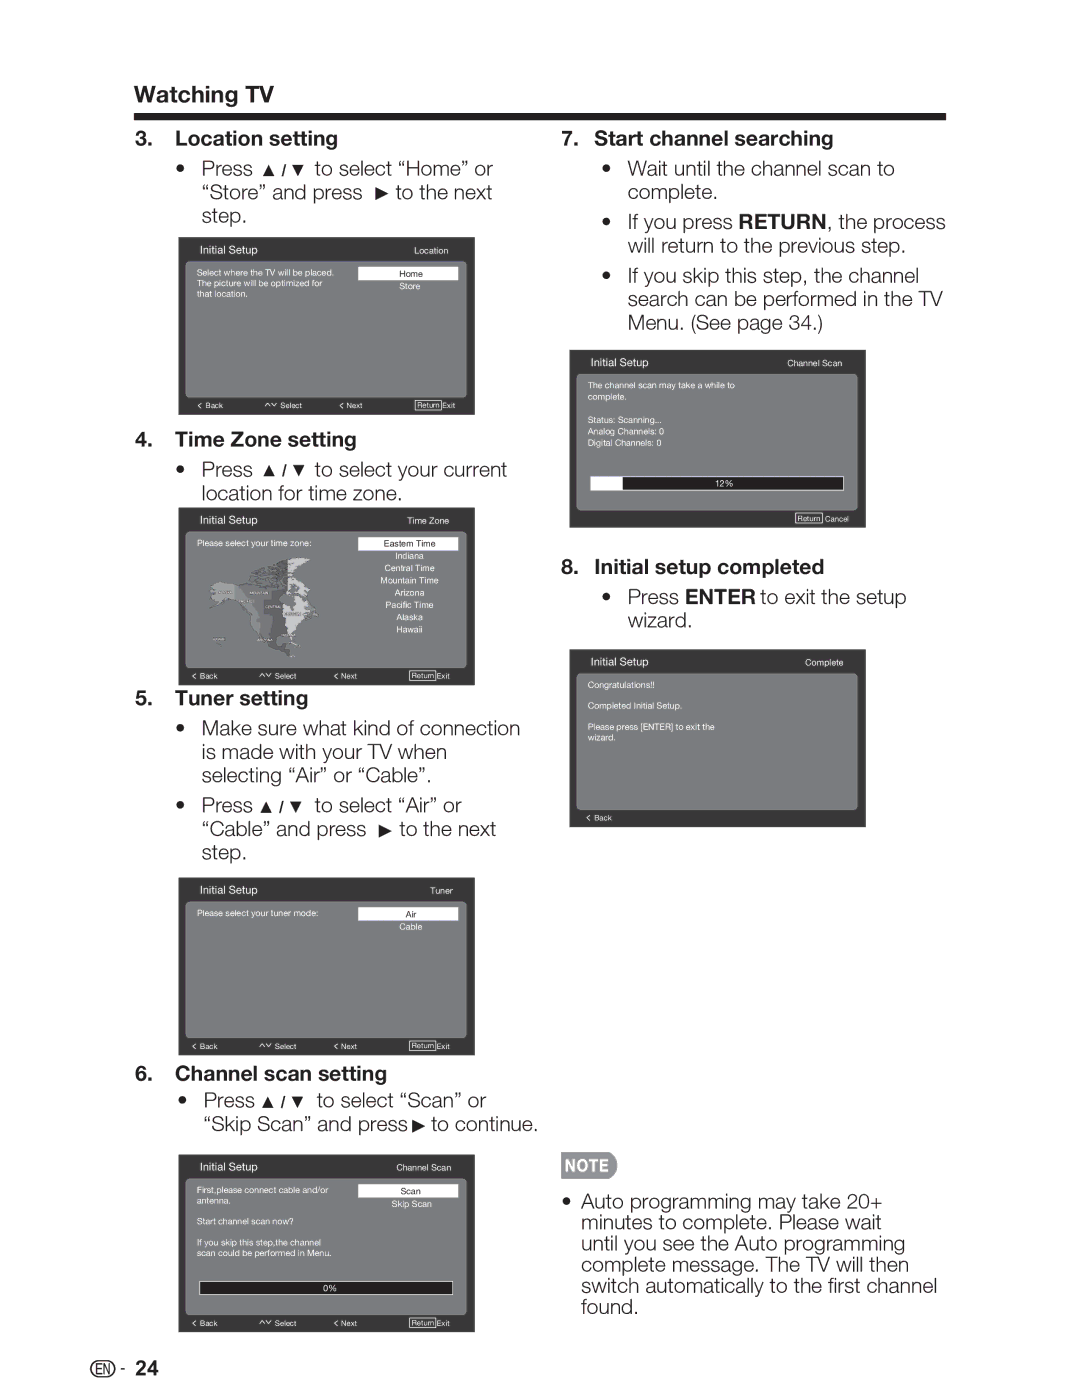
Watching TV
Mute
Direct Button Operation
Input
Sleep
Flashback Audio
AV Mode
Direct Button Operation
Surround
Closed Captions CC
Digital broadcasting audio mode
Example when receiving Digital broadcasting
View Mode
Press View Mode
Menu Items
For TV Mode
On-Screen Display Menu
On-Screen Display Menu
On-Screen Display Menu Operation
Menu Operation Button
Using the remote control
Using the control panel of the main unit
Video Menu
Advanced Video
AV Mode
Color Temperature
VGA
Equalizer
Audio Menu
Surround
Speaker
Audio Language
TV Menu Audio Mode
CH Skip
Favorite Channels
View mode
Setup Menu
Tuner Mode
Time Setup
Location
Reset
Caption
Version Info
Program Block
Parental Menu
Channel Block
TV Ratings
On-Screen Display Menu Rating Enable
Age rating Content rating
TV-Y7
PG-13
On-Screen Display Menu Movie Ratings
Canadian English Ratings
NC-17
Input Block
Change Password
Clean All
USB
Browse the file folder
USB
Play Video
Appendix
Troubleshooting
Problem Possible Solution
LC-32S V29U LC-46S V49U
Appendix
Specifications
LC-26S V490U
PC Compatibility Chart
Command table
Communication procedure
Command format
PC control of the TV
Clearing the Master Password
Information on the Software License for This Product
FCC warning
Legal notices
FCC Part
Cables
Calling for Service
Limited Warranty
Informations Importantes
Français
Marques DE Commerce
Déclaration DE Conformité
Cher Client Sharp
Consignes DE Sécurité Importantes
Compagnie Conducteurs DE Délectricité Mise À LA Terre
Précautions à prendre lors du transport du téléviseur
Soins du châssis
Soins du panneau à cristaux liquides
Sécurité DES Enfants
Fixation et retrait du support
Accessoires fournis
Référence Rapide
Référence Rapide
Démontage de la colonne du support pour un montage mural
Conseils dinstallation rapide
Appuyez sur le bouton Power Alimentation du téléviseur
Utilisation de la télécommande
Précautions concernant la télécommande
Connexion du câble dantenne
Préparation
Antennes
Installation des piles dans la télécommande
Préparation
Contenu
Noms des pièces
TV Avant TV Côté/Arrière
Télécommande
Noms des pièces
Présentation des connexions
Connexion à un équipement externe
Affichage de limage provenant dun périphérique externe
Avec un câble de conversion DVI-HDMI Entrée 1, 2, ou
Connexion à un équipement externe
Avec un câble Hdmi Entrée 1, 2, ou
Avec un câble Composante Entrée
Avec un câble composite Entrée
Avec un câble coaxial
Connexion dun amplificateur audio
Connexion dun amplificateur audio-vidéo
Avec un câble RGB analogique PC in Entrée PC
Brancher un ordinateur personnel
Avec un câble de conversion DVI-HDMI Entrée 1, 2
Regarder la télévision
Installation initiale
Installation initiale
Mise sous tension / hors tension
Regarder la télévision
Changement de canal
Modification du volume
Contrôle direct par les boutons
Entrée
Contrôle direct par les boutons
Mode AV
Mode MTS/SAP stéréo
Canal Précédent
Exemple réception dune émission numérique
Mode de diffusion audio numérique
Sous-titres codés CC
View Mode Mode Daffichage
Pour lentrée PC
Éléments du menu
Pour le mode TV
Menu daffichage à lécran
Exemple
Menu daffichage à lécran
Fonctionnement du menu daffichage à lécran
Menu de la
Boutons de contrôle du menu
Menu vidéo
Ou Exit Quitter de la
Ctrl Luma adaptable
Film, Economie dénergie, Utilisateur ou Dynamic Dynamique
Adaptive Backlight Rétroéclairage adaptable
Couleur Chair
Entourez
Chaînes préférées
Mode audio
Menu TV Audio Language
Pour enregistrer un canal favori
Conf de lheure
Mode syntoniseur
Mode d’affichage
Sous-titre
Style de Sous-titre
Emplacement
Sous-titre Numérique
Réinitialisation
Bloc de programmes
Menu Parental
Blocage de chaîne
Activer classement
Menu daffichage à lécran Classement TV US
Classification par âge Du contenu
Menu daffichage à lécran Classement films US
Class. Canada angl
Tout nettoyer
Blocage d’entrée
Changer Le Mot de Passe
Résolution maximale
Naviguer dans le dossier de fichiers
Boutons de couleur Rouge
Regarder les photos
Lire laudio
Displayaffichage Info
USB
Dépannage
Problème Solution possible
Appendice
Appendice
Spécifications
25 5/16 x 17 9/16 x 7 13/32 pouces
Tableau de compatibilité PC
Conditions de communication
Format de la commande
Contrôle du téléviseur par le PC
Procédure de communication
Information sur la licence du logiciel de ce produit
Suppression DU MOT DE Passe Maître
Avertissement de la CFC
Mentions légales
CFC Partie
Câbles
Page
Page
Page
LC-46SV49U LC-32SV29U LC-26SV490U
Información Importante
Marcas Comerciales
Estimado Cliente DE Sharp
Instrucciones Importantes DE Seguridad
Instrucciones Importantes DE Seguridad
Instrucciones Importantes DE Seguridad
Cuidado del panel de cristal líquido
Precauciones al transportar la TV
Cuidado de la cubierta
Seguridad DE LOS Niños
Colocación/extracción de la base
Referencia Rápida
Accesorios suministrados
Referencia Rápida
Extracción del cuello de la base para el montaje en pared
El indicador Power Encendido
Sugerencias para la instalación rápida
Utilización del control remoto
Precauciones relacionadas con el control remoto
Conexión de la antena Cable
Preparación
Antenas
Preparación
Instalación de las pilas en el control remoto
Contenido Nombres de las partes
Ilustraciones dimensionales
Contenido
Introducción a las conexiones Visualización de la TV
Nombres de las partes
TV parte frontal TV parte lateral/posterior
Nombres de las partes
Control remoto
Introducción a las conexiones
Ejemplo
Conexión de los equipos externos
Visualización de la imagen de un equipo externo
Conexión de los equipos externos
Al utilizar el cable Hdmi Input Entrada 1, 2, o
Al utilizar el cable de video componente Input Entrada
Conexión de un amplificador de audio
Conexión de una PC
Configuración de idioma
Configuración inicial
Configuración inicial
Visualización de la TV
Visualización de la TV
Dígitos por ejemplo, el canal
Utilización directa de los botones
Ejemplos
Punto 1 IR
Sonido Envolvente
Utilización directa de los botones
Canal Anterior
Congelar
Ejemplos al recibir MTS y SAP
Subtítulos ocultos CC
Modo de audio de transmisión Digital
Ejemplo al recibir transmisiones digitales
Para el modo de entrada de PC
Modo DE Visualización
Para programas en alta definición
Para programas en
Para el modo TV
Menú de visualización en pantalla
Elementos del menú
Menú de visualización en pantalla
Funcionamiento del menú de visualización en pantalla
Utilización del panel de control de la unidad principal
Botones para la navegación Menú Video Por el menú
Utilización del control remoto
Vídeo avanzado
Modo AV
Temperatura de color
Sensor de luz ambiental
Altavoces
Menú Audio Sonido surround
Ecualizador
Tipo de Spdif
Modo de audio
Menú TV Lenguaje del Audio
Canales Favoritos
Modo de visualización
Configuración
Configuración de hora
Modo sintonizador
Ubicación
Subtítulos Digitales
Estilo de Subtítulos
Reiniciar
Bloqueo de programas
Menú Paterno
Bloqueo de canal
Activar niveles
Clasificación etárea Clasificación de Contenido
Clasificación
Clasif. ingl. Canadá Clasificación de inglés canadiense
Clasificación de la película Descripción
De la película
Limpiar todo
Bloquear entrada
Cambiar Contraseña
Examinación de la carpeta de archivos
Miniatura de USB
Botones de colores Rojo repetir
Visualización de imágenes
Reproducción de audio
Display Visualizar información
USB
Apéndice
Apéndice
LC-32SV29U LC-46SV49U
25 5/16 x 17 9/16 x 7 13/32
VGA
Ocho códigos Ascii + CR
Apéndice
Advertencia relacionada con la normativa FCC
Avisos legales
Apartado 15 de la FCC
Aviso para Canadá
Dimensional Drawings
LC-46SV49U
LC-26SV490U
Sharp Electronics Corporation