Appendix
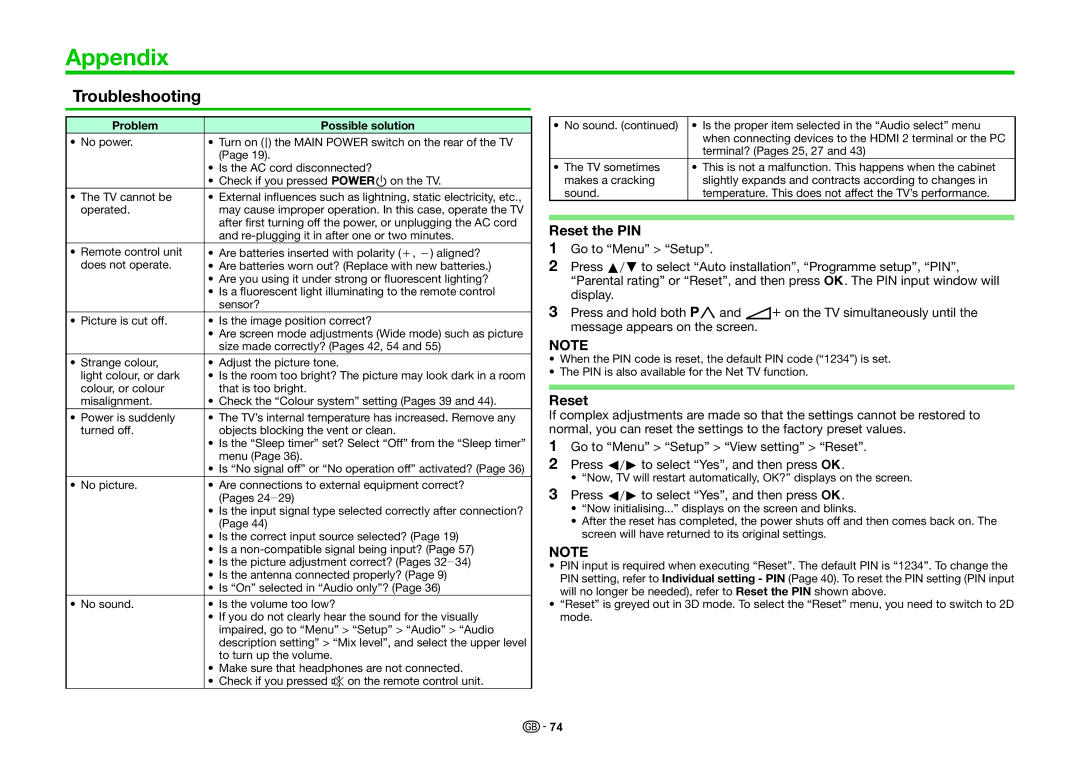
Troubleshooting
Problem | Possible solution |
• No power. | • Turn on (;) the MAIN POWER switch on the rear of the TV |
| (Page 19). |
| • Is the AC cord disconnected? |
| • Check if you pressed <aon the TV. |
• The TV cannot be | • External influences such as lightning, static electricity, etc., |
operated. | may cause improper operation. In this case, operate the TV |
| after first turning off the power, or unplugging the AC cord |
| and |
• Remote control unit | • Are batteries inserted with polarity (e, f) aligned? |
does not operate. | • Are batteries worn out? (Replace with new batteries.) |
| • Are you using it under strong or fluorescent lighting? |
| • Is a fluorescent light illuminating to the remote control |
| sensor? |
• Picture is cut off. | • Is the image position correct? |
| • Are screen mode adjustments (Wide mode) such as picture |
| size made correctly? (Pages 42, 54 and 55) |
• Strange colour, | • Adjust the picture tone. |
light colour, or dark | • Is the room too bright? The picture may look dark in a room |
colour, or colour | that is too bright. |
misalignment. | • Check the “Colour system” setting (Pages 39 and 44). |
• Power is suddenly | • The TV’s internal temperature has increased. Remove any |
turned off. | objects blocking the vent or clean. |
| • Is the “Sleep timer” set? Select “Off” from the “Sleep timer” |
| menu (Page 36). |
| • Is “No signal off” or “No operation off” activated? (Page 36) |
• No picture. | • Are connections to external equipment correct? |
| (Pages 24_29) |
| • Is the input signal type selected correctly after connection? |
| (Page 44) |
| • Is the correct input source selected? (Page 19) |
| • Is a |
| • Is the picture adjustment correct? (Pages 32_34) |
| • Is the antenna connected properly? (Page 9) |
| • Is “On” selected in “Audio only”? (Page 36) |
• No sound. | • Is the volume too low? |
| • If you do not clearly hear the sound for the visually |
| impaired, go to “Menu” > “Setup” > “Audio” > “Audio |
| description setting” > “Mix level”, and select the upper level |
| to turn up the volume. |
| • Make sure that headphones are not connected. |
| • Check if you pressed eon the remote control unit. |
• No sound. (continued) | • Is the proper item selected in the “Audio select” menu |
| when connecting devices to the HDMI 2 terminal or the PC |
| terminal? (Pages 25, 27 and 43) |
• The TV sometimes | • This is not a malfunction. This happens when the cabinet |
makes a cracking | slightly expands and contracts according to changes in |
sound. | temperature. This does not affect the TV’s performance. |
|
|
|
|
Reset the PIN
1Go to “Menu” > “Setup”.
2Press a/bto select “Auto installation”, “Programme setup”, “PIN”, “Parental rating” or “Reset”, and then press ;. The PIN input window will display.
3Press and hold both :rand i+on the TV simultaneously until the message appears on the screen.
NOTE
•When the PIN code is reset, the default PIN code (“1234”) is set.
•The PIN is also available for the Net TV function.
Reset
If complex adjustments are made so that the settings cannot be restored to normal, you can reset the settings to the factory preset values.
1Go to “Menu” > “Setup” > “View setting” > “Reset”.
2Press c/dto select “Yes”, and then press ;.
•“Now, TV will restart automatically, OK?” displays on the screen.
3Press c/dto select “Yes”, and then press ;.
•“Now initialising...” displays on the screen and blinks.
•After the reset has completed, the power shuts off and then comes back on. The screen will have returned to its original settings.
NOTE
•PIN input is required when executing “Reset”. The default PIN is “1234”. To change the PIN setting, refer to Individual setting - PIN (Page 40). To reset the PIN setting (PIN input will no longer be needed), refer to Reset the PIN shown above.
•“Reset” is greyed out in 3D mode. To select the “Reset” menu, you need to switch to 2D mode.
![]()
![]() 74
74
