Manuals
/
Sharp
/
Computer Equipment
/
Projector
Sharp
PG-M20S Setting up the Screen, Standard Setup Front Projection, Example of Standard Setup
Models:
PG-M20S
1
21
87
87
Download
87 pages
6.74 Kb
18
19
20
21
22
23
24
25
Page 21
Image 21
Page 20
Page 22
Page 21
Image 21
Page 20
Page 22
Contents
DIGITAL MULTIMEDIA PROJECTOR
OPERATION MANUAL
Introduction Setup and Connections Basic Operation Easy to
PG-M20S
Η εγκατάσταση αυτή ανταπ Ε
Model No. PG-M20S Serial No
DANGER
SPECIAL NOTE FOR USERS IN THE U.K
Page
ENGLISH
Introduction
Introduction
INFORMATION
PRODUCT DISPOSAL
Caution Concerning the Lamp Replacement
1. Image Quality
Outstanding Features
2. Light, Compact, and Unique Slim Design
3. Superior PC Compatibility
Setup and Connections
Contents
Introduction
Basic Operation
Introduction
Appendix
IMPORTANT SAFEGUARDS
19. Replacement Parts
18. Damage Requiring Service
20. Safety Check
READ BEFORE USING THE PRODUCT
Info
IMPORTANT SAFEGUARDS cont
To install Acrobat Reader from the CD-ROM
How to Access the PDF Operation Manuals
Accessing the PDF Manuals
For other operating systems
Projector Front and Top View
Part Names
Exhaust vent Kensington Security Standard connector
Projector Side View
Using the Kensington Lock
INPUT 1 terminal
Part Names cont
Remote Control
Available Range of the Remote Control
Using the Remote Control
Inserting the Batteries
1 Slide the cover in the direction of the arrow to open it
Accessories
Supplied accessories
Optional cables
Setup and Connections
Setup and Connections
Using the Adjustment Feet
Setup
3 Rotate the adjustment feet to make minor changes
1 Press the foot releases
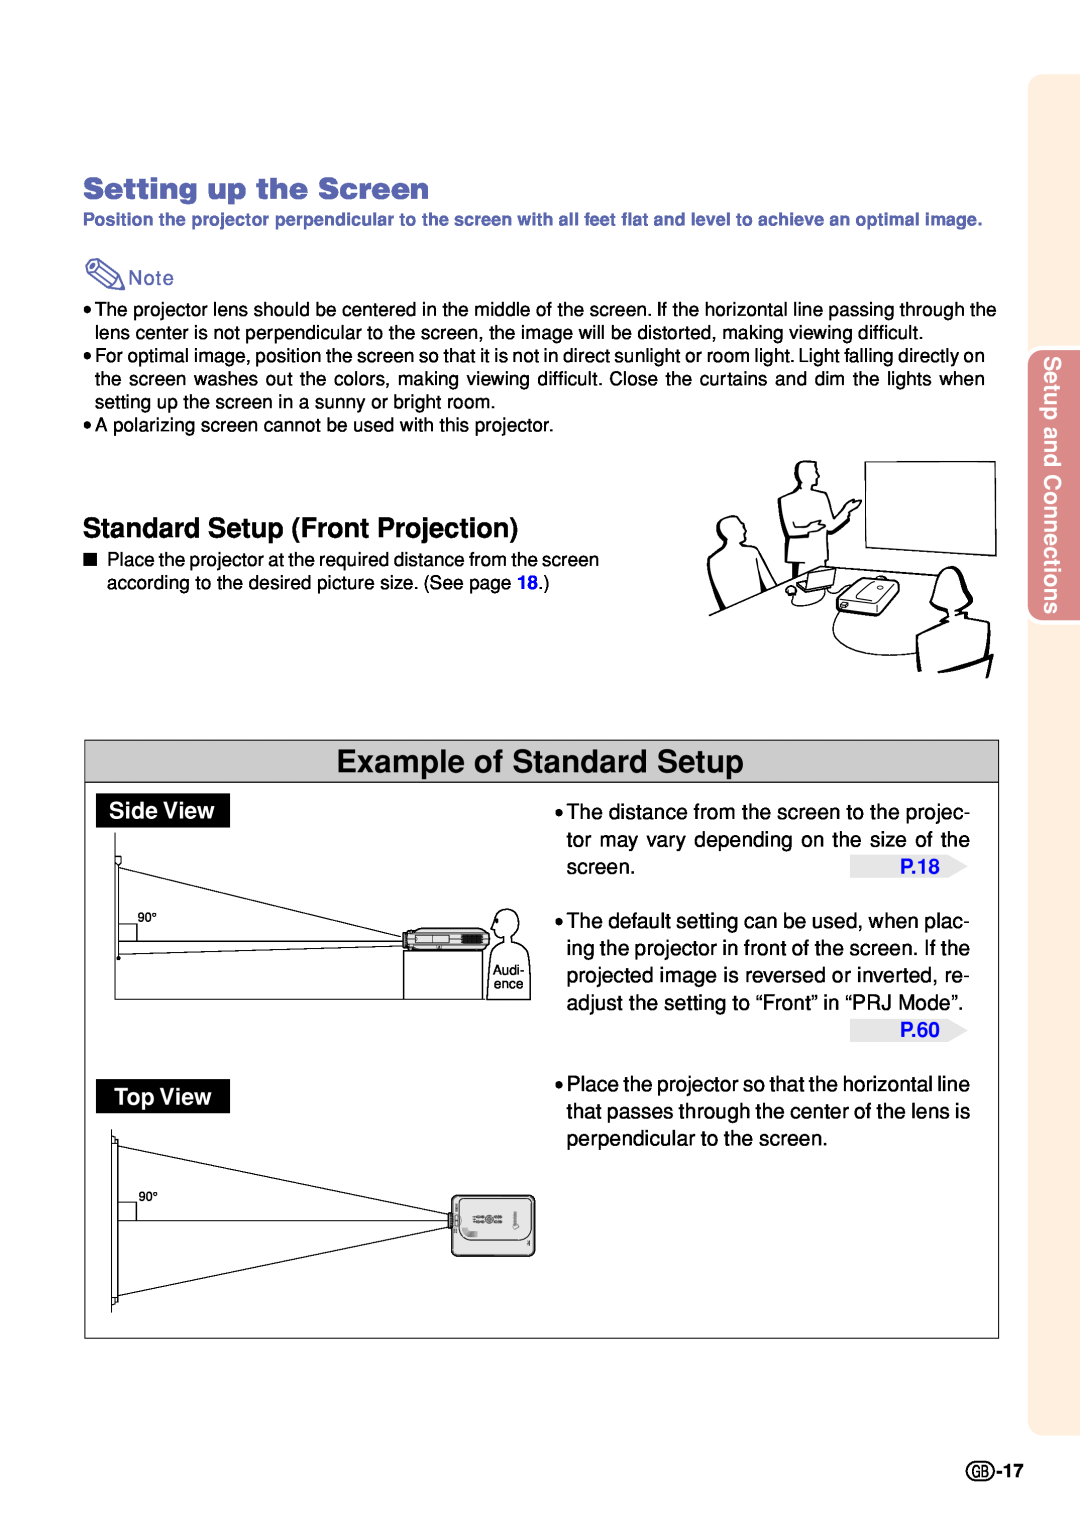
Standard Setup Front Projection
Setting up the Screen
Example of Standard Setup
Side View
Screen Size and Projection Distance
Setup cont
Ceiling-mount setup
Projection using a mirror
Projecting a Reversed/Inverted Image
Projection from behind the screen
Before Connecting
Connecting the Projector to Other Devices
Connecting the Power Cord
This projector can be connected to
Connecting to a Computer Using the DVI to 15-pin D-sub Cable
Connecting the Projector to a Computer
Connecting the thumbscrew cables
Connecting to a Computer Using a DVI Cable Sold Separately
Connecting the Projector to Other Devices cont
“Plug and Play” function when connecting to a 15-pin terminal
1 Connect the projector to the computer using the DVI cable
Connecting to Component Video Equipment
Connecting to Video Equipment
To audio output terminal VCR or other audio-visual equipment
To S-VIDEO output terminal To video output terminal
2 ø3.5mm to RCA cable commercially available
1Composite video cable commercially available
Watching Images on Both the Projector and a Monitor
Connecting to a Monitor
Using the Wireless Pre- sentation Function
Using the Wireless Presentation Function of the Remote Control
1 Connect the projector to the computer using the supplied USB cable
2 Press while using presentation software on your computer
Basic Operation
Basic Operation
Image Projection
Basic Procedure
1 Plug the power cord into the wall outlet
2 Press on the projector or on the remote control
3 Press , or on the re- mote control to select the IN- PUT Mode
INPUT 2 Mode
Selecting the On-screen Display Language
Image Projection cont
5 Press to temporarily turn off the picture and sound
1 Press
1 The focus is adjusted by rotat- ing the focus ring
Adjusting the Lens
2 Zooming is adjusted by mov- ing the zoom knob
3 Press or to select the desired language, and then press 4 Press
Correcting Trapezoidal Distortion
Correcting Trapezoidal Distortion Keystone Correction
2 Press
to ad
UNDO button
projected image upwards
Menu Bar Items
Main menu
Sub menu
Main menu
Basic Operations Adjustments
Using the Menu Screen
3 Press or to select the item you want to adjust
2 Press or to select the menu you want to adjust
4 Press or to adjust the item selected
5 Press
Using the Menu Screen cont
Basic Operations Settings
3 Press or to select the item you want to set
When setting an item, press or
Some adjustment items will display a confirmation message
4 Press
6 Press
Adjusting the Picture
Adjusting Image Preferences
Selecting the Signal Type
Progressive Mode
Adjusting Computer Images
When Auto Sync is OFF
Saving Adjustment Settings
Special Mode Settings
Selecting Adjustment Settings
Checking the Input Signal
Adjustment settings stored in the projector can be easily accessed
Adjusting Computer Images cont
Auto Sync Display Function
Auto Sync Adjustment
Easy to Use Functions
Easy to Use Functions
Selecting the Picture Display Mode
Switching the Picture Display Using Different Input Signals
COMPUTER
“NORMAL” is fixed when SVGA 800 ⋅ 600 signals are entered
VIDEO
DOT BY DOT
Storing an Image in Still Image Format
Displaying a Still Image
Enlarging a Specific Portion of an Image
Displaying an Enlarged Portion of an Image
⋅ 1 ⋅ 2 ⋅ 3 ⋅ 4 ⋅ 9 ⋅ 16 ⋅ 36 ⋅
Adjusting Gamma Correction
Gamma Correction Function
2 Depending on the input mode
Displaying the Inset Picture
Displaying Dual Pictures Pict in Pict
control or on the projector to switch the image in the inset picture
to select
Selecting the Power Save Mode
Setting the Power Save Mode
Automatic Power Shutoff Function
Using Auto Search
Setting the Color Manage- ment Function sRGB
Activating the sRGB Color Management Function
Auto Search Function
Video Digital Noise Reduction DNR System
Setting the On-screen Display
Reducing Image Noise DNR
Turning Off the On-screen Display
Setting the Video System
Setting the Video System
Capturing the Image
Saving Projected Images
Deleting the Captured Image
1 Press or to select “ Save Image” and press
Selecting a Startup Image
Setting a Background Image
Selecting a Background Image
Selecting a Startup Image
Using a RGB Monitor Loop-out Adaptor
Using an RGB Monitor Loop-out Adaptor
Displaying the Lamp Usage Time
Confirming the Lamp Usage Time
Displaying and Setting the Break Timer
Displaying the Break Timer
1 When “” is displayed, press
Timer
Setting up the Keylock
Setting the Projection Mode
Reversing/Inverting Projected Images
Locking the Operation Buttons on the Projector
Canceling the Keylock Setting
Setting up a Password
Entering the Password
3 Enter the password again in “Reconfirm” and press
Changing the Password
Setting up a Password cont
If You Forget Your Password
1 Press , and to enter the password in “Old Pass- word” and press
Entering the Keycode
Setting the Anti-Theft
2 Enter the remaining 3 digits by pressing any buttons you like
3 Enter the same keycode once more in “Reconfirm”
Setting the Anti-Theft cont
Changing the Keycode
3 Enter the same 4-digit keycode in “Reconfirm”
Returning to the Default Settings
Initializing the Settings
Overview of All Menu Setting
Displaying the Adjustment Settings
Appendix
Appendix
Carrying the Projector
How to Use the Carrying Case
1 Open the cover of the carrying case
3 Reinsert the inner padding into the carrying case
Cleaning the projector
Maintenance
Cleaning the lens
Cleaning the exhaust and intake vents
Maintenance Indicators
About the TEMPERATURE WARNING indicator
About the LAMP REPLACEMENT indicator
Lamp
Regarding the Lamp
Caution Concerning the Lamp
Replacing the Lamp
Regarding the Lamp cont
Removing and Install- ing the Lamp Unit
1 Press on the projector to turn off the power
Disconnect the power cord
1 Connect the power cord
Resetting the Lamp Timer
2 Reset the lamp timer
4 Remove the lamp unit
Signal
Connecting Pin Assignments
Pin No
Name
that are not VESA standards
Multiple signal support
Troubleshooting
Power cannot be turned
For SHARP Assistance
Specifications are subject to change without notice
Specifications
Rear View
Dimensions
Side View
Top View
Glossary
Index
SHARP CORPORATION
Top
Page
Image
Contents