U N P A C K I N G A N D I N S T A L L A T I O N I N S T R U C T I O N S

UNPACKING AND EXAMINING YOUR OVEN

Open the bottom of the carton, bend the carton flaps back and tilt the oven over to rest on plasticfoam pad. Lift carton off oven and remove all packing materials, WALL and TOP CABINET TEMPLATE, Turntable, and Turntable Support. SAVE THE CARTON AS IT MAY MAKE INSTALLATION EASIER.

1.Remove the feature sticker from the outside of the door, if there is one.

2.DO NOT REMOVE THE WAVEGUIDE COVER, which is located on the right side wall of the oven cavity. Check to see that there is a WALL TEM- PLATE and TOP CABINET TEMPLATE. Read enclosures and SAVE the Operation Manual.

Hinges

Oven cavity

Waveguide cover

Safety

Door seals

and sealing

door

surfaces

latches


Check the oven for any damage, such as misaligned or bent door, damaged door seals and sealing surfaces, broken or loose door hinges and latches and dents inside the cavity or on the door. If there is any damage, do not operate the oven and contact your dealer or SHARP AUTHORIZED SERVICER. See Installation Instructions for more details.

Please read all instructions thoroughly before installing the Over the Range Microwave Oven/Hood System. Two people are recommended to install this product.

If a new electrical outlet is required, its installation should be completed by a qualified electrician before the Microwave Oven/Hood is installed. See 3 ELECTRICAL GROUNDING INSTRUCTIONS on page 7.

12"


1 MOUNTING SPACE

30"


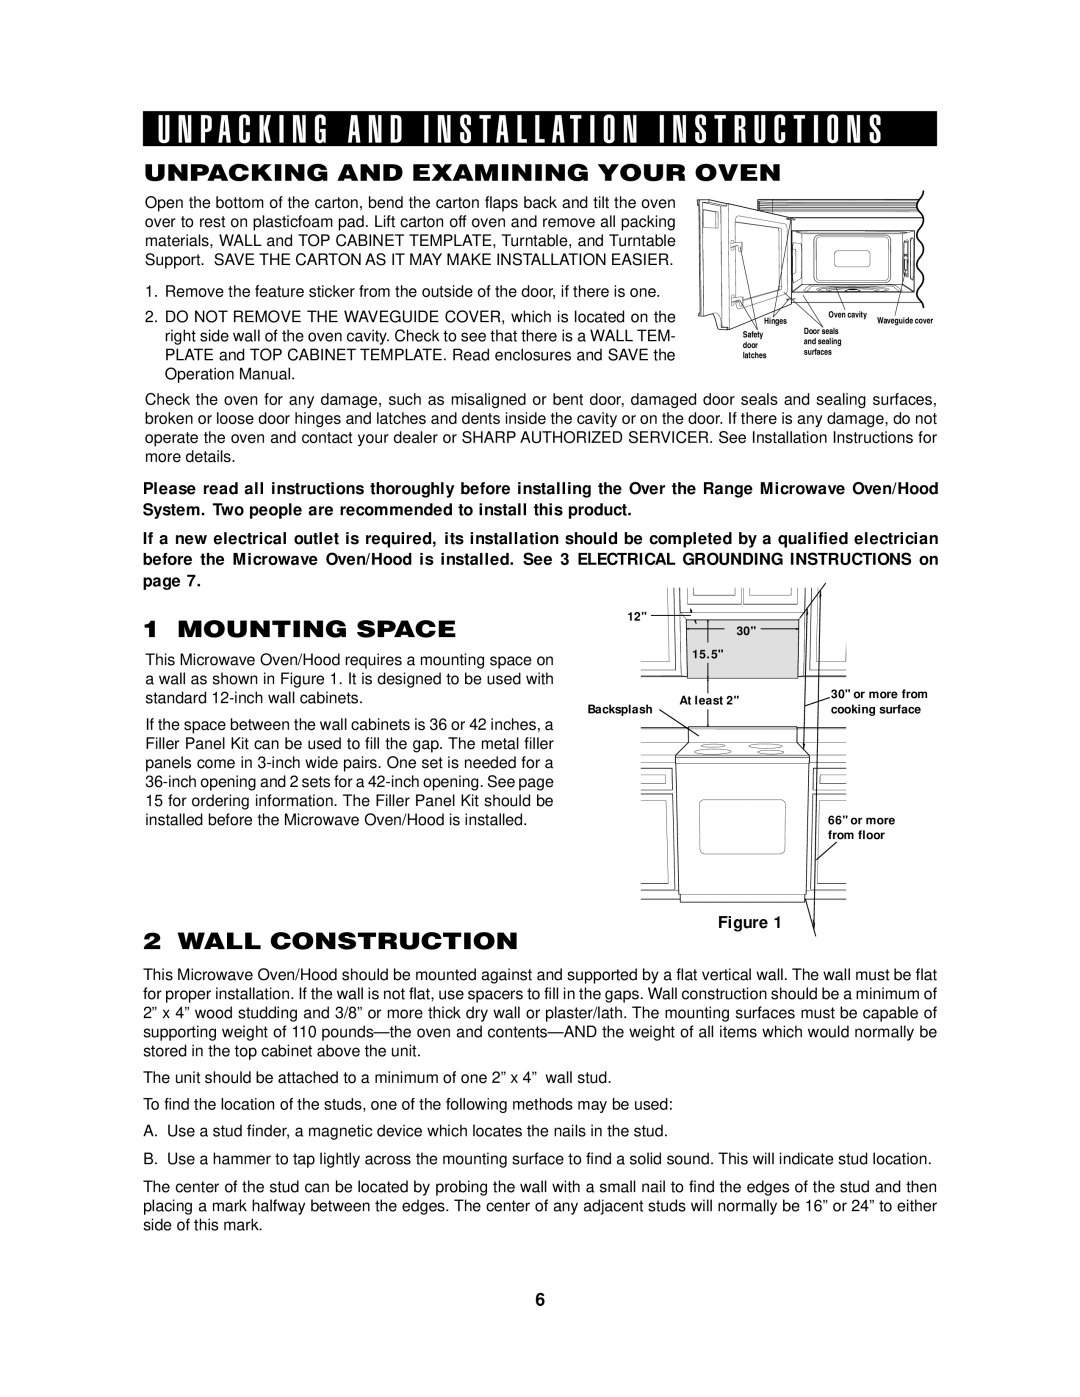
This Microwave Oven/Hood requires a mounting space on

15.5"


a wall as shown in Figure 1. It is designed to be used with


30" or more from

standard 12-inch wall cabinets.

At least 2"

Backsplash


cooking surface

If the space between the wall cabinets is 36 or 42 inches, a


Filler Panel Kit can be used to fill the gap. The metal filler


panels come in 3-inch wide pairs. One set is needed for a


36-inch opening and 2 sets for a 42-inch opening. See page


15 for ordering information. The Filler Panel Kit should be


installed before the Microwave Oven/Hood is installed.


66" or more


from floor

Figure 1

2 WALL CONSTRUCTION

This Microwave Oven/Hood should be mounted against and supported by a flat vertical wall. The wall must be flat for proper installation. If the wall is not flat, use spacers to fill in the gaps. Wall construction should be a minimum of 2” x 4” wood studding and 3/8” or more thick dry wall or plaster/lath. The mounting surfaces must be capable of supporting weight of 110 pounds—the oven and contents—AND the weight of all items which would normally be stored in the top cabinet above the unit.

The unit should be attached to a minimum of one 2” x 4” wall stud.

To find the location of the studs, one of the following methods may be used:

A.Use a stud finder, a magnetic device which locates the nails in the stud.

B.Use a hammer to tap lightly across the mounting surface to find a solid sound. This will indicate stud location.

The center of the stud can be located by probing the wall with a small nail to find the edges of the stud and then placing a mark halfway between the edges. The center of any adjacent studs will normally be 16” or 24” to either side of this mark.

6

Page 6
Image 6
Sharp R-1405, R-1406 manual Unpacking and Examining Your Oven, Mounting Space, Wall Construction

R-1405, R-1406, R-1406 specifications

The Sharp R-1406 and R-1405 are models from a renowned line of microwave ovens that combine style, functionality, and advanced technology to meet modern kitchen needs. Both appliances are designed to deliver convenience and efficiency, making them an essential tool for meal preparation.

Starting with the Sharp R-1406, this model boasts a sleek design that complements any kitchen décor. It features a compact size, which makes it ideal for small spaces while still offering a generous interior capacity. One of the standout characteristics of the R-1406 is its user-friendly control panel, which comes with easily accessible buttons for setting the cooking time and power levels. The microwave utilizes a turntable to ensure even cooking and heating of food, which is a critical feature for achieving perfect results with every dish.

In terms of technology, the R-1406 is equipped with a range of pre-programmed settings that cater to various cooking needs. These presets allow users to quickly reheat leftovers, defrost frozen items, or cook specific dishes without needing to determine the cooking time manually. The appliance employs a powerful magnetron that ensures quick and efficient microwave energy production, resulting in faster cooking times. Additionally, the R-1406 features a user-friendly digital display that makes monitoring cooking progress easy.

The Sharp R-1405, while similar in design, offers its unique set of features tailored to different cooking preferences. This model also prioritizes space-saving design but benefits from enhanced energy efficiency. The R-1405 includes a smart inverter technology that provides a consistent cooking power, allowing for more even heating and defrosting compared to conventional microwave ovens. This is particularly useful when preparing delicate foods, ensuring they are heated consistently without the risk of cooking certain areas too much.

Both models come with safety features such as child locks and automatic shut-off, promoting safe use in households with children. They are built with durable materials designed to withstand the rigors of daily cooking while ensuring easy cleaning. The combination of user-friendly features, innovative technology, and sleek design makes both the Sharp R-1406 and R-1405 excellent choices for anyone looking to enhance their cooking experience with reliable microwave solutions. They exemplify Sharp's commitment to quality and efficiency in home appliances.