Recording the Date and Time
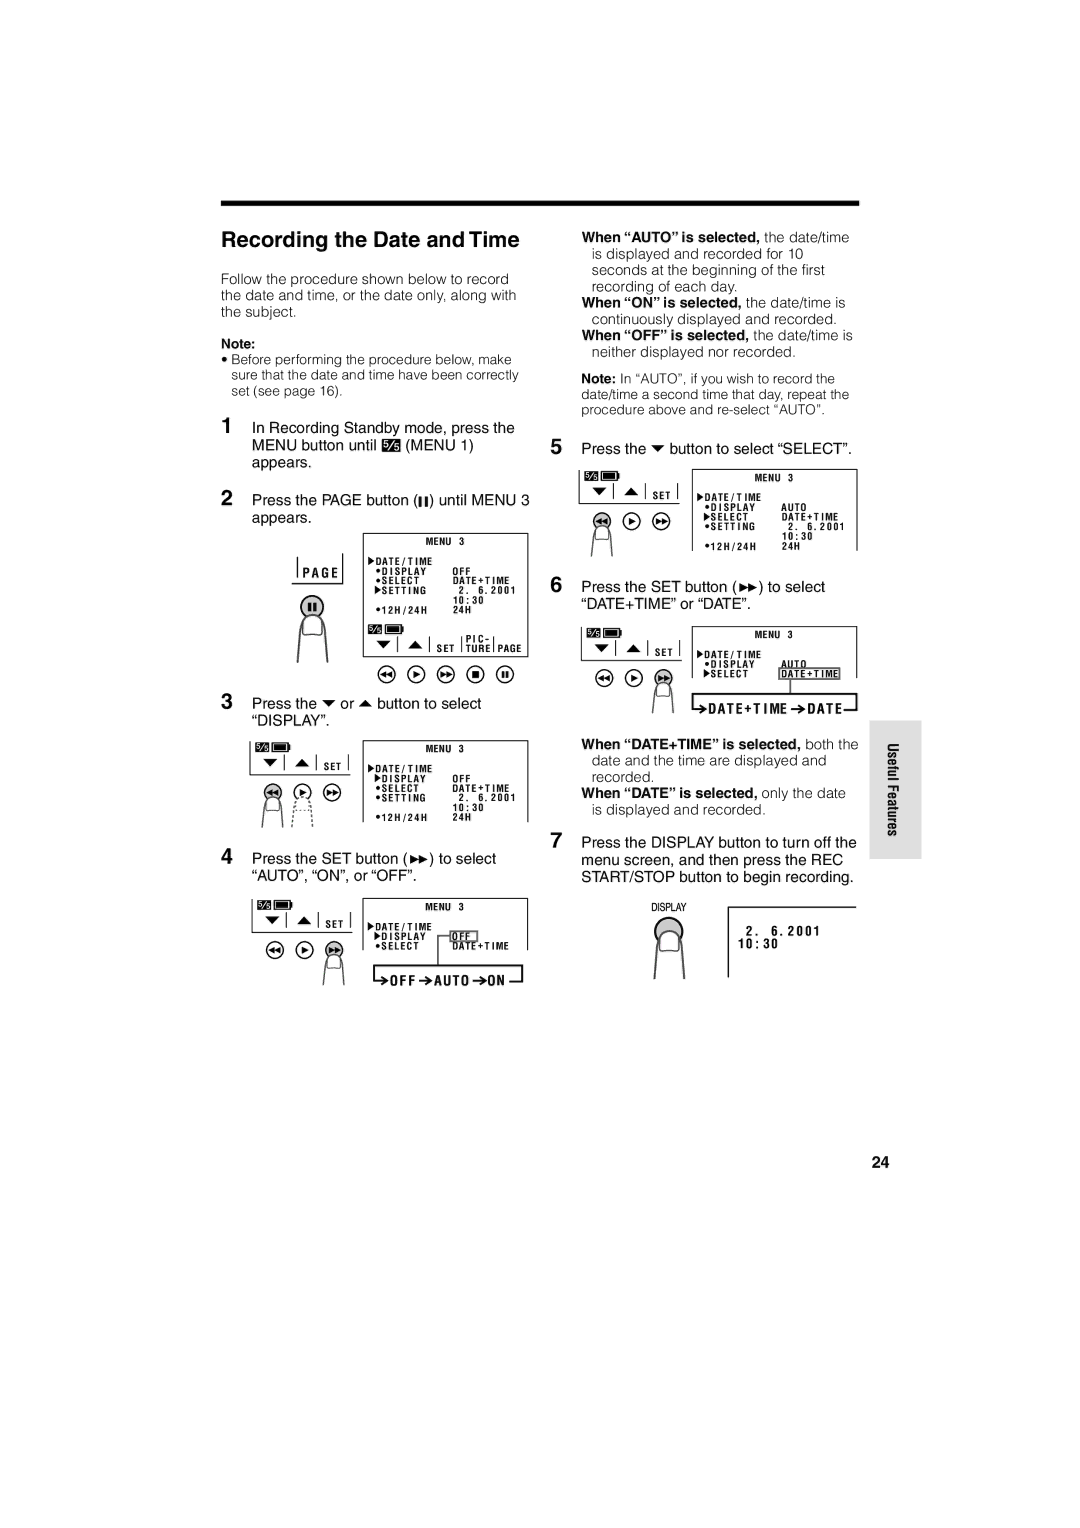
Follow the procedure shown below to record the date and time, or the date only, along with the subject.
Note:
•Before performing the procedure below, make sure that the date and time have been correctly set (see page 16).
1 In Recording Standby mode, press the MENU button until![]() (MENU 1) appears.
(MENU 1) appears.
2 Press the PAGE button (![]()
![]() ) until MENU 3 appears.
) until MENU 3 appears.
|
|
|
| MENU | 3 |
|
|
|
|
| |||
| P A G E |
| DA T E / T I ME |
|
|
|
|
|
|
| |||
|
|
|
|
|
|
|
|
| |||||
|
| D I S P L A Y | O F F | ||||||||||
|
|
| S E L E C T | DA T E + T I ME | |||||||||
|
|
| S E T T I NG | 2 | 6 2 0 0 1 | ||||||||
|
|
|
|
|
|
| 1 0 | 3 0 |
|
| |||
|
|
| 1 2 H / 2 4 H | 2 4 H | |||||||||
|
|
| 5 |
|
|
|
|
| P I C - |
|
| ||
|
|
|
|
|
|
|
|
|
|
| |||
|
|
|
|
|
| S E T |
| TURE |
| PAGE | |||
|
|
|
|
|
|
| |||||||
|
|
|
|
|
|
|
|
|
|
|
|
|
|
|
|
|
|
|
|
|
|
|
|
|
|
|
|
3 Press the or | button to select | |||||||||
| “DISPLAY”. |
|
|
| ||||||
|
|
|
|
|
|
|
|
|
|
|
|
|
|
|
|
|
|
| MENU | 3 |
|
|
|
|
| S E T |
|
| DA T E / T I ME |
|
| |
|
|
|
|
|
| |||||
|
|
|
|
|
|
|
| D I S P L A Y | O F F |
|
|
|
|
|
|
|
|
| S E L E C T | DA T E + T I ME | |
|
|
|
|
|
|
|
| S E T T I NG | 2 | 6 2 0 0 1 |
|
|
|
|
|
|
|
|
| 1 0 | 3 0 |
|
|
|
|
|
|
|
| 1 2 H / 2 4 H | 2 4 H |
|
4 Press the SET button (B) to select “AUTO”, “ON”, or “OFF”.
|
|
|
|
|
|
|
|
| MENU | 3 |
|
|
| |
|
|
| S E T |
|
|
| DA T E / T I ME |
|
|
|
| |||
|
|
|
|
|
|
| ||||||||
|
|
|
|
|
|
|
| D I S P L A Y |
| O F F | + T I ME |
| ||
|
|
|
|
|
|
|
| S E L E C T |
| DA T E |
| |||
|
|
|
|
|
|
|
|
|
|
|
|
|
|
|
|
|
|
|
|
|
|
|
|
|
|
|
|
|
|
When “AUTO” is selected, the date/time is displayed and recorded for 10 seconds at the beginning of the first recording of each day.
When “ON” is selected, the date/time is continuously displayed and recorded.
When “OFF” is selected, the date/time is neither displayed nor recorded.
Note: In “AUTO”, if you wish to record the date/time a second time that day, repeat the procedure above and
5 Press the button to select “SELECT”.
|
|
|
|
|
|
| MENU | 3 |
|
|
|
|
|
| S E T |
|
|
| DA T E / T I ME |
|
|
|
|
|
|
|
|
|
|
| |||||
|
|
|
|
|
|
| D I S P L A Y | AUTO |
|
| |
|
|
|
|
|
|
| S E L E C T | DA T E + T I ME | |||
|
|
|
|
|
|
| S E T T I NG | 2 | 3 | 6 | 2 0 0 1 |
|
|
|
|
|
|
|
| 1 0 | 0 |
| |
|
|
|
|
|
|
| 1 2 H / 2 4 H | 2 4 H |
|
|
|
6 Press the SET button (B) to select “DATE+TIME” or “DATE”.
|
|
|
|
|
|
| MENU | 3 |
| |
|
|
| S E T |
|
| DA T E / T I ME |
|
|
| |
|
|
|
|
|
| |||||
|
|
|
|
|
|
| D I S P L A Y | AUTO |
| |
|
|
|
|
|
|
| S E L E C T | DA T E + T I ME |
| |
|
|
|
|
|
|
|
|
|
|
|
When “DATE+TIME” is selected, both the date and the time are displayed and recorded.
When “DATE” is selected, only the date
is displayed and recorded.
7 Press the DISPLAY button to turn off the menu screen, and then press the REC START/STOP button to begin recording.
2 | 6 | 2 0 0 1 |
1 0 | 3 0 |
|
Useful Features
24
