Operation

1.Turn on the Power switch and set the Manual/Auto switch to Manual.

2.Set the Peak/VU meter to Peak or VU as desired.

3.The 1 kHz internal tone oscillator can be used to help align the following equipment levels (master mixer, amplifier, re- corder, etc.) to the output level of the FP410.The tone oscil- lator is activated by pulling the Master gain control outward. Its level at the FP410 output is set by the Master gain con- trol. After setting equipment levels, turn off the tone oscilla- tor by pushing the Master gain control inward.

4.“Talk” the microphone connected to the FP410 Channel 1 input, and slowly raise the Channel 1 Gain control to the point where the green LED flickers regularly with normal speech, and the red LED only occasionally with louder speech peaks.

5.Set the other FP410 channel gains in the same manner.

6. Set the Flat ( )/Low--Cut () switches adjacent to each Gain control as required. The low--cut position reduces pick- up of low--frequency room noise.

7.Set the Manual/Auto switch to Auto. In about one second, unused microphone inputs will turn off and the level of an in- dividual talker’s voice will rise above the background noise and reverberation to become clearer and more intelligible.

8.Adjust the FP410 Master Gain control for the desired output level, as indicated by the Peak or VU meter, or by the follow- ing equipment.

9.The FP410 is now ready for operation.

USING AN EQUALIZER/FEEDBACK CONTROLLER WITH AN AUTOMATIC MIXER

When setting up a sound system which has an outboard equalizer or feedback controller in the signal chain, set the FP410 to MANUAL. This activates all microphone inputs, so every possible feedback path is open. With the FP410 in MANUAL mode, equalize the sound system and/or “Ring Out” the room to set the feedback controller.

After equalization is complete, set the FP410 to AUTO- MATIC mode. Remember that the input of an automatic mixer drops by 3 dB every time the number activated inputs doubles. When using an FP410 in MANUAL mode, the master output drops by 9 dB when all 8 inputs are activated. Conversely, it will rise by 9 dB when switched back to AUTOMATIC mode.

MODIFIABLE FUNCTIONS

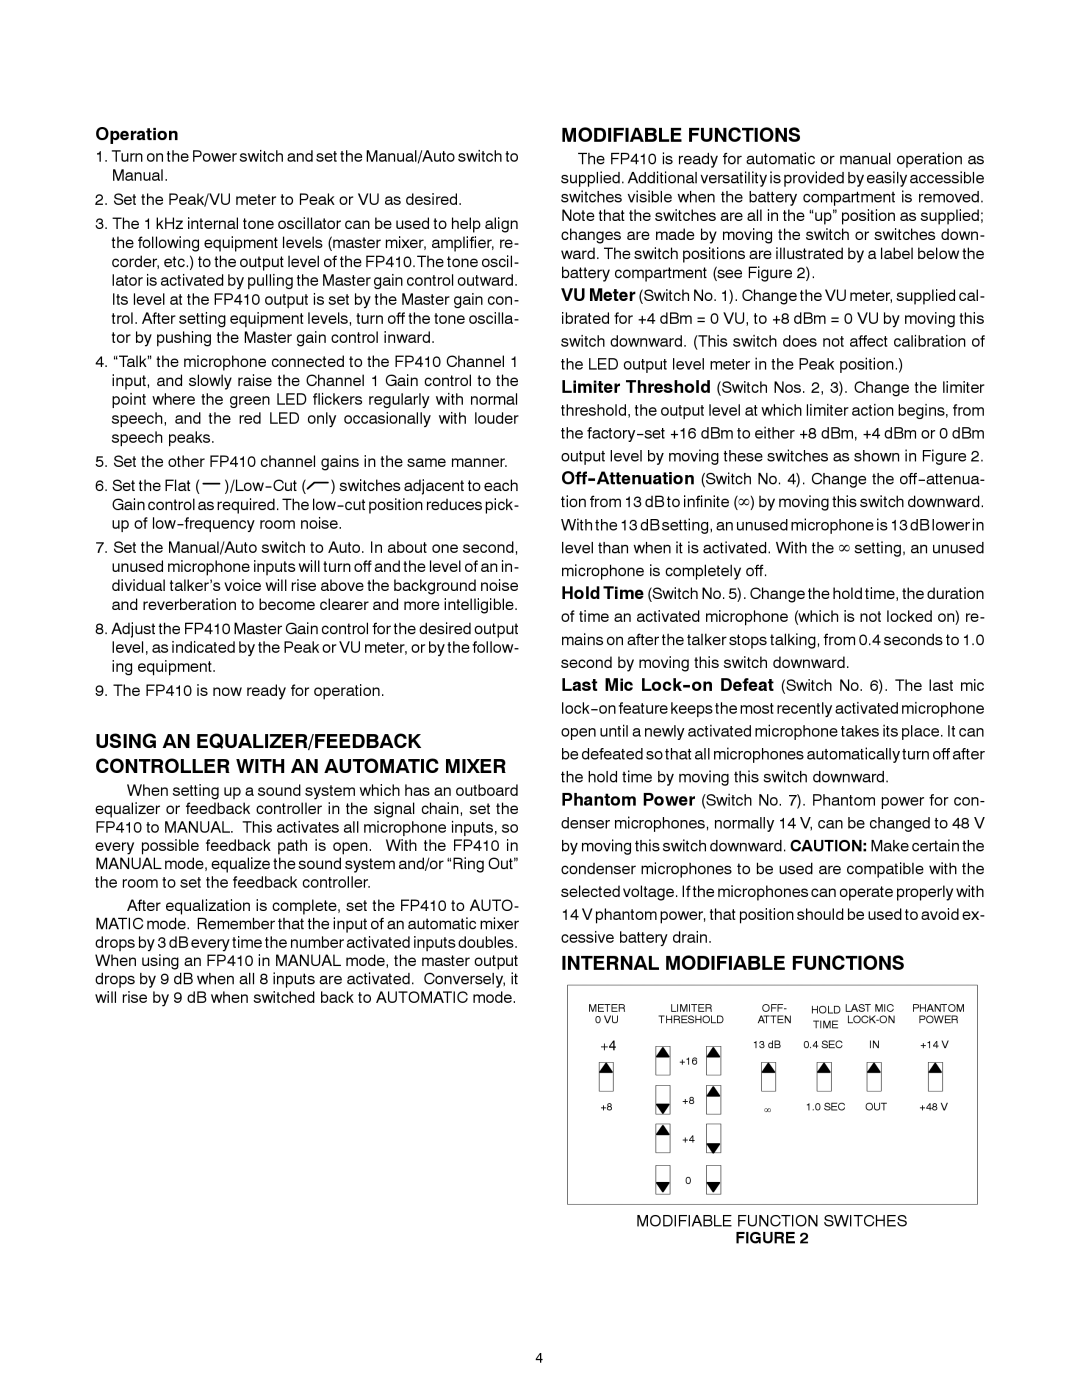
The FP410 is ready for automatic or manual operation as supplied. Additional versatility is provided by easily accessible switches visible when the battery compartment is removed. Note that the switches are all in the “up” position as supplied; changes are made by moving the switch or switches down- ward. The switch positions are illustrated by a label below the battery compartment (see Figure 2).

VU Meter (Switch No. 1). Change the VU meter, supplied cal- ibrated for +4 dBm = 0 VU, to +8 dBm = 0 VU by moving this switch downward. (This switch does not affect calibration of the LED output level meter in the Peak position.)

Limiter Threshold (Switch Nos. 2, 3). Change the limiter threshold, the output level at which limiter action begins, from the factory--set +16 dBm to either +8 dBm, +4 dBm or 0 dBm output level by moving these switches as shown in Figure 2. Off-Attenuation(Switch No. 4). Change the off--attenua- tion from 13 dB to infinite () by moving this switch downward. With the 13 dB setting, an unused microphone is 13 dB lower in level than when it is activated. With the setting, an unused microphone is completely off.

Hold Time (Switch No. 5). Change the hold time, the duration of time an activated microphone (which is not locked on) re- mains on after the talker stops talking, from 0.4 seconds to 1.0 second by moving this switch downward.

Last Mic Lock-on Defeat (Switch No. 6). The last mic lock--on feature keeps the most recently activated microphone open until a newly activated microphone takes its place. It can be defeated so that all microphones automatically turn off after the hold time by moving this switch downward.

Phantom Power (Switch No. 7). Phantom power for con- denser microphones, normally 14 V, can be changed to 48 V by moving this switch downward. CAUTION: Make certain the condenser microphones to be used are compatible with the selected voltage. If the microphones can operate properly with 14 V phantom power, that position should be used to avoid ex- cessive battery drain.

INTERNAL MODIFIABLE FUNCTIONS

METER

LIMITER

OFF-

HOLD LAST MIC

PHANTOM

0 VU

THRESHOLD

ATTEN

TIME

LOCK-ON

POWER

+4


13 dB

0.4 SEC

IN

+14 V


+16


+8

+8

1.0 SEC

OUT

+48 V


+4


0

MODIFIABLE FUNCTION SWITCHES

FIGURE 2

4

Page 4
Image 4
Shure FP410 manual Modifiable Functions

FP410 specifications

The Shure FP410 is a compact, portable dual-channel wireless receiver designed for professional audio applications, particularly in the fields of video production, broadcasting, and live events. It embodies Shure’s commitment to high-quality audio transmission, reliability, and ease of use, making it an ideal choice for audio professionals who demand superior performance in their equipment.

One of the standout features of the FP410 is its dual-channel capability, allowing users to receive audio signals from two separate transmitters simultaneously. This is particularly beneficial in situations where multiple audio sources need to be captured independently, such as interviews or multi-person presentations. The unit operates in the 500 to 600 MHz frequency range, providing a wide selection of channels and minimizing the risk of interference from other wireless devices.

The FP410 is equipped with Shure's advanced digital signal processing technology, enabling it to deliver clear, high-fidelity audio with minimal latency. The unit utilizes a proprietary Automatic Frequency Selection feature, which scans the environment and selects the best available frequency, ensuring a stable and reliable connection. Additionally, it features a frequency diversity mode that provides even further protection against dropouts and interference by simultaneously receiving signals on two separate frequencies.

The design of the FP410 is rugged yet lightweight, making it suitable for both stationary setups and mobile use. It features a large, easy-to-read LCD screen that displays essential information, including battery life, signal strength, and channel selection, allowing users to monitor their setup at a glance. The receiver can be powered via AA batteries or an external power supply, adding flexibility for various field conditions.

Another notable characteristic of the FP410 is its versatility in connectivity options. It includes balanced XLR and unbalanced 1/4-inch output connections, providing compatibility with a range of audio devices, from cameras to mixers. This adaptability makes it a valuable tool for videographers, musicians, and sound engineers alike.

In summary, the Shure FP410 represents an advanced solution for wireless audio transmission. With its dual-channel operation, intelligent frequency selection, robust design, and versatile connectivity, it meets the demands of professional audio applications while ensuring exceptional sound quality and reliability. Whether for location shoots, live broadcasts, or stage performances, the FP410 is engineered to excel in any environment, solidifying Shure’s reputation as a leader in audio technology.