Simplifying The Digital Lifestyle
Page
FlashTrax Tutorial
Advanced Features
Introducing FlashTrax
Appendix
What Can I Do With FlashTrax?
What Is FlashTrax?
Introducing FlashTrax
About This Manual
Unpacking FlashTrax
FlashTrax Controls and Components
Powering FlashTrax
Push until battery clicks into place Press to Remove
Page
Enter Setup Mode
Setting the Date
Power on
FlashTrax Tutorial
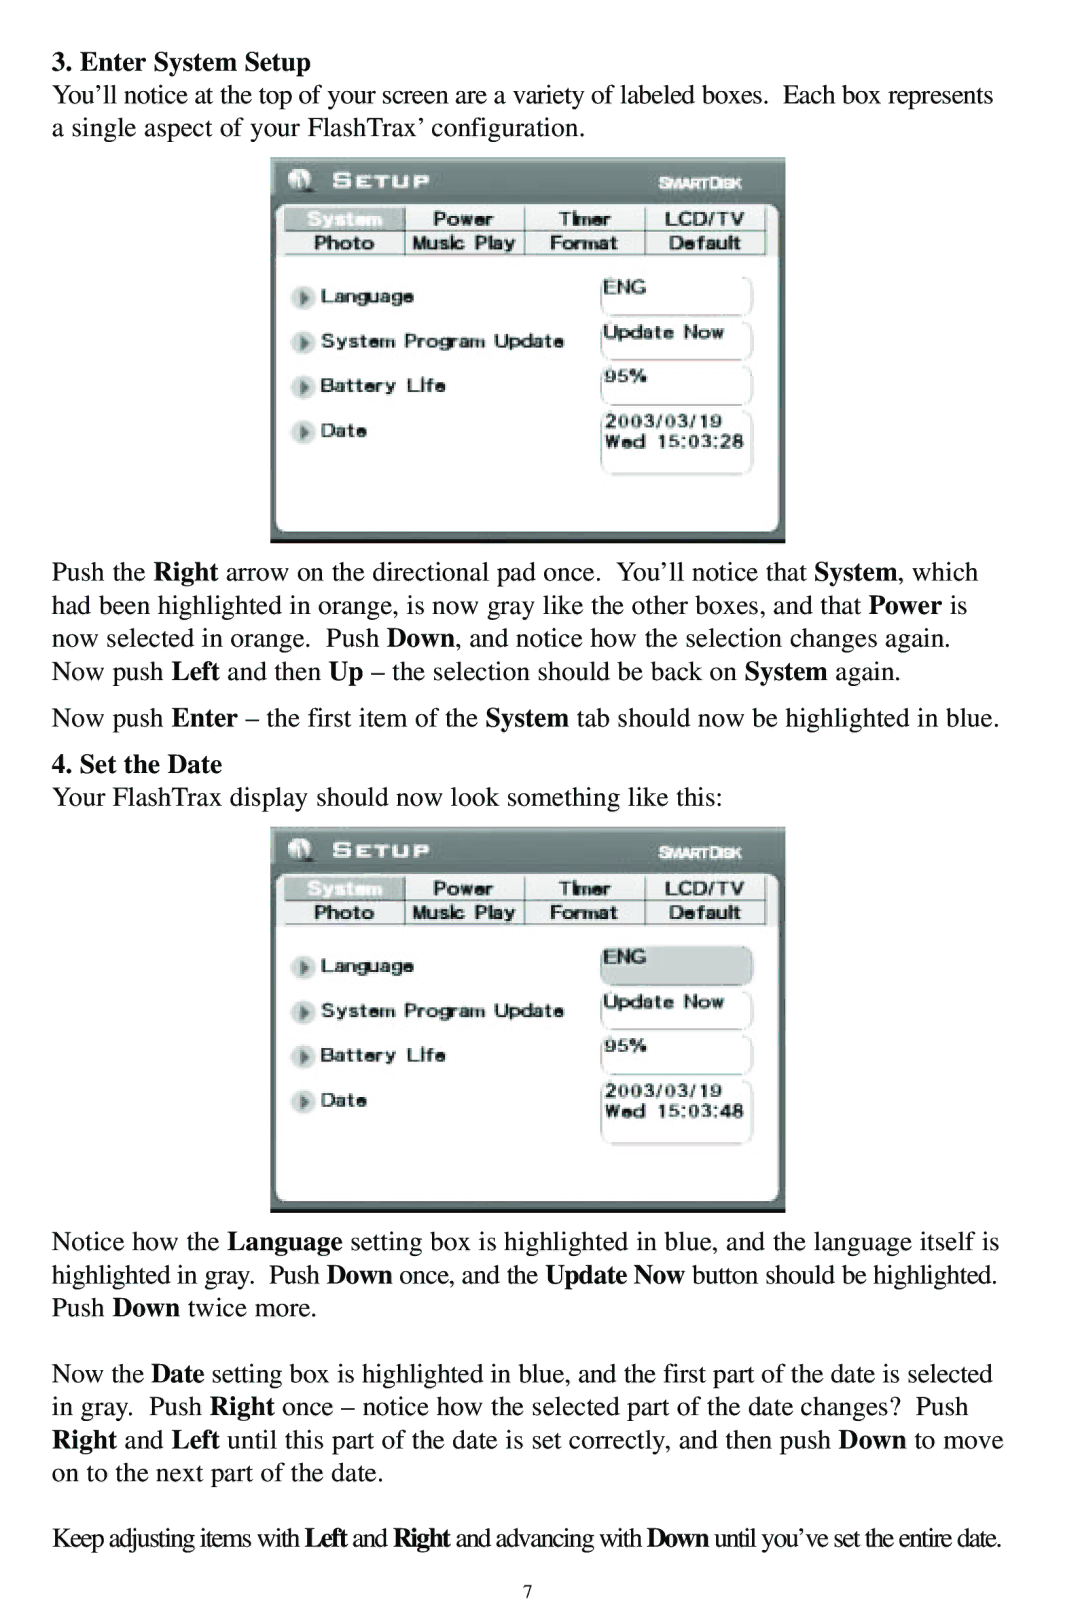
Enter System Setup
Set the Date
Previewing Pictures on Your FlashTrax
Exit Setup
Enter Photo Viewer Mode
Browse to the Tutorial Folder
Playing MP3 Music on Your FlashTrax
Play the Music
Automatically Copying Media To Your FlashTrax
Connect Your FlashTrax
Access the Contents of Your FlashTrax
Downloading Pictures to Your Computer
Disconnect Your FlashTrax
Where to Go From Here
Using the Remote Control
Advanced Features
Connecting to a Computer
Viewing Images on a TV
Windows 98 Second Edition Installation
Automatic Copying Advanced Features
File Explorer Advanced Features
Always Properly Disconnect
File or Directory Rename
Cut, Copy, Paste, and Delete
Quick Delete
Create a New Directory
Where Did These Files Come From?
Photo Viewer Advanced Features
Folder Tree Mode
Viewing Long File Names
Music Player Advanced Features
Viewing Video Files
Advanced Setup
Format Setup
Music Setup
Restoring Default Settings
Specifications
Appendix
System Requirements for PC connectivity
Copyright Statement
FCC Compliance
Fonctions avancées
Présentation de FlashTrax
Didacticiel FlashTrax
Annexe
Quest-ce que FlashTrax?
Présentation de FlashTrax
Que puis-je faire avec FlashTrax?
Déballage de FlashTrax
Commandes et composants FlashTrax
Zoom + / Mode Esc MultiFunction Socket Power
Alimentation de FlashTrax
Avant de commencer
Entrez dans Setup Mode
Didacticiel FlashTrax
Réglage de la date
Réglez la date
Entrez dans System Setup
Flèche vers le bas
Prévisualisation dimage sur votre FlashTrax
Quittez Setup
Entrez dans Photo Viewer Mode
Allez au dossier Tutorial
Pivotez dune image
Affichez les imagettes
Affichez une image
Faites un zoom
Lecture de musique MP3 sur votre FlashTrax
Entrez dans Music Player Mode
Jouez la musique
Prenez quelques photos
Essayez les commandes externes
Copie automatique de support dans FlashTrax
Éteignez votre FlashTrax
Bouton Copy Insérez la carte CompactFlash
Téléchargement dimages dans votre ordinateur
Lancez la copie automatique
Connectez votre FlashTrax
Accédez au contenu de votre FlashTrax
Prochaine étape
Débranchez votre FlashTrax
Affichage dimage sur un téléviseur
Utilisation de la télécommande
Fonctions avancées
Connexion à un ordinateur
File Explorer Fonctions avancées
Installation de Windows 98 deuxième édition
Copie automatique Fonctions avancées
Déconnectez toujours correctement
Renommer un fichier ou un répertoire
Couper, copier, coller et supprimer
Suppression rapide
Création dun nouveau répertoire
Doù viennent ces fichiers?
Info disque
Visualisation de noms de fichier longs
Fichiers ou dossiers cachés courants Système dexploitation
Diaporamas
Photo Viewer Fonctions avancées
Zoom et panoramique avancés
Affichage dimagettes
Music Player Fonctions avancées
Connexion dun casque découte ou de haut-parleurs
Setup avancée
Affichage de fichiers vidéo
Formats pris en charge
Mises à jour logicielles
Restauration des réglages par défaut
Annexe
Spécifications
Poids
Besoin daide?
Enregistrement du produit SmartDisk Termes de la garantie
Exigences système pour connectivité PC
Avis de Copyright
Conformité FCC
Erweiterte Funktionen
Einführung
FlashTrax-Tutorial
Anhang
Was kann man mit FlashTrax alles machen?
Einführung
Was ist FlashTrax?
Zu diesem Handbuch
FlashTrax auspacken
FlashTrax Steuerungselemente und Komponenten
Stromversorgung des FlashTrax
Drücken, bis Akku einrastet Zum Herausnehmen
Bevor Sie beginnen
Setup Mode aufrufen
FlashTrax-Tutorial
Datum einstellen
System Setup aufrufen
Datum einstellen
Bildvorschau am FlashTrax
Setup verlassen
Photo Viewer Mode aufrufen
Suchen Sie den Tutorial Folder
Ein Bild drehen
Thumbnails ansehen
Ein Bild ansehen
Ein Bild heranzoomen
MP3-Musik abspielen
Music Player Mode aufrufen
Musik abspielen
Bilder aufnehmen
Automatisches Kopieren von Medien auf den FlashTrax
Anwendung der externen Steuerungen
Schalten Sie den FlashTrax aus
Copy-Taste CompactFlash -Karte einlegen
Bilder auf den Computer herunterladen
Starten Sie das automatische Kopieren
Anschließen des FlashTrax
Auf die FlashTrax-Inhalte zugreifen
Wie es weiter geht
FlashTrax vom Computer trennen
Anschluss an einen Computer
Erweiterte Funktionen
Bilder am Fernseher ansehen
Verwendung der Fernbedienung
Immer korrekt trennen
Installation bei Windows 98 Second Edition
Automatisches Kopieren Erweiterte Funktionen
Medien löschen
Schnelles Löschen
File Explorer Erweiterte Funktionen
Ausschneiden, Kopieren, Einfügen und Löschen
Datei oder Verzeichnis umbenennen
Anzeige langer Dateinamen
Neues Verzeichnis erstellen
Speicher-Info
Woher kommen diese Dateien?
Zoomen und Schwenken
Photo ViewerErweiterte Funktionen
Übliche versteckte Dateien oder Ordner Betriebssystem
Diashows abspielen
Music Player Erweiterte Funktionen
Erweiterter Setup
Videodateien ansehen
Software-Updates
Language Sprache
Standardeinstellungen wiederherstellen
Anhang
Technische Daten
Systemvoraussetzungen nur bei PC-Konnektivität
Aussage zum Urheberrecht
FCC-Vorschriften
Funzioni avanzate
Introduzione
Esercitazione di FlashTrax
Appendice
Funzioni di FlashTrax
Introduzione
Informazioni su FlashTrax
Informazioni sul manuale
Disimballaggio di FlashTrax
Zoom + Power Mode
Comandi e componenti di FlashTrax
Accensione di FlashTrax
Prima di cominciare
Entrare in Setup Mode
Esercitazione di FlashTrax
Impostazione della data
Entrare in System Setup
Impostare la data
Anteprima della immagini su FlashTrax
Uscire da Setup
Entrare in Photo Viewer Mode
Raggiungere il Tutorial Folder
Riproduzione di musica in formato MP3 su FlashTrax
Riprodurre la musica
Effettuare delle foto
Copia automatica di contenuto multimediale su FlashTrax
Utilizzare i comandi esterni
Spegnere FlashTrax
Collegare FlashTrax
Come trasferire immagini sul computer
Tasto Copy Inserire la scheda CompactFlash
Accedere al contenuto di FlashTrax
Visualizzazione di immagini sulla TV
Funzioni avanzate
Conclusione
Scollegare FlashTrax
Come utilizzare il telecomando
Installazione per sistemi Windows 98 Second Edition
Collegamento al computer
Seguire la procedura appropriata di scollegamento
File Explorer Funzioni avanzate
Cancellazione del contenuto multimediale
Copia automatica Funzioni avanzate
Taglia, Copia, Incolla e Elimina
Creazione di una nuova directory
Eliminazione rapida
Come ridenominare di un file o una directory
Informazioni sul disco
Origine dei file
Photo Viewer Funzioni avanzate
Visualizzazione dei nomi lunghi di file
Zoom e panoramica avanzati
Music Player Funzioni avanzate
Visualizzazione di file video
Setup Avanzata
Aggiornamenti del software
Ripristino delle impostazioni predefinite
Appendice
Specifiche
Requisiti del sistema per la connettività al PC
Dichiarazione sul Copyright
Conformità FCC
Características avanzadas
Presentación de FlashTrax
Tutorial de FlashTrax
Apéndice
¿Qué puedo hacer con FlashTrax?
Presentación de FlashTrax
¿Qué es FlashTrax?
Acerca de este manual
Comprobación del paquete de FlashTrax
Zoom + Mode Esc MultiFunction Socket Power
Controles y componentes de FlashTrax
Cómo alimentar su FlashTrax
Antes de comenzar
Cómo configurar la fecha
Tutorial de FlashTrax
Enciéndalo
Ingrese al Setup Mode
Ingrese a System Setup
Ingrese al Photo Viewer Mode
Configure la fecha
Salga del Setup
Cómo visualizar fotografías previamente en su FlashTrax
Busque la Tutorial Folder
Visualice las miniaturas
Visualice una fotografía
Ingrese al Music Player Mode
Cómo reproducir música MP3 en su FlashTrax
Gire una imagen
Reproduzca la música
Pruebe usar los controles externos
Apague su FlashTrax
Cómo copiar medios a su FlashTrax automáticamente
Tome algunas fotografías
Inicie la copia automática
Acceda al contenido de su FlashTrax
Cómo descargar fotografías en su computadora
Conecte su FlashTrax
Desconecte su FlashTrax
Cómo visualizar imágenes en un televisor
Características avanzadas
Pasos a seguir de aquí en más
Cómo usar el control remoto
Instalación de Windows 98 Segunda Edición
Cómo realizar una conexión con una computadora
Copiado automático Características avanzadas
Siempre desconéctelo correctamente
Cortar, Copiar, Pegar y Eliminar
File Explorer Características avanzadas
Cómo borrar el contenido de los medios
Eliminación rápida
Información sobre el disco
Cambio de nombre de archivos o directorios
Creación de un nuevo directorio
Cómo visualizar nombres de archivo extensos
Archivos o carpetas ocultos comunes Sistema operativo
Photo Viewer Características avanzadas
¿De dónde provienen estos archivos?
Aplicación de zoom y paneo avanzada
Visualización del estado del zoom
Music Player Características avanzadas
Vista en miniatura
Cómo obtener información sobre una imagen
Cómo visualizar archivos de video
Setup avanzada
Actualizaciones de software
Cómo restaurar las configuraciones predeterminadas
Apéndice
Especificaciones
Requisitos del sistema para conectividad con PC
Declaración de Copyright
Conformidad con las disposiciones de la FCC
Geavanceerde functies
FlashTrax Inleiding
FlashTrax-zelfstudieprogramma
Aanhangsel
Wat kan ik met de FlashTrax doen?
FlashTrax Inleiding
Wat is FlashTrax?
Informatie over deze handleiding
De FlashTrax uit de verpakking halen
FlashTrax-knoppen en onderdelen
Stroomvoorziening van de FlashTrax
Video Out Audio Out
Voordat u begint
FlashTrax-zelfstudieprogramma
De datum instellen
Ga naar System Setup
Ga naar Setup Mode
Schakel het apparaat
Verlaat Setup
Stel de datum
Blader naar de map Tutorial
Ga naar Photo Viewer Mode
Voorbeelden van uw afbeeldingen bekijken op de FlashTrax
Bekijk de miniatuurafbeeldingen
Bekijk een afbeelding
Ga naar Music Player Mode
MP3-muziek afspelen op de FlashTrax
Draai een afbeelding
Speel de muziek af
Probeer de externe knoppen uit
Sluit de FlashTrax af
Mediabestanden automatisch kopiëren naar de FlashTrax
Neem een paar fotos
Start het automatisch kopiëren
Sluit de FlashTrax aan
Afbeeldingen naar de computer downloaden
Ga naar de inhoud van de FlashTrax
En hoe nu verder
Geavanceerde functies
Afbeeldingen op de televisie bekijken
Automatisch kopiëren geavanceerde functies
Installatie op een computer met Windows 98 Tweede editie
De FlashTrax aansluiten op de computer
De afstandsbediening gebruiken
Materiaal wissen
File Explorer geavanceerde functies
Knippen, Kopiëren, Plakken en Verwijderen
Een nieuwe map maken
Snel verwijderen
Naam van bestand of map wijzigen
Schijfinfo
Waar komen deze bestanden vandaan?
Photo Viewer geavanceerde functies
Lange bestandsnamen bekijken
Vaakvoorkomende verborgen bestanden of mappen
Weergave in/uitzoomstatus
Diapresentaties afspelen
Weergave Miniatuurafbeeldingen
Informatie verzamelen over een afbeelding
Music Player geavanceerde functies
Geavanceerde Setup
Videobestanden bekijken
Standaardinstellingen herstellen
147
Aanhangsel
Specificaties
Systeemvereisten voor pc-connectiviteit
Copyright-verklaring
Naleving van de FCC-voorschriften
155
Simplifying The Digital Lifestyle