Trinitronâ Color Computer Display
Declaration of Conformity
EN 55022 Compliance Czech Republic Only
Table of Contents
Transportation
Precautions
Installation
Maintenance
Front
Identifying parts and controls
Rear
Connect your monitor to your computer
Setup
Connect the power cord
Turn off the monitor and computer before connecting
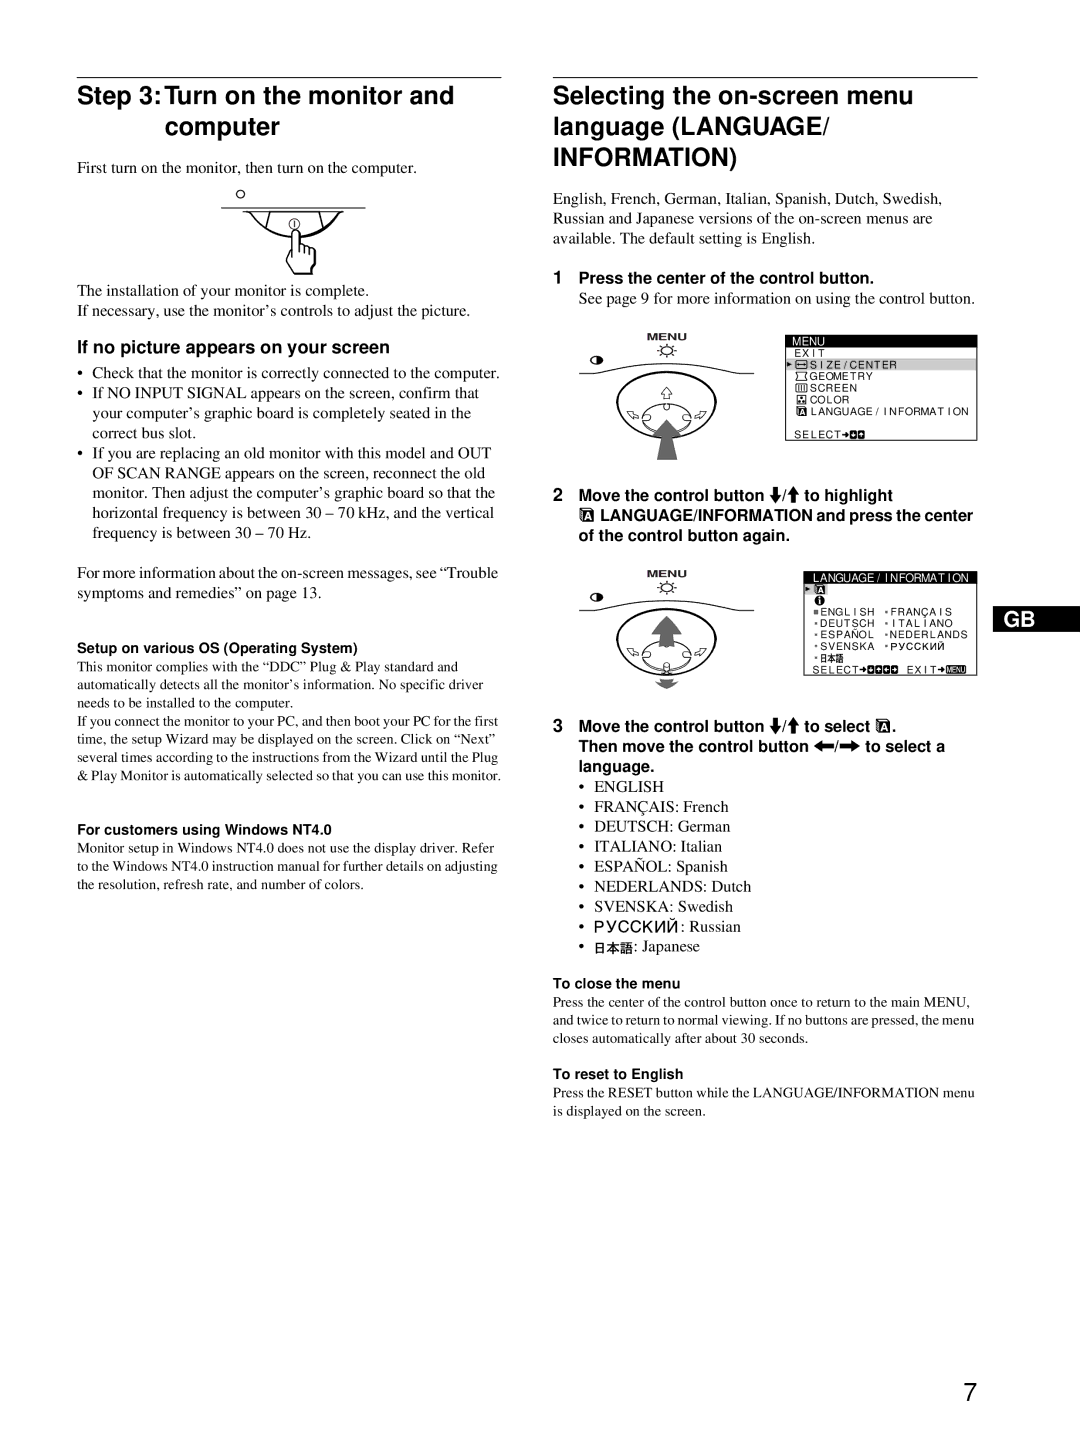
Press the center of the control button
Turn on the monitor and computer
Selecting the on-screen menu language Language
If no picture appears on your screen
Customizing Your Monitor
Displaying the current input signal
Navigating the menu
Using the control button
Adjusting the brightness and contrast
Adjusting the centering Picture Center
Adjusting the size of the picture Size
If necessary, fine tune the color temperature
Adjusting the shape of the picture Geometry
Adjusting the color of the picture Color
Move the control button /, to select a color temperature
Resetting the adjustments
Additional settings Screen
Troubleshooting
Technical Features
Oscillates, or is scrambled
Trouble symptoms and remedies
Symptom Check these items No picture
Picture flickers, bounces
Properly
Symptom Check these items Picture is ghosting
Power is turned on
Picture is not centered or sized
Self-diagnosis function
Specifications
If the ! power indicator is green
If the ! power indicator is flashing orange
Page
Table des Matières
Installation
Utilisation du support pivotant
Précautions
Entretien
Transport
Avant
Identification des composants et des commandes
Arrière
Raccordement à un ordinateur Macintosh ou compatible
Installation
2éme étapeRaccordez le cordon d’alimentation
Raccordement à un PC/AT IBM ou à un ordinateur compatible
English Anglais
Appuyez au centre de la manette de commande
3éme étapeMettez le moniteur et l’ordinateur sous tension
Si aucune image n’apparaît à l’écran
Personnalisation de votre moniteur
Affichage du signal d’entrée en cours
Pilotage par menus
Réglage de la taille de l’image Taille
Utilisation de la manette de commande
Réglage de la luminosité et du contraste
Réglage du centrage de l’image Centrage
Réglage de la forme de l’image
Agrandir ou réduire l’image Zoom
Réglage des couleurs de l’image Couleur
Suppression du moiré
Réglages supplémentaires Ecran
Réinitialisation des réglages
Démagnétisation de l’écran
Fonction d’économie d’énergie
Caractéristiques techniques
Dépannage
Modes présélectionné et utilisateur
Symptôme Vérifiez Pas d’image
Symptômes et remèdes
’image est floue
’image n’est pas centrée ou de
Déplacez la manette de commandem/M pour sélectionner
Symptôme Vérifiez Des images fantômes
Apparaissent
Si l’indicateur ! alimentation clignote en orange
Fonction d’autodiagnostic
Spécifications
Si l’indicateur ! alimentation est allumé en vert
Page
Hinweise
Inhalt
Wartung
Sicherheitsmaßnahmen
Warnhinweis zum Netzanschluß
Aufstellung
Vorderseite
Lage und Funktion der Teile und Bedienelemente
Rückseite
Anschließen an einen Macintosh oder kompatiblen Computer
Anschließen des Geräts
Schritt 2 Anschließen des Netzkabels
Anschließen an einen IBM PC/AT oder Kompatiblen Computer
Deutsch
Schritt 3 Einschalten von Monitor und Computer
Wenn auf dem Bildschirm kein Bild erscheint
Drücken Sie auf die Mitte der Steuertaste
Einstellen des Monitors
Anzeigen des aktuellen Eingangssignals
Navigieren in den Menüs
Die Steuertaste
Einstellen von Helligkeit und Kontrast
Einstellen der Bildposition Bildlage
Einstellen der Bildgröße Grösse
Einstellen der Form des Bildes
Vergrößern oder Verkleinern des Bildes Zoomen
Einstellen der Farbe des Bildes Farbe
Zurücksetzen der Einstellungen
Weitere Einstellungen
Die Energiesparfunktion
Technische Merkmale
Störungsbehebung
Vordefinierte Modi und Benutzermodi
Oszilliert oder ist gestört
Symptome für Fehler und Abhilfemaßnahmen
Symptom Überprüfen Sie bitte folgendes Kein Bild
Das Bild flimmert, springt
Wellenförmige oder elliptische
Das Bild ist nicht zentriert, oder die
Bildgröße ist nicht korrekt
Die Bildränder sind gekrümmt
Wenn die Netzanzeige ! orange blinkt
Technische Daten
Selbstdiagnosefunktion
Wenn die Netzanzeige ! grün leuchtet
Page
Instalación
Índice
Precauciones
Parte frontal
Identificación de los componentes y los controles
Parte posterior
Conexión a un ordenador IBM PC/AT o compatible
Instalación
Paso 1 Conexión del monitor al ordenador
Paso 2 Conexión del cable de alimentación
Pulse el centro del botón de control
Paso 3 Encendido del monitor y del ordenador
Selección del idioma de los menús en pantalla Language
Si las imágenes no aparecen en pantalla
Navegación por el menú
Personalización del monitor
Visualización de la señal de entrada actual
Uso del botón de control
Ajuste del brillo y del contraste
Ajuste del centrado de la imagen Centro
Ajuste del tamaño de la imagen Tamaño
Rotación
Ampliación o reducción de la imagen Zoom
Ajuste de la forma de la imagen
Ajuste del color de la imagen Color
Desmagnetización de la pantalla
Cancelación del muaré
Ajustes adicionales Pantalla
Restauración de los ajustes
Características técnicas
Solución de problemas
Oscila o aparece codificada
Problemas y soluciones
Problema Compruebe lo siguiente Ausencia de imagen
La imagen parpadea, se ondula
Los bordes de la imagen aparecen
Problema Compruebe lo siguiente Aparecen imágenes fantasma
La imagen aparece descentrada o
Con un tamaño incorrecto
Si el indicador ! alimentación parpadea en naranja
Especificaciones
Función de autodiagnóstico
Si el indicador ! alimentación está iluminado en verde
Page
Indice
Installazione
Precauzioni
Fronte Retro
Identificazione dei componenti e dei comandi
Collegamento ad un computer IBM PC/AT o Compatibile
Installazione
Punto 1Collegamento del monitor al computer
Punto 2Collegamento del cavo di alimentazione
Premere il tasto di comando al centro
Punto 3Accensione del monitor e del computer
Selezione della lingua dei menu a schermo Language
Se sullo schermo non appaiono le immagini
Come spostarsi all’interno del menu
Personalizzazione del monitor
Visualizzazione del segnale di ingresso corrente
Utilizzo del tasto di comando
Regolazione della luminosità e del contrasto
Ripristino delle regolazioni
Trapezio
Regolazione del colore dell’immagine Colore
Rotazione
Cuscino
Eliminazione dell’effetto moiré
Impostazioni aggiuntive Schermo
Ripristino delle regolazioni
Smagnetizzazione dello schermo
Funzione di risparmio energetico
Guida alla soluzione dei problemi
Caratteristiche
Modo preimpostato e modo utente
Oscilla oppure è confusa
Sintomi e soluzioni dei problemi
Sintomo Controllare quanto segue Assenza d’immagine
’immagine è tremolante, salta
Bordi dell’immagine sono
Delle dimensioni corrette
Sintomo Controllare quanto segue ’immagine è sdoppiata
’immagine non è centrata o non è
Se l’indicatore di accensione ! alimentazione è verde
Funzione di autodiagnostica
Caratteristiche tecniche
Page
Ñîäåðæàíèå
Ìåðû ïðåäîñòîðîæíîñòè ïðè ïîäêëþ÷åíèè ê ñåòè ýëåêòðîïèòàíèÿ
Ìåðû ïðåäîñòîðîæíîñòè
Ïåðåäíÿÿ ïàíåëü
Èäåíòèôèêàöèÿ äåòàëåé è îðãàíîâ óïðàâëåíèÿ
Øàã 2 Ïîäêëþ÷èòå êàáåëü ïèòàíèÿ
Øàã 1 Ïîäêëþ÷èòå ìîíèòîð ê êîìïüþòåðó
Âûáîð ÿçûêà â ýêðàííîì ìåíþ LANGUAGE/ÈÍÔÎÐÌÀÖÈß
Øàã 3 Âêëþ÷èòå ìîíèòîð è êîìïüþòåð
Ïåðåìåùåíèå ïî ýêðàííîìó ìåíþ
Ïîäñòðîéêà ìîíèòîðà
Ðåãóëèðîâêà öåíòðîâêè èçîáðàæåíèÿ Öåíòð
Ðåãóëèðîâêà ÿðêîñòè è êîíòðàñòíîñòè èçîáðàæåíèÿ
Ðåãóëèðîâêà ðàçìåðà èçîáðàæåíèÿ Ðàçìåð
Ðåãóëèðîâêà ôîðìû èçîáðàæåíèÿ ÃÅÎÌETPÈß
Óâåëè÷åíèå èëè óìåíüøåíèå èçîáðàæåíèÿ Macøtaá
Ðåãóëèðîâêà öâåòà èçîáðàæåíèÿ Öâåò
Cáðîñ íàñòðîåê
Äîïîëíèòåëüíûå íàñòðîéêè Ýkpah
Ýêðàííûå ñîîáùåíèÿ
Ïðåäóñòàíîâëåííûå ðåæèìû è íàñòðîéêà ïîëüçîâàòåëåì
Ôóíêöèÿ ýêîíîìèè ýíåðãèè
Äåìïôåðíûå íèòè
Ñèìïòîì Ïðîâåðüòå ýòè ïîçèöèè Íåò èçîáðàæåíèÿ
Ñèìïòîìû íåïîëàäîê è äåéñòâèÿ ïî èõ óñòðàíåíèþ
Íåïðàâèëüíûå öåíòðîâêà èëè
Если индикатор ! питание горит зеленым
Функция самодиагностики
Page
Innehåll
Installera bildskärmen
Använda vridplattan
Säkerhetsföreskrifter
Varning angående nätanslutning
Underhåll
Framsida
Identifiera delar och reglage
Baksida
Ansluta till en IBM PC/AT-dator eller en Kompatibel dator
Installera bildskärmen
Steg 1 Anslut bildskärmen till datorn
Steg 2 Ansluta nätkabeln
Tryck mitt på kontrollknappen
Steg 3 Slå på bildskärmen och datorn
Välja språk för menyerna på skärmen Language
Om ingen bild visas på skärmen
Anpassa bildskärmen
Visa aktuell insignal
Bläddra i menyerna
Använda kontrollknapparna
Justera ljusstyrka och kontrast
Justera bildens centrering Center
Justera bildens storlek Storl
Justera bildens form Geometri
Förstora eller förminska bilden Zoom
Justera bildens färg Färg
Återställa justeringarna
Ytterligare inställningar Bild
Felsökning
Tekniska egenskaper
Felsökning och åtgärder
Visa bildskärmens namn, serienummer och tillverkningsdatum
Om ! på/av-indikatorn blinkar orange
Tekniska data
Självdiagnosfunktionen
Om ! på/av-indikatorn lyser grön
Page
Opstelling
Inhoud
Onderhoud
Installatie
Voorzorgsmaatregelen
Waarschuwing betreffende voedingsaansluitingen
Achterkant
Voorkant
Aansluiting op een IBM PC/AT Compatibele computer
Opstelling
Stap 1 Sluit uw monitor aan op uw computer
Stap 2 Sluit het netsnoer aan
Druk in het midden van de regeltoets
Stap 3 Zet de monitor en de computer aan
De schermmenutaal kiezen
Indien er geen beeld op het scherm verschijnt
Het menu overlopen
Uw monitor persoonlijk instellen
Het huidige ingangssignaal laten verschijnen
Gebruik van de regeltoets
Helderheid en contrast instellen
De beeldcentrering regelen Centr
De beeldgrootte regelen AFM
Beweeg de regeltoets /, om een kleurtemperatuur te kiezen
Het beeld vergroten of verkleinen Zoom
De beeldvorm regelen
De beeldkleur regelen Kleuren
Moiré-annulering regelen
Bijkomende instellingen Scherm
Instellingen terugstellen
Het scherm demagnetiseren
Storingzoeken
Technische kenmerken
Is gestoord
Storingen en oplossingen
Symptoom Controleer het volgende Geen beeld
Het beeld knippert, springt, golft
Beeldranden gebogen
Symptoom Controleer het volgende Spookbeelden
Beeldcentrering of -grootte niet
Orde
Zelfdiagnosefunctie
Als de ! aan/uit indicator groen oplicht
Als de ! aan/uit indicator oranje knippert
Specificaties
Page
Appendix
Preset mode timing table
TCO’99 Eco-document
Environmental requirements