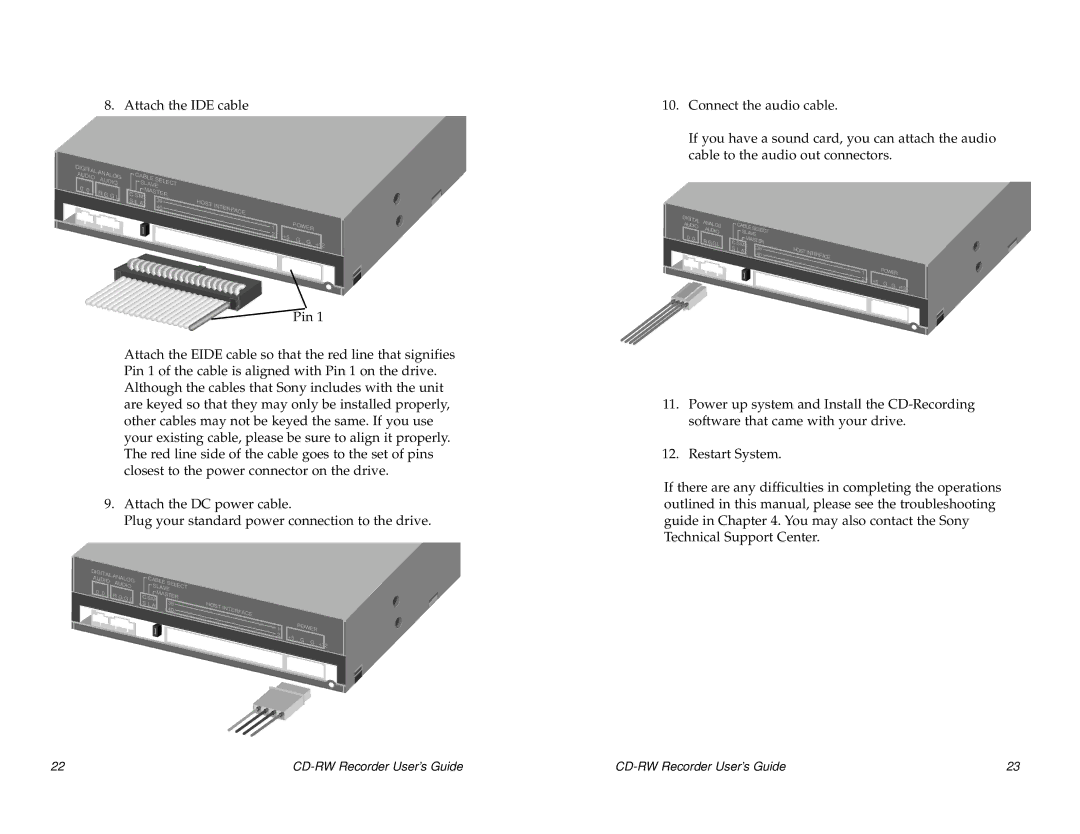
8. Attach the IDE cable

DIGITAL

ANALOG


CABLE


AUDIO


SELECT


AUDIO


0

0


SLAVE


R G

G L

C

S M

MASTER


39


S L A


HOST


40

INTERFACE


1


POWER


2

+5

G

G


+12


Pin 1

Attach the EIDE cable so that the red line that signifies Pin 1 of the cable is aligned with Pin 1 on the drive. Although the cables that Sony includes with the unit are keyed so that they may only be installed properly, other cables may not be keyed the same. If you use your existing cable, please be sure to align it properly. The red line side of the cable goes to the set of pins closest to the power connector on the drive.

9. Attach the DC power cable.

Plug your standard power connection to the drive.

DIGITAL

ANALOG


CABLE


AUDIO


SELECT


AUDIO


0

0


SLAVE


R G

G L

C

S M

MASTER


39


S L A


HOST


40

INTERFACE


1


POWER


2

+5

G

G


+12


10.Connect the audio cable.

If you have a sound card, you can attach the audio cable to the audio out connectors.

DIG

ITAL

AN

ALO


AU


CABLE S


DIO

G


ELECT


AUDIO


S


0 0


LAVE


R G

G L

C

S M

MASTE

R


39

H


S L

A


OST

INTER


40


FACE

1


PO

WER


2

+5

G


G

+12


11.Power up system and Install the CD-Recording software that came with your drive.

12.Restart System.

If there are any difficulties in completing the operations outlined in this manual, please see the troubleshooting guide in Chapter 4. You may also contact the Sony Technical Support Center.

22

CD-RW Recorder User’s Guide

CD-RW Recorder User’s Guide

23

Page 16
Image 16
Sony CRX140E, CRX0811 manual Attach the IDE cable

CRX0811, CRX140E specifications

The Sony CRX140E and CRX0811 are notable optical drives that reflect the precision engineering and technological innovation that Sony has become synonymous with. These drives are tailored for users seeking reliable performance in CD and DVD recording and playback.

The Sony CRX140E is a multi-format CD/DVD writer that supports a variety of disc types. It is capable of writing DVDs at speeds of up to 8x and CDs at speeds reaching 40x, making it a strong contender for users who frequently handle CD and DVD media. One standout feature of the CRX140E is its support for various disc formats including DVD±R, DVD±RW, and CD-R/RW. This versatility makes it an ideal choice for personal and professional users alike.

Meanwhile, the CRX0811 model is designed with efficiency and compactness in mind. Typically found in slim-line laptops, this optical drive showcases Sony's commitment to maximizing performance without sacrificing space. The CRX0811 also supports a range of formats and writes DVDs at impressive rates, catering to the ongoing demand for high-capacity data storage options. Its ability to read both CDs and DVDs further enhances its appeal, making it a handy tool for retrieving data from older formats.

Both models utilize advanced error correction technologies that ensure the integrity of data during the writing processes. This means users can trust that their data is being preserved safely, which is essential for critical backups and archival purposes. The drives are designed for ease of use; they are equipped with plug-and-play capabilities that allow for quick installations and setups.

In terms of design, the CRX140E and CRX0811 feature robust and durable constructions, ensuring longevity in varied usage scenarios. The sleek designs of these drives complement contemporary PCs and laptops, fitting seamlessly into modern setups. The user experience is further enhanced by their low noise operation, which allows for a quieter environment during use.

Overall, the Sony CRX140E and CRX0811 represent a blend of functionality, reliability, and advanced technology. These drives cater to a diverse audience, from casual users needing simple data storage solutions to professionals requiring robust recording capabilities, making them a valuable addition to any tech arsenal.