Trinitron Colour Video TV
Precautions
Safety Information
Colour System of Your Set
About Moisture Condensation
Contents
Checking the supplied accessories
Inserting batteries into the remote control
Preparation
Getting Started
Connecting the Aerial
Connecting an indoor aerial KV- 14V5D, KV-14V6D only
Connecting an outdoor aerial
To connect both VHF and UHF aerials
Before you begin
Tuning in to TV Stations
Selecting the menu language
Presetting channels automatically
To stop automatic channel presetting
For programme positions beyond
If you have made a mistake
Skipping programme positions
Captioning a TV station name
Repeat from the beginning and select on in step
Tuning in to a channel temporarily
Press + ×or Ãuntil r appears in the D position and press OK
Setting up ShowView Manually
Setting the guide channels
T U P G U I D E C H Prog Guide
Setting the Clock
If the clock has stopped and --/-- is displayed
Switching the video TV on and off
Adjusting the volume
Watching the TV
Selecting TV programmes
Effect
Adjusting the picture
Effect of each control
Listening with headphones
Muting the sound
Displaying the on-screen information
Watching line input
Viewing Teletext
To change the Teletext channel
Superimposing a Teletext page on the TV Picture
Accessing the next or preceding
Preventing a Teletext page from being Updated or changed
Adhesive tape Safety tab
Playing a Tape
Inserting a video cassette
Ejecting a video cassette
Resetting the tape counter
Playing a tape
Playing a tape repeatedly Auto
Replaying a scene automatically
Setting the colour system
Displaying the on-screen indications
Amount of tape remaining
Beginning of the tape End of the tape
Viewing programmes in 169 mode
Recording TV Programmes
Recording TV programmes
Recording with the TV off
To stop recording
Recording TV Programmes Using the Timer
Setting the timer
If you have made a mistake during timer setting
Before you begin
If you turn the U switch off
If you try to do an incorrect operation
Daily/weekly recording
Using the video TV before timer recording starts
To stop timer recording
Checking the timer settings
Changing or cancelling the timer settings
To change the setting
To cancel the setting
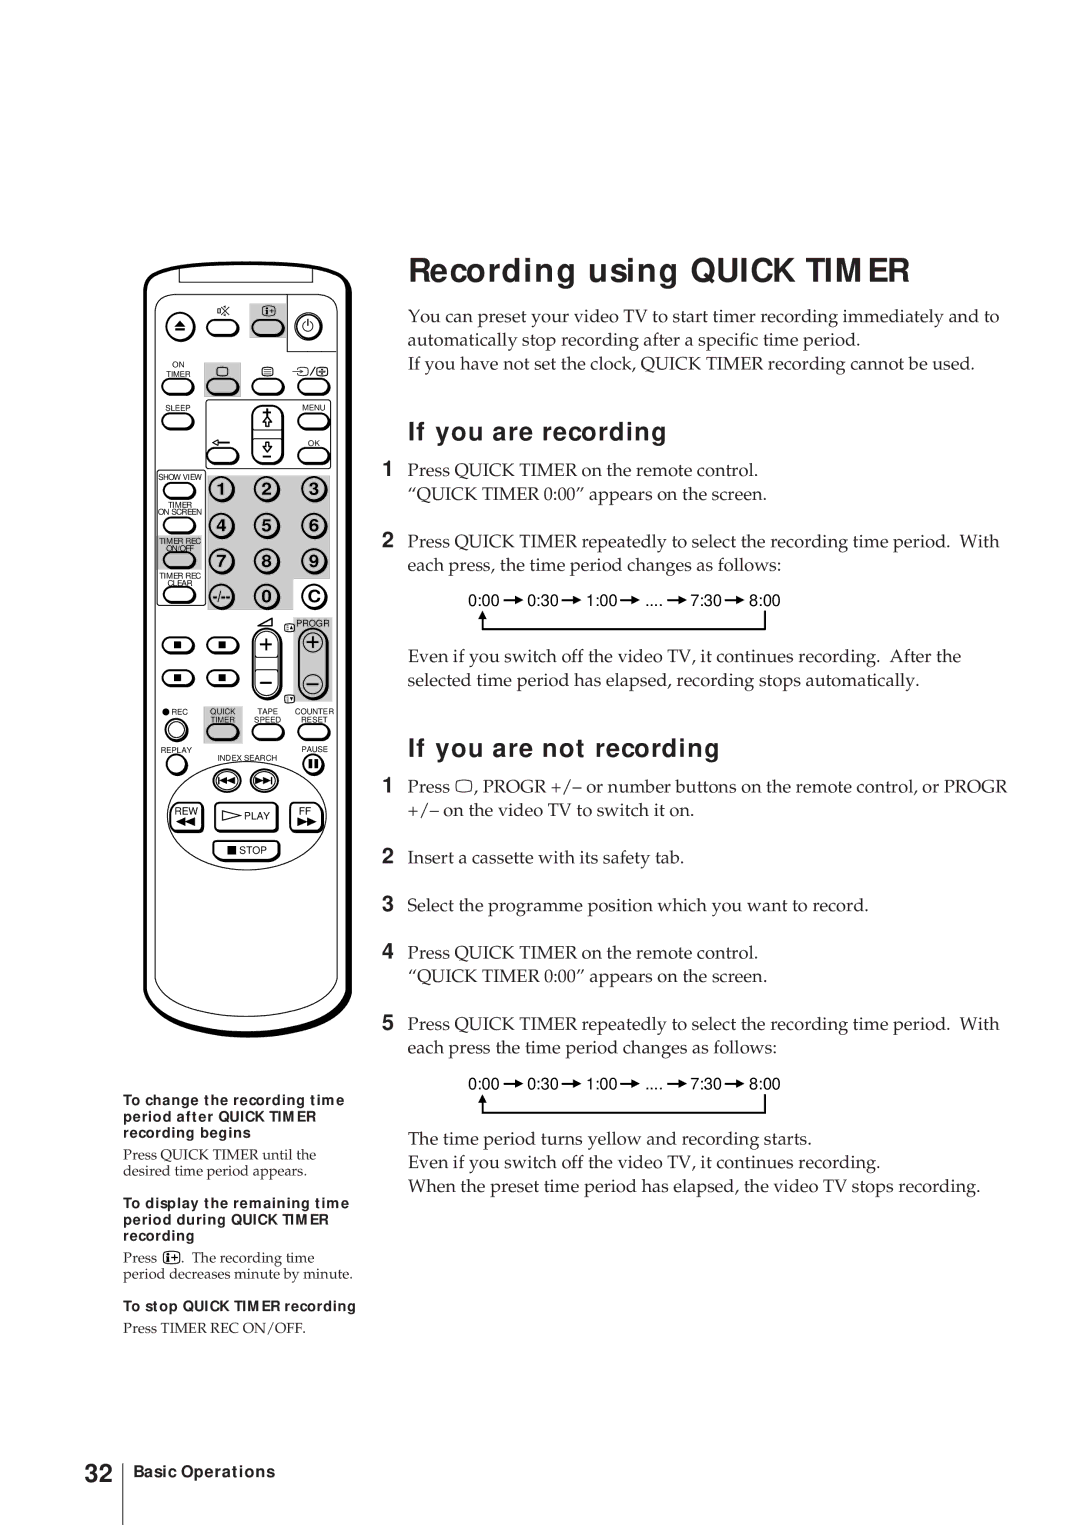
Recording using Quick Timer
To stop Quick Timer recording
If you are recording
If you are not recording
Timer recording with VPS/PDC signals
Using the + ×or Ãbuttons, select ON, then press OK
Recording TV Programmes Using ShowView
To stop recording
Additional Operations
Switching Off Automatically Sleep Timer
To cancel the timer
To erase the message
Using Function Lock
Searching Using the Index Function
To stop searching
To return to automatic tracking
Adjusting with the optimum picture control OPC
About the Auto Head Cleaner
Watching the picture input from optional equipment
Connecting Optional Equipment
To watch the video input signal
Editing with another VCR
Watching the pay-TV channel KV- 14V6D, KV-21V6D only
Editing from another VCR
Editing onto another VCR
Additional Information
Troubleshooting
Function Problems Possible causes and remedies
ON/OFF
Video head cleaning
Symptoms caused by contaminated video heads
Taking Care of Your Video TV
Worn video heads
Specifications
Receivable channels and channel displays
KV-14V5D, KV-14V6D
Index to Parts and Controls
Video TV set-front
Remote control
Menu
Additional Information
Bedienungsanleitung
Vorsicht
Farbsystem
Sicherheitsinformationen
Kondensation
Inhaltsverzeichnis
Erste Schritte
Schritt 1 Vorbereitung
Auspacken
Einlegen der Batterien in die Fernbedienung
Erste Schritte
Schritt 2 Anschluß der Antenne
Anschluß einer Zimmerantenne nur KV-14V5D, KV-14V6D
Anschluß einer Außenantenne
Anschluß einer VHF- und einer UHF-Antenne
Bevor Sie beginnen
Schritt 3 Senderabspeicherung
Auswählen der Menüsprache
Automatisches Abspeichern von Sendern
Beenden der automatischen Senderabspeicherung
Falls Sie einen Fehler gemacht haben
Manuelles Abspeichern von Sendern
Für Programmplätze über
Manuell Abspeichern PRG SYS Name AFT
Individuelle Senderkennung
Wiedereinschalten der automatischen Feinabstimmung AFT
Vorübergehendes Einstellen eines Senders
Hinweis nur KV-14V6D, KV- 21V6D
Angezeigt wird
Vorbereitungen
Schritt 4 Einrichten von ShowView
Einstellen der Leitzahlen
Erste Schritte
Schritt 5 Einstellen der Uhr
Die Uhr steht, und --/-- wird angezeigt
TV-Betrieb
Ein- und Ausschalten des Video-TV- Geräts
Programmwahl
Einstellen der Lautstärke
Anmerkung
Einstellen des Bildes
Möglichkeiten der Bildeinstellung
Abschalten des Tons
Einblenden der Informationsanzeigen auf dem Bildschirm
Anschauen des Videobildes Videoeingangsbetrieb
Anschluß von Kopfhörern
Anzeigen von Videotext
Ein- und Ausschalten von Videotext
Die TOPtext-Funktion
So wechseln Sie den Videotextkanal
Zugreifen auf die nächste oder vorhergehende Seite
Einblenden einer Videotextseite in das Fernsehbild
Wiedergabe einer Videokassette
Einlegen der Videokassette
Herausnehmen einer Videokassette
Schützen einer Kassette vor versehentlichem Löschen
Wiedergabe einer Kassette
Zurückstellen des Bandzählers
Wiederholte Wiedergabe einer Kassette Auto Repeat
Automatisches Wiederholen einer Szene
Einstellen des Farbsystems
Aufrufen der Bildschirmanzeigen
Bandanfang
Aktuelles Datum
Anzeigen von Programmen im 169-Modus
Aufnahme von TV-Programmen
Aufnehmen von TV-Programmen
Aufnahme bei ausgeschaltetem TV- Gerät
Beenden der Aufnahme
Vor Beginn der Programmierung
Aufnahme von TV-Programmen mit dem Timer
Programmieren des Timers
Wenn Sie beim Programmieren die falschen Schritte ausführen
Wenn Sie den Schalter U ausschalten
Täglich/wöchentlich wiederkehrende Aufnahme
Benutzung des Video-TV-Geräts vor der Timer-Aufnahme
Stoppen der Timer-gesteuerten Aufnahme
Überprüfen der Timer- Einstellungen
Ändern oder Löschen von Timer- Einstellungen
Ändern der Einstellung
Löschen der Einstellung
Aufnehmen mit dem Sofort-Timer
Stoppen der Sofort-Timer- Aufnahme
Wenn bereits aufgenommen wird
Wenn noch nicht aufgenommen wird
Nur KV-14V5D, KV-21V5D
Aufnehmen von Fernsehprogrammen mit ShowView
So stoppen Sie die Aufnahme
Weitere Funktionen
Automatische Abschaltfunktion Sleep Timer
Löschen des Timers
Automatische Einschaltfunktion On Timer
Löschen der Meldung
Die Funktion Funktionssperre
Suchen mit der Funktion Index
So beenden Sie die Suche
Umschalten auf automatische Spurlageneinstellung
Einstellen des Bildes mit der OPC- Funktion
Automatische Reinigung der Videoköpfe
Anschluß eines anderen Videorecorders zur Wiedergabe
Wahl des Videoeingangssignals
Anschluß und Betrieb eines anderen Videorecorders
Überspielen mit einem anderen Videorecorder
Anzeigen des Pay-TV-Kanals nur KV-14V6D, KV-21V6D
Überspielen von einem anderen Videorecorder
Überspielen auf einen anderen Videorecorder
Weitere Informationen
Funktion Probleme Mögliche Ursachen und Lösungen
Störungsbehebung
Timer REC on
Durch verschmutzte Videoköpfe hervorgerufene Symptome
Wartung
Reinigung der Videoköpfe
Abgenutzte Videoköpfe
Technische Daten
Empfangbare Kanäle und Kanalanzeigen
Lage und Funktion der Teile und Bedienelemente
Video-TV-Gerät-Vorderseite
Fernbedienung
100
101
Précautions
Système couleur de votre appareil
Consignes de sécurité
En ce qui concerne la condensation d’humidité
Table des matières
103
Vérification des accessoires fournis
Mise en place des piles dans la télécommande
Installation
Etape 1 Préparation
Etape 2 Raccordement de l’antenne
Raccordement à une antenne extérieure
Raccordement aux antennes VHF et UHF
105
Etape 3 Réglage des canaux
Choix de la langue des menus
Avant de commencer
106
Présélection automatique des canaux
107
Pour arrêter la présélection
Automatique des canaux
Présélection manuelle des canaux
108
Pour les numéros de chaînes au delà de
En cas d’erreur
Pour les numéros de programmes au delà de
Saut de numéros de chaîne
109
Attribution d’un nom à une chaîne
110
Pour réactiver le réglage fin automatique AFT
Réglage fin manuel
111
Remarque KV-14V6D, KV- 21V6D uniquement
Syntonisation temporaire d’une chaîne
112
Sélection d’une chaîne codée KV-14V6D, KV-21V6D uniquement
113
114
Etape 4 Réglage manuel du ShowView
Réglage des canaux guide
115
’horloge ne fonctionne plus et --/-- est affiché
Etape 5 Réglage de l’horloge
116
Réglage du volume sonore
Regarder la télévision
Mise en marche et arrêt du Combo
Sélection des chaînes TV
Effet de chaque réglage
Réglage de l’image
118
Arrêt momentané du son
Affichage d’informations à l’écran
Visualisation des images de l’appareil raccordé
Utilisation des écouteurs
Visualisation du télétexte
Activation et désactivation du télétexte
Utilisation de Fasttext
120
121
Accès à la page suivante ou précédente
Incrustation d’une page de télétexte sur l’image télévisée
Lecture d’une cassette vidéo
Introduction d’une cassette vidéo
Ejection d’une cassette vidéo
Protection d’une cassette contre tout effacement accidentel
123
Lecture d’une cassette
Remise à zéro du compteur de bande
124
Lecture répétée d’une cassette
Relecture automatique d’une scène
Sélection du système couleur
125
Visualisation d’émissions en mode 169e
126
Enregistrement de programmes télévisés
Enregistrement de programmes télévisés
Pour arrêter l’enregistrement
Pour interrompre momentanément l’enregistrement
Réglage de la minuterie
128
Avant de commencer
En cas d’erreur pendant le réglage de la minuterie
Si vous déclenchez le commutateur U
129
Si les réglages effectués sont incorrects
130
Enregistrement quotidien/hebdomadaire
Pour arrêter l’enregistrement par minuterie
Vérification des réglages de la minuterie
Modification ou annulation des réglages de la minuterie
131
Pour modifier le réglage
Enregistrement immédiat par minuterie
Si un enregistrement est en cours
Si aucun enregistrement n’est en cours
132
Enregistrement par minuterie avec signaux VPS/PDC
Remarques concernant l’enregistrement VPS/PDC
Enregistrement d’émissions télévisées à l’aide du ShowView
134
135
Pour arrêter l’enregistrement
Arrêt automatique Temporisateur
136
Fonctions complémentaires
Pour désactiver le temporisateur
137
Pour faire disparaître le message
Utilisation de la fonction Blocage Fonctions
138
139
Recherche à l’aide de la fonction
Pour arrêter la recherche
Amélioration de la qualité des images vidéo
Ajustement de l’alignement
Ajustement automatique de l’alignement
Ajustement manuel de l’alignement
141
Optimisation de la qualité d’image fonction OPC
Auto-nettoyeur de tête de lecture
Pour visualiser le signal d’entrée vidéo
Raccordement d’autres appareils
Visualisation d’images à partir d’autres appareils
142
Montage avec un autre magnétoscope
Regarder une chaîne codée KV- 14V6D, KV-21V6D uniquement
Montage à partir d’un autre magnétoscope
Montage sur un autre magnétoscope
Fonction Symptômes Causes possibles et solutions
Guide de dépannage
144
Informations complémentaires
145
OFF
Entretien du Combo
Nettoyage des têtes vidéo
Têtes vidéo usagées
146
147
Caractéristiques techniques
Canaux captables et indications des canaux
148
Liste des éléments/commandes
Combo Panneau avant
Télécommande
149
Informations complémentaires
151
Belangrijk
Kleursysteem
Veiligheid
Over kondensvocht
Inhoud
153
Bijgeleverde accessoires controleren
Stap 1 Voorbereiding
Batterijen in afstandsbediening doen
154
Stap 2 De antenne aansluiten
Een binnenantenne aansluiten alleen KV-14V5D, KV-14V6D
Een buitenantenne aansluiten
VHF- en UHF-antenne aansluiten
Stap 3 Televisiezenders instellen
De menutaal kiezen
Voordat u begint
156
Stoppen met automatisch instellen van voorkeuzezenders
Automatisch kanalen instellen
157
Handmatig kanalen instellen
158
Programmanummers boven
Als u zich vergist hebt
Programmanummers overslaan
159
Naam van een zender vastleggen
160
AFT automatische fijnafstemming opnieuw activeren
Handmatige fijnafstemming
161
Opmerking alleen KV-14V6D, KV-21V6D
Tijdelijk afstemmen op een zender
162
163
164
Stap 4 ShowView handmatig instellen
De guide-kanalen instellen
165
De klok staat stil en --/-- wordt afgebeeld
Stap 5 De klok instellen
166
Geluidsvolume aanpassen
Televisie kijken
Video-TV aan- en uitzetten
Zenders kiezen
Het beeld afstellen
168
Effect van de verschillende beeldinstellingen
Let op
Geluid uitzetten
Informatie op scherm afbeelden
Videobeelden bekijken
Luisteren via hoofdtelefoon
Het Teletekst-kanaal wijzigen
Teletekst kijken
170
171
Toegang tot de volgende of vorige pagina krijgen
Een Teletekst-pagina over het televisiebeeld heen weergeven
Een band afspelen
Een videocassette laden
De videocassette verwijderen
Een cassette beveiligen tegen wissen
173
Een band afspelen
Bandteller op nul zetten
174
Een cassette herhaaldelijk afspelen Herhalen
Een scène automatisch herhalen
175
Het kleursysteem instellen
Scherminformatie afbeelden
Programma’s bekijken in 169 mode
176
Opnemen terwijl de televisie uit staat
Televisieprogramma’s opnemen
Televisieprogramma’s opnemen
Opnemen met de timer
Timer instellen
Als u zich tijdens het instellen van de timer vergist hebt
178
Als u een onjuiste bewerking Probeert uit te voeren
Als u de U schakelaar uitschakelt
Video-TV gebruiken voor timer- opname begint
Opnemen met timer stoppen
Dagelijks of wekelijks opnemen
180
Timer-instelling controleren
Timer-instelling veranderen of opheffen
181
De instelling veranderen
Opnemen met de Quick Timer
Als u aan het opnemen bent
Als u niet aan het opnemen bent
182
Timer-opname met VPS/PDC- signalen
Opmerkingen over opnemen met VPS/PDC
TV-programma’s opnemen met ShowView
184
185
Stoppen met opnemen
De SLEEP-instelling opheffen
Automatisch uitschakelen met SLEEP-timer
186
Het bericht van het scherm verwijderen
Automatisch inschakelen met on Timer
187
Gebruik van Kinderslot
188
189
Zoeken met behulp van de Index functie
Stoppen met zoeken
Handmatig
Terug naar automatische tracking
191
Afstellen met OPC Optimum Picture Control
Automatische koppenreiniger
Extra apparatuur aansluiten
Beeldinvoer van een ander apparaat bekijken
Het video-invoersignaal bekijken
192
Kopiëren met een tweede videorecorder
Abonneetelevisie kijken alleen KV-14V6D, KV-21V6D
Kopiëren vanaf een andere videorecorder
Kopiëren naar een andere videorecorder
Functie Probleem Mogelijke oorzaken en oplossingen
Verhelpen van storingen
194
Timer REC ON/OFF
195
Onderhoud van de video-TV
De videokoppen reinigen
Versleten videokoppen
Controle van de videokoppen na 1000 uur gebruik
197
Technische gegevens
Ontvangbare kanalen en kanaalweergave
198
Onderdelen en bedieningsorganen
Voorzijde van de video-TV
Afstandsbediening
199
Aanvullende informatie
201
Varning
Observera
Innehåll
203
Steg 1 Förberedelser
Kontrollera de medsända tillbehören
Sätta in batterierna i fjärrkontrollen
204
Steg 2 Ansluta antenner
Ansluta en inomhusantenn gäller endast KV-14V5D, KV-14V6D
Ansluta en utomhusantenn
Ansluta både VHF- och UHF-antenner
Steg 3 Ställa in TV-stationer
Välja menyspråk
Innan du börjar
206
Avbryta automatisk förinställning av kanaler
Förinställa kanaler automatiskt
207
Programpositioner efter
Om du gör fel
Komma igång
Namnge en TV-station
210
211
Reaktivera den automatiska fininställningen AFT
Observera gäller endast KV- 14V6D, KV-21V6D
Ställa in en kanal tillfälligt
212
213
Obs
214
Steg 4 Ställa in ShowView manuellt
Ställa in guidekanalerna
215
Klockan har stannat och --/-- visas
Steg 5 Ställa klockan
216
Se på TV
Sätta på och stänga av TV/videon
Välja TV-program
Justera volymen
Kontrollernas effekt
Justera bilden
218
Dämpa ljudet
Visa information på skärmen
Se på videokanalen
Lyssna med hörlurar
Visa Text-TV
Sätta på och stänga text-TV
Använda Snabbtext
220
Visa nästa eller föregående sida
Visa en text-TV-sida på TV-bilden
Hindra att en text-TV-sida uppdateras eller ändras
221
Spela upp ett band
Sätta in en videokassett
Ta ut en videokassett
Skydda en kassett mot oavsiktlig radering
223
Spela upp ett band
Nollställa räkneverket
224
Spela upp ett band upprepade gånger Auto Repeat
Spela om ett avsnitt automatiskt
Ställa in färgsystemet
225
Återstående bandlängd Början på bandet
Bandfunktionsläge
Se på program i 169-läge
226
Spela in TV-program med TVn avstängd
Spela in TV-program
Spela in TV-program
Spela in TV-program med hjälp av timern
Ställa in timern
228
Innan du börjar
Om U-omkopplaren är frånslagen
229
Om du försöker göra felaktiga inställningar
Använda TV/videon innan timer- inspelningen börjar
Avsluta timer-inspelning
Daglig inspelning och veckoinspelning
230
231
Kontrollera timer-inställningen
Ändra eller återta timer-inställning
232
Spela in med Quick Timer
Om du spelar
Angående VPS/PDC-inspelning
Timer-inspelning med VPS/PDC- signaler
233
Spela in TV-program med ShowView
234
235
Avbryta inspelningen
Stänga av timern
Stänga av automatiskt insomningsfunktion
236
Ytterligare funktioner
Ta bort meddelandet
Sätta på TV/videon vid önskad tid Med timer
237
Använda Function Lock
238
239
Söka med hjälp av indexfunktionen
Avbryta sökningen
Förbättra videobildens kvalitet
Justera inställningen
Justera inställningen automatiskt
Justera inställningen manuellt
241
Justera med optimal bildkontroll OPC
Automatisk rengöring av videohuvudena
Se videoingångssignalen
Ansluta extrautrustning
Se bilder från inkopplad extrautrustning
242
Redigering med annan videobandspelare
Se på betal-TV-kanalen gäller endast KV-14V6D, KV-21V6D
Redigering från annan videobandspelare
Redigera till en annan videobandspelare
Funktion Problem Tänkbara orsaker och åtgärder
Felsökning
244
Ytterligare information
245
Skötsel av TV/videon
Rengöra videohuvudena
Slitna videohuvuden
Kontrollera videohuvudena efter 1000 timmars användning
247
Tekniska data
Kanaler och positioner
248
Förteckning över delar och kontroller
TV/videons frontpanel
Fjärrkontroll
249
Ytterligare information
Ytterligare information
Sony Corporation