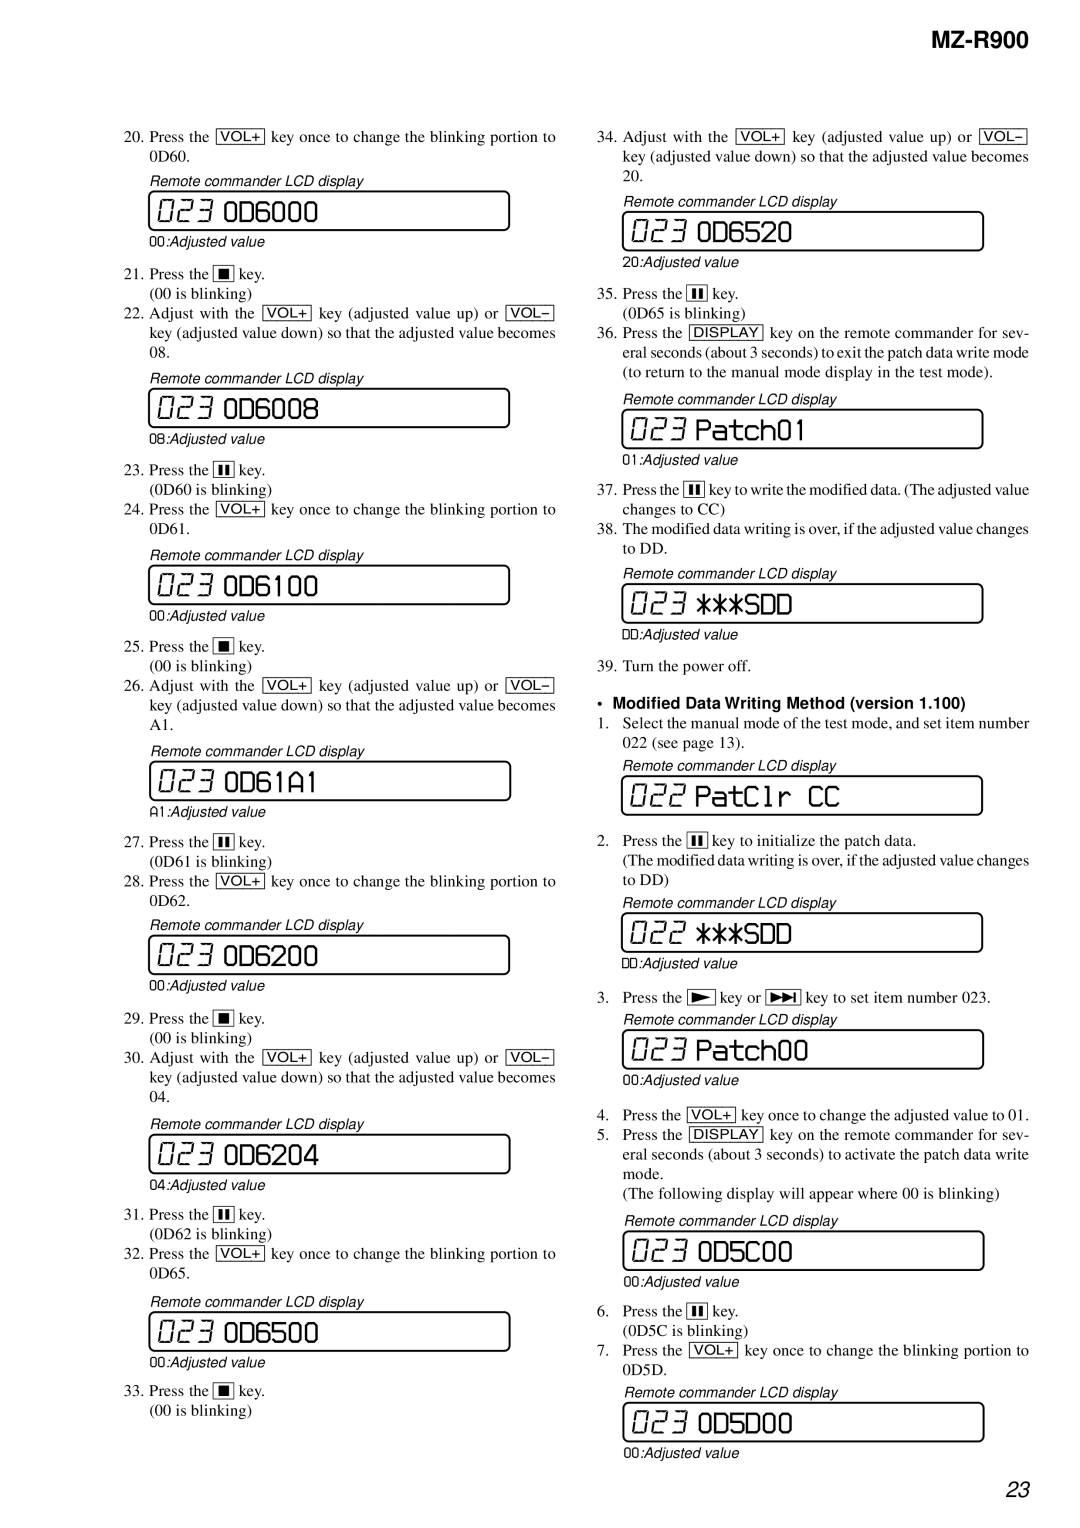
20.Press the [VOL+] key once to change the blinking portion to 0D60.
Remote commander LCD display
0230D6000
00:Adjusted value
21.Press the x key.
(00 is blinking)
22.Adjust with the [VOL+] key (adjusted value up) or
Remote commander LCD display
0230D6008
08:Adjusted value
23.Press the X key.
(0D60 is blinking)
24.Press the [VOL+] key once to change the blinking portion to 0D61.
Remote commander LCD display
0230D6100
00:Adjusted value
25.Press the x key.
(00 is blinking)
26.Adjust with the [VOL+] key (adjusted value up) or
Remote commander LCD display
0230D61A1
A1:Adjusted value
27.Press the X key.
(0D61 is blinking)
28.Press the [VOL+] key once to change the blinking portion to 0D62.
Remote commander LCD display
0230D6200
00:Adjusted value
29.Press the x key.
(00 is blinking)
30.Adjust with the [VOL+] key (adjusted value up) or
Remote commander LCD display
0230D6204
04:Adjusted value
31.Press the X key.
(0D62 is blinking)
32.Press the [VOL+] key once to change the blinking portion to 0D65.
Remote commander LCD display
0230D6500
00:Adjusted value
33.Press the x key. (00 is blinking)
MZ-R900
34.Adjust with the [VOL+] key (adjusted value up) or
Remote commander LCD display
0230D6520
20:Adjusted value
35.Press the X key.
(0D65 is blinking)
36.Press the [DISPLAY] key on the remote commander for sev- eral seconds (about 3 seconds) to exit the patch data write mode (to return to the manual mode display in the test mode).
Remote commander LCD display
023Patch01
01:Adjusted value
37.Press the X key to write the modified data. (The adjusted value changes to CC)
38.The modified data writing is over, if the adjusted value changes to DD.
Remote commander LCD display
023***SDD
DD:Adjusted value
39. Turn the power off.
• Modified Data Writing Method (version 1.100)
1.Select the manual mode of the test mode, and set item number 022 (see page 13).
Remote commander LCD display
022 PatClr CC
2.Press the X key to initialize the patch data.
(The modified data writing is over, if the adjusted value changes to DD)
Remote commander LCD display
022***SDD
DD:Adjusted value
3.Press the N key or > key to set item number 023.
Remote commander LCD display
023Patch00
00:Adjusted value
4.Press the [VOL+] key once to change the adjusted value to 01.
5.Press the [DISPLAY] key on the remote commander for sev- eral seconds (about 3 seconds) to activate the patch data write mode.
(The following display will appear where 00 is blinking)
Remote commander LCD display
0230D5C00
00:Adjusted value
6.Press the X key. (0D5C is blinking)
7.Press the [VOL+] key once to change the blinking portion to 0D5D.
Remote commander LCD display
0230D5D00
00:Adjusted value
23
