SY-KT600 DRAGON Plus Quick Start Guide
USB20_3 / USB20_4
Pin1 | Pin2 |
|
| Pin3 |
| Pin4 |
| Pin6 |
| Pin7 |
| Pin8 | Pin9 | Pin10 | |||
VCC |
| Data(+) |
| GND |
| VCC |
|
| Data(+) | GND | GND | ||||||
|
|
|
|
|
|
|
|
|
|
|
|
|
|
|
|
| |
|
|
|
|
|
|
|
|
| 1394: FW1 |
|
|
|
|
|
| ||
Pin1 |
| Pin2 |
| Pin3 |
| Pin4 |
| Pin5 | Pin6 |
| Pin7 |
| Pin8 | Pin9 | Pin10 | ||
A0PC |
| GND |
| B0PC |
| NC |
| PWR0 | A0MC |
| CGND |
| B0MC | PWR0 | CGND | ||
|
|
|
|
|
|
|
|
|
|
|
|
|
|
|
| ||
|
|
|
|
|
|
|
|
| 1394: FW2 |
|
|
|
|
|
| ||
Pin1 |
| Pin2 |
| Pin3 |
| Pin4 |
| Pin5 | Pin6 |
| Pin7 |
| Pin8 | Pin9 | Pin10 | ||
A1PC |
| GND |
| B1PC |
| NC |
| PWR1 | A1MC |
| CGND |
| B1MC | PWR1 | CGND | ||
Hardware Installation
CPU Cooling Fan: CPUFAN1
Pin1 |
| Pin2 |
| Pin3 |
GND |
| 12V |
| SENSOR |
|
|
| ||
| Chassis Fan: CHAFAN1 |
| ||
Pin1 |
| Pin2 |
| Pin3 |
GND |
| 12V |
| SENSOR |
|
|
|
|
|
CPU Cooling Fan: CPUFAN2
Pin1 |
| Pin2 |
| Pin3 |
GND |
| 12V |
| NC |
|
|
| ||
| Chassis Fan: CHAFAN2 |
| ||
Pin1 |
| Pin2 |
| Pin3 |
GND |
| 12V |
| NC |
|
|
|
|
|
| CD |
|
| Pin1 | Pin2 | Pin3 | Pin4 | ||
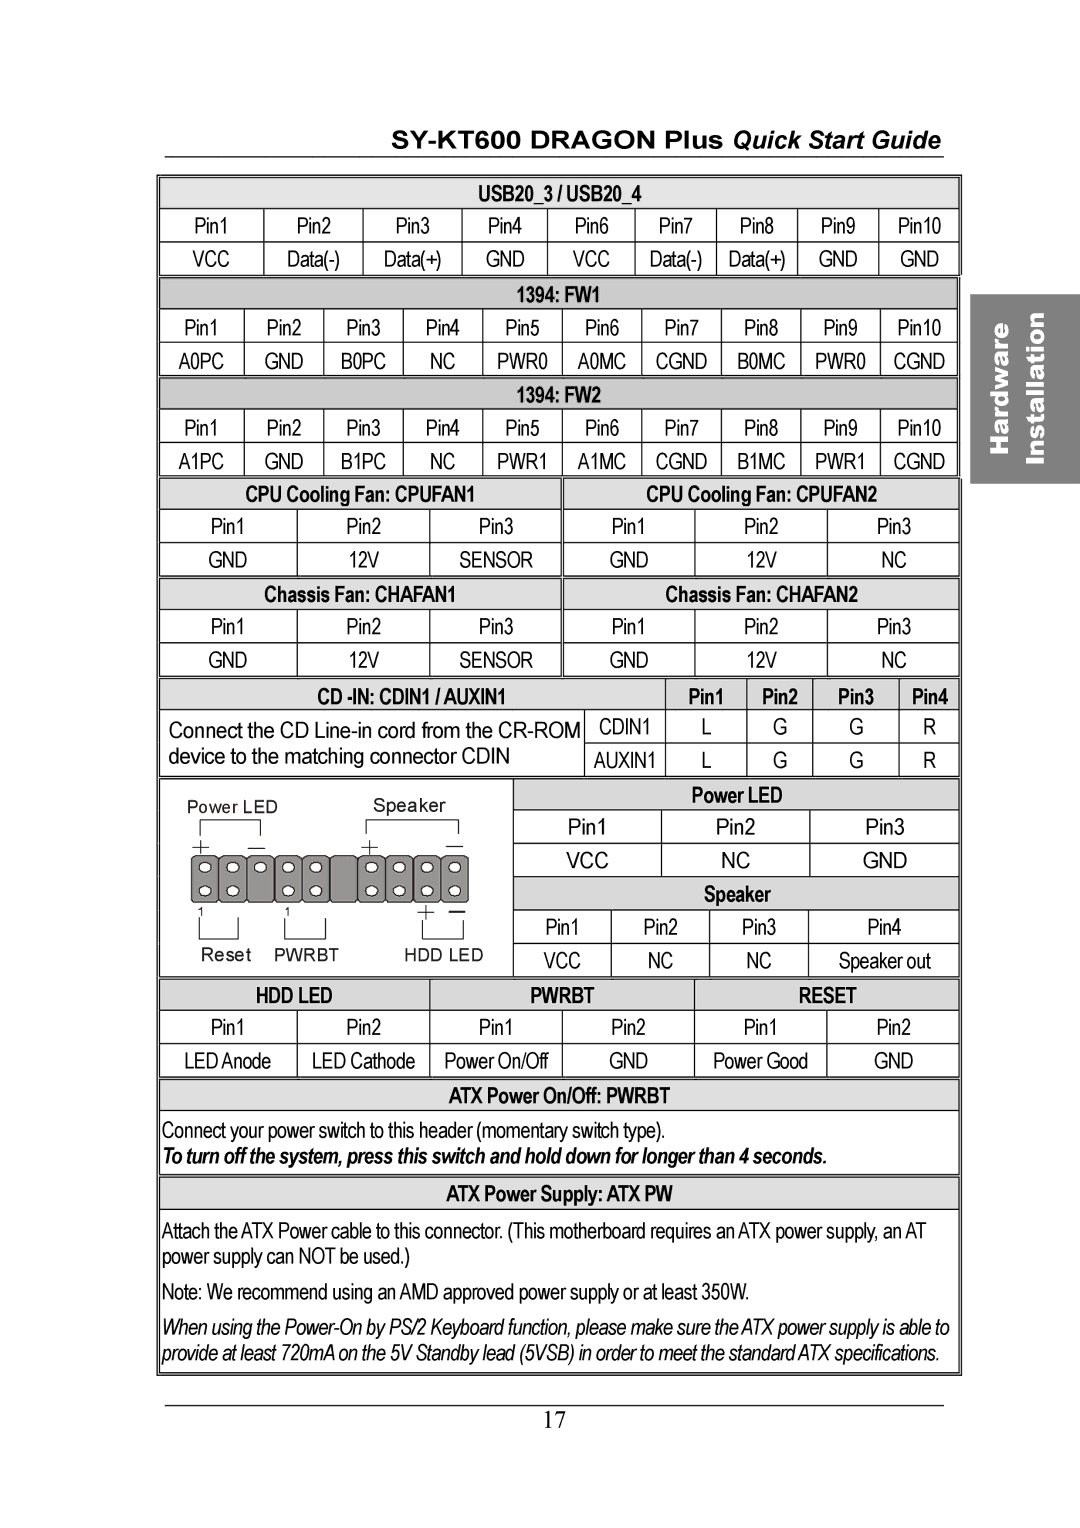
Connect the CD | CDIN1 | L | G | G | R | ||||
device to the matching connector CDIN |
| AUXIN1 | L | G | G | R | |||
Power LED | Speaker |
|
| Power LED |
|
| |||
Pin1 | Pin2 | Pin3 |
| ||||||
|
|
|
|
| |||||
|
|
|
| VCC | NC | GND |
| ||
|
|
|
|
|
| Speaker |
|
| |
Reset |
|
|
| Pin1 | Pin2 |
| Pin3 | Pin4 |
|
PWRBT | HDD LED | VCC | NC |
| NC | Speaker out | |||
HDD LED |
|
| PWRBT |
| RESET |
| |||
Pin1 |
| Pin2 | Pin1 |
| Pin2 |
| Pin1 | Pin2 |
|
LED Anode | LED Cathode | Power On/Off | GND | Power Good | GND | ||||
ATX Power On/Off: PWRBT
Connect your power switch to this header (momentary switch type).
To turn off the system, press this switch and hold down for longer than 4 seconds.
ATX Power Supply: ATX PW
Attach the ATX Power cable to this connector. (This motherboard requires an ATX power supply, an AT power supply can NOT be used.)
Note: We recommend using an AMD approved power supply or at least 350W.
When using the
17
