Program I: |
|
|
|
Week | Heart Rate (%) | Duration (minutes) | Workouts per Week |
1,2 | 60 to 65 | 15 | 3 |
3,4 | 60 to 65 | 15 | 3 |
5,6 | 60 to 65 | 15 | 3 |
|
|
|
|
Program II: |
|
|
|
Week | Heart Rate (%) | Duration (minutes) | Workouts per Week |
1,2 | 65 to 70 | 20 | 3 |
3,4 | 65 to 70 | 20 | 3 |
5,6 | 65 to 70 | 20 | 3 |
Program III: |
|
|
|
Week | Heart Rate (%) | Duration (minutes) | Workouts per Week |
1,2 | 70 to 75 | 20 | 4 |
3,4 | 70 to 75 | 25 | 4 |
5,6 | 70 to 75 | 25 | 4 |
|
|
|
|
Program IV: |
|
|
|
Week | Heart Rate (%) | Duration (minutes) | Workouts per Week |
1,2 | 75 to 80 | 25 | 4 |
3,4 | 75 to 80 | 25 | 4 |
5,6 | 75 to 80 | 30 | 4 |
Program V: |
|
|
|
Week | Heart Rate (%) | Duration (minutes) | Workouts per Week |
1,2 | 80 to 85 | 30 | 4 |
3,4 | 80 to 85 | 35 | 4 |
5,6 | 80 to 85 | 35 | 4 |
|
|
|
|
PROGRAM VARIATION ON THE S SERIES TREADMILL
Everyone can benefit from using treadmills because walking, jogging, and running provide results. The STAR TRAC S SERIES TREADMILL gives you infinite workout possibilities. Here are some suggested programs for the deconditioned, average and athletic users.
Deconditioned (beginning) Exercisers
This group, which includes the overweight, cardiac rehabilitated and the senior population, requires more personal attention and
Average Exercisers
This group is classified by those who live somewhat active lifestyles (exercising about twice a week) or fit into the age category of
Starting speed for this group ranges from about 3.0 to 3.5 mph. Typically, exercisers in this category will not use elevation, however, it is strongly encouraged for varied intensity and variability. Exercisers in this category may not be comfortable exceeding 10% incline. Progression of intensity and time is gradual (weekly) and frequency progress may not occur until after 4 weeks.
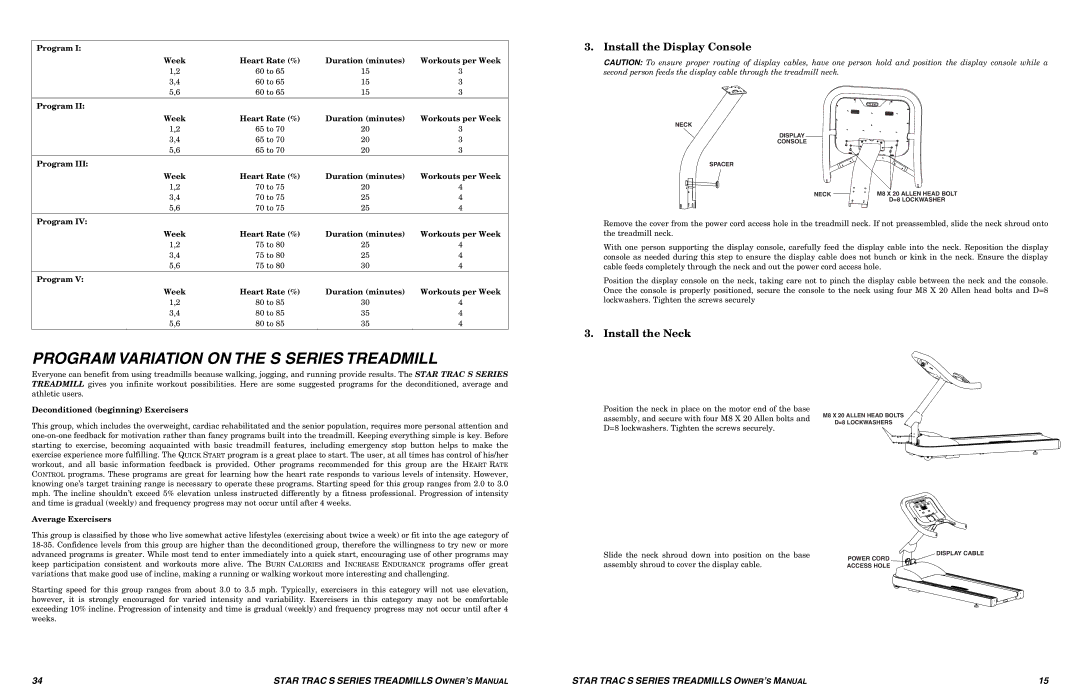
3. Install the Display Console
CAUTION: To ensure proper routing of display cables, have one person hold and position the display console while a second person feeds the display cable through the treadmill neck.
NECK
DISPLAY
CONSOLE
SPACER
NECK |
| M8 X 20 ALLEN HEAD BOLT |
| ||
|
| D=8 LOCKWASHER |
Remove the cover from the power cord access hole in the treadmill neck. If not preassembled, slide the neck shroud onto the treadmill neck.
With one person supporting the display console, carefully feed the display cable into the neck. Reposition the display console as needed during this step to ensure the display cable does not bunch or kink in the neck. Ensure the display cable feeds completely through the neck and out the power cord access hole.
Position the display console on the neck, taking care not to pinch the display cable between the neck and the console. Once the console is properly positioned, secure the console to the neck using four M8 X 20 Allen head bolts and D=8 lockwashers. Tighten the screws securely
3. Install the Neck
Position the neck in place on the motor end of the base
assembly, and secure with four M8 X 20 Allen bolts and M8 X 20 ALLEN HEAD BOLTS
D=8 LOCKWASHERS
D=8 lockwashers. Tighten the screws securely.
Slide the neck shroud down into position on the base | DISPLAY CABLE |
assembly shroud to cover the display cable. | POWER CORD |
ACCESS HOLE |
34 | STAR TRAC S SERIES TREADMILLS OWNER’S MANUAL | STAR TRAC S SERIES TREADMILLS OWNER’S MANUAL | 15 |