Manual Setup
CHAPTER 5
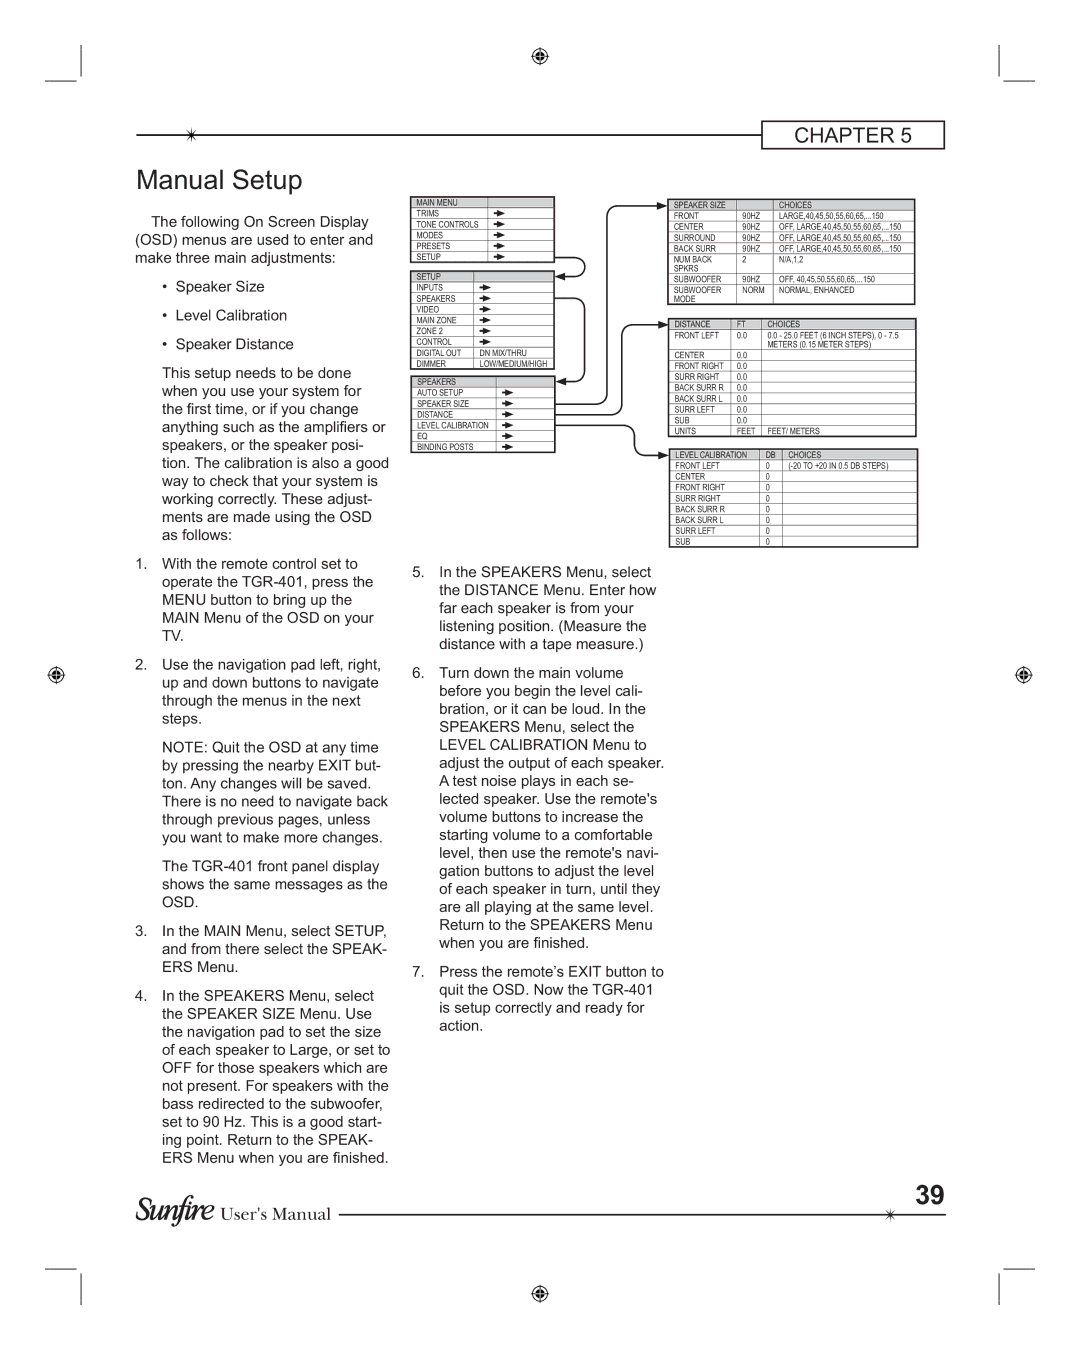
The following On Screen Display (OSD) menus are used to enter and make three main adjustments:
•Speaker Size
•Level Calibration
•Speaker Distance
This setup needs to be done when you use your system for the rst time, or if you change anything such as the ampli ers or speakers, or the speaker posi- tion. The calibration is also a good way to check that your system is working correctly. These adjust- ments are made using the OSD as follows:
MAIN MENU
TRIMS
TONE CONTROLS
MODES
PRESETS
SETUP
SETUP
INPUTS
SPEAKERS
VIDEO
MAIN ZONE
ZONE 2
CONTROL |
|
|
|
| |
DIGITAL OUT | DN MIX/THRU | |
DIMMER | LOW/MEDIUM/HIGH | |
SPEAKERS
AUTO SETUP
SPEAKER SIZE
DISTANCE
LEVEL CALIBRATION
EQ
BINDING POSTS
| SPEAKER SIZE |
|
|
|
|
| CHOICES |
| |
| FRONT |
| 90HZ |
|
| LARGE,40,45,50,55,60,65,...150 |
| ||
| CENTER |
| 90HZ |
|
| OFF, LARGE,40,45,50,55,60,65,...150 |
| ||
| SURROUND |
| 90HZ |
|
| OFF, LARGE,40,45,50,55,60,65,...150 |
| ||
| BACK SURR |
| 90HZ |
|
| OFF, LARGE,40,45,50,55,60,65,...150 |
| ||
| NUM BACK |
| 2 |
|
|
| N/A,1,2 |
| |
| SPKRS |
|
|
|
|
|
|
|
|
| SUBWOOFER |
| 90HZ |
|
| OFF, 40,45,50,55,60,65,...150 |
| ||
| SUBWOOFER |
| NORM |
|
| NORMAL, ENHANCED |
| ||
| MODE |
|
|
|
|
|
|
|
|
|
|
|
|
|
|
|
|
|
|
| DISTANCE |
| FT |
| CHOICES |
| |||
| FRONT LEFT | 0.0 |
| 0.0 - 25.0 FEET (6 INCH STEPS), 0 - 7.5 |
| ||||
|
|
|
|
| METERS (0.15 METER STEPS) |
| |||
| CENTER | 0.0 |
|
|
|
|
|
| |
| FRONT RIGHT | 0.0 |
|
|
|
|
|
| |
| SURR RIGHT | 0.0 |
|
|
|
|
|
| |
| BACK SURR R | 0.0 |
|
|
|
|
|
| |
| BACK SURR L | 0.0 |
|
|
|
|
|
| |
| SURR LEFT | 0.0 |
|
|
|
|
|
| |
| SUB | 0.0 |
|
|
|
|
|
| |
| UNITS |
| FEET |
| FEET/ METERS |
| |||
|
|
|
|
|
|
|
|
|
|
| LEVEL CALIBRATION |
| DB |
| CHOICES | ||||
| FRONT LEFT |
|
|
| 0 |
|
| ||
| CENTER |
|
|
| 0 |
|
|
|
|
| FRONT RIGHT |
|
|
| 0 |
|
|
|
|
| SURR RIGHT |
|
|
| 0 |
|
|
|
|
| BACK SURR R |
|
|
| 0 |
|
|
|
|
| BACK SURR L |
|
|
| 0 |
|
|
|
|
| SURR LEFT |
|
|
| 0 |
|
|
|
|
| SUB |
|
|
| 0 |
|
|
|
|
1.With the remote control set to operate the
2.Use the navigation pad left, right, up and down buttons to navigate through the menus in the next steps.
NOTE: Quit the OSD at any time by pressing the nearby EXIT but- ton. Any changes will be saved.
There is no need to navigate back through previous pages, unless you want to make more changes.
The
3.In the MAIN Menu, select SETUP, and from there select the SPEAK- ERS Menu.
4.In the SPEAKERS Menu, select the SPEAKER SIZE Menu. Use the navigation pad to set the size of each speaker to Large, or set to OFF for those speakers which are not present. For speakers with the bass redirected to the subwoofer, set to 90 Hz. This is a good start- ing point. Return to the SPEAK- ERS Menu when you are nished.
5.In the SPEAKERS Menu, select the DISTANCE Menu. Enter how far each speaker is from your listening position. (Measure the distance with a tape measure.)
6.Turn down the main volume before you begin the level cali- bration, or it can be loud. In the SPEAKERS Menu, select the LEVEL CALIBRATION Menu to adjust the output of each speaker. A test noise plays in each se- lected speaker. Use the remote's volume buttons to increase the starting volume to a comfortable level, then use the remote's navi- gation buttons to adjust the level of each speaker in turn, until they are all playing at the same level. Return to the SPEAKERS Menu when you are nished.
7.Press the remote’s EXIT button to quit the OSD. Now the
39
![]() User's Manual
User's Manual
