Need help?
LC320SL1
Start
Game console
HD camcorder Blu-ray Disc player
HD game console
Cable receiver Satellite box
DVD recorder
Home theater system DVD player
Disconnect the AC power cord before connecting devices
1EMN25723
Or use an Hdmi connection
Television
Contenu de la boîte Qué hay en la caja
Téléviseur
Televisor
Mount base onto TV
Cable
Connect the power and antenna or cable
Menú del TV. Pulse OK para
Follow the on-screen instructions to complete your TV setup
Confirmar la selección
Exclamation point within an equilateral triangle is
Manufacturer
Responsible Party Funai CORPORATION, Inc
Trademark Information
Trade Name Sylvania
Model LC320SL1
Features
Contents
Introduction
Symbols Used in this Manual
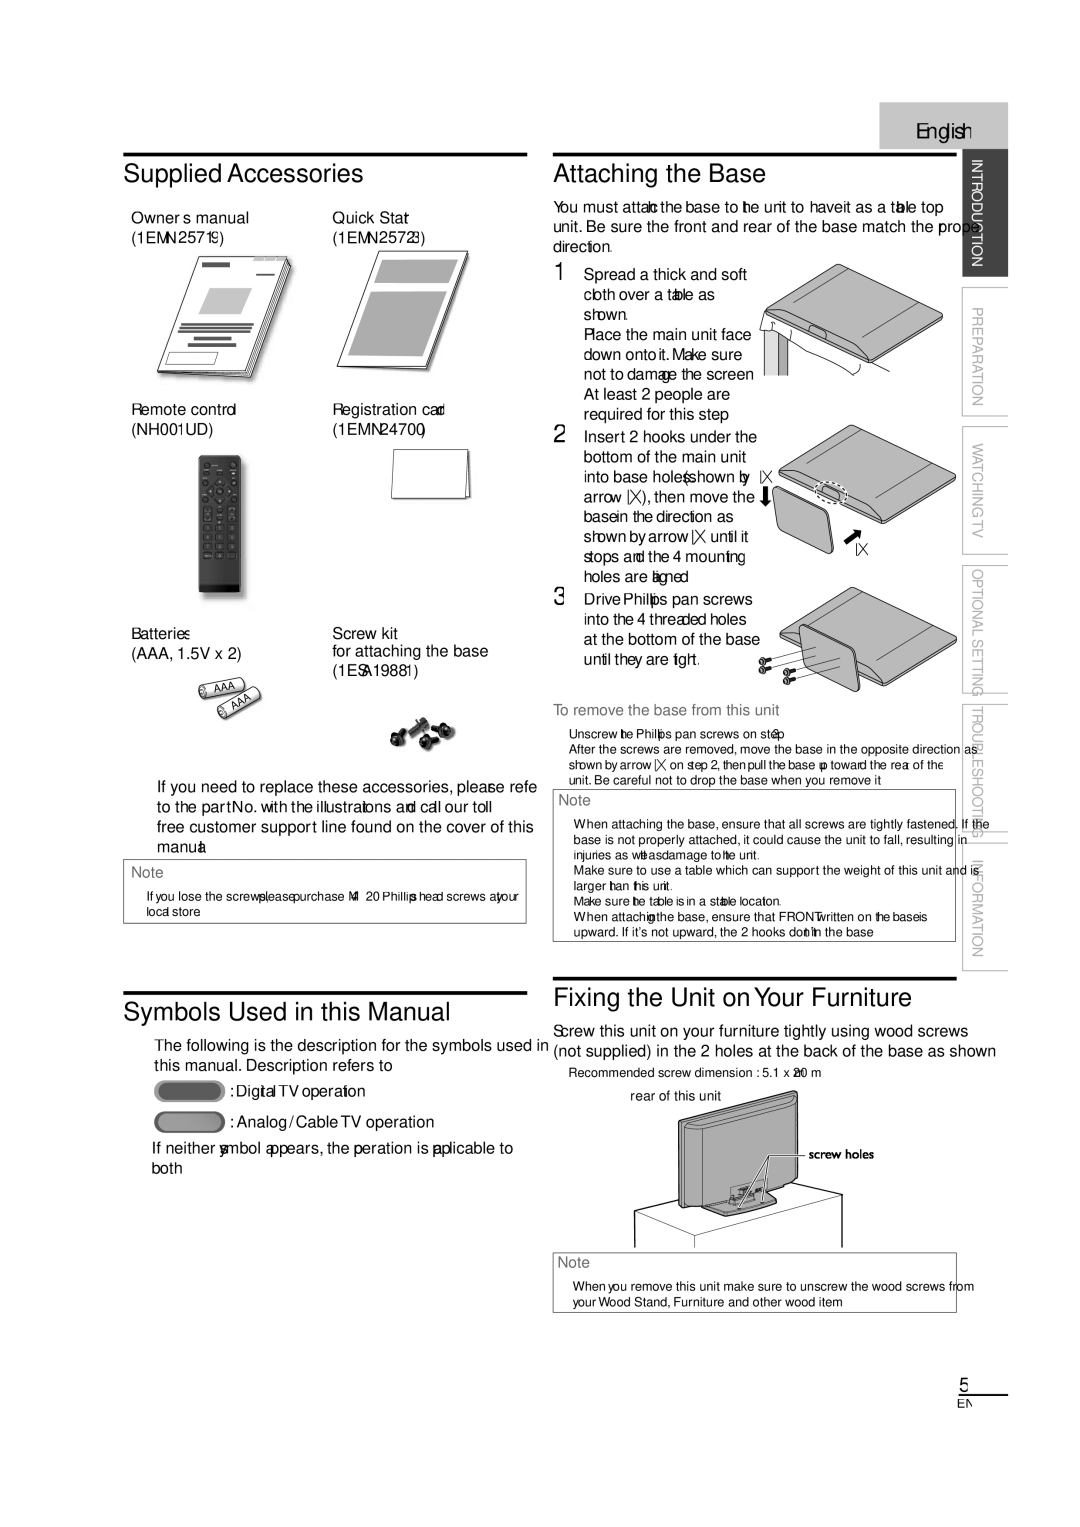
Supplied Accessories
Attaching the Base
Fixing the Unit on Your Furniture
Stand by indicator
Power on indicator
Receives infrared rays transmitted from the remote Control
Control Panel
Side Panel
Terminals
Input jacks for Video Hdmi 2 Input jack
Rear Panel
Installing the Batteries
Remote Control Function
Component Video connector
Initial Setup p.15
Preparation
Antenna Connection
HDMI-DVI Connection
External Device Connection
Hdmi Connection
Hdmi connection offers the highest picture quality
Video Connection
Component Video Connection
BD/DVD recorder with e omponent video outpu j
BD/DVD recorder with
Audio Output Connection
Composite Video Connection
480
PC Connection
600
024 768 60Hz
Cable Management
Plug In the AC Power Cord
Keep the cables through this holder to avoid tangling them
Rear of this unit AC outlet
Initial Setup
Silence Mode
Volume Adjustment
Switching Audio Mode
Watching TV
Stretched horizontally to fill the screen
Wide
Normal
Picture Wide
Reducing the Brightness
TV Screen Information
Autoprogram
Optional Setting
Main Menu
Channel List
By using CH /, you can select the memorized channels only
Add Channels
Language Selection
Antenna Confirmation
Language
Use / to select Language, then press OK
Sharpness, Color Temperature
Picture Adjustment
Picture Mode
Adjust the following items
Sound Mode
Sound Adjustment
TV Speakers
Primary MTS
See the following description for setting each item
Use / to select Features, then press OK
Closed Caption
There are 3 display modes according to programs
Caption Style
Digital Caption Service
Use / to select On, then press OK
Font Size
Font Style
Font Color
Background Opacity
Repeatedly to switch between View and Block
Setting US Movie ratings
Child Lock
Channel Lock
Change PIN
Device List
Fun-Link
Fun-Link Control
Is sent from your connected Fun-Link device
Current Software Info
Energy Saving Mode
Location
Confirm the version of the software currently used
Question Answer
Troubleshooting
Symptom Remedy
Troubleshooting Guide
Screen
Volume changes Change You switch to a different input
Noise or trash
Screen size changes Input modes
Information
Maintenance
Glossary
Electrical Specification
General Specifications
Other Specifications
Page
Can be provided
Shipping charges to return defective product
Contact the Customer Care Center at
Español Français English
Consignes de Sécurité Importantes
Nom Commercial Sylvania
Personne Responsable Funai CORPORATION, Inc
Modèle LC320SL1
Numéro de Téléphone
Contenu
Foire aux Questions FAQ Guide de Dépannage
Caractéristiques
Connexion de l’Antenne
Symboles Utilisés dans ce Manuel
Accessoires Fournis
Fixation du Téléviseur sur le Support Mural
Indicateur Power on
Panneau de Commande
Fenêtre de capteur infrarouge
Indicateur Stand by
Panneau Arrière
Bornes
Insérer les Piles
Boutons de la Télécommande
Connexion de l’Antenne
Préparation
Connexion à un Décodeur de
Diffusion par Câble / Satellite
Connexion HDMI-DVI
Connexion d’un Appareil Externe
Connexion Hdmi
Pour la connexion Hdmi
Connexion S-Vidéo
Connexion Vidéo à Composantes
Câble S-Vidéo Câble audio Côté de l’appareil
Sortie S-Vidéo
Connexion de Sortie Audio
Connexion Vidéo Composite
Analogique diffusion analogique et numérique
Appareils audio analogiques externes
Connexion PC
Format Résolution Balayage vertical
Les signaux suivants peuvent être affichés
En ferrite Câble de
Branchez le Cordon d’Alimentation Secteur
Gestion des Câbles
La Programmation auto commence
Installation Initiale
Du / et appuyez sur OK
Sélectionnez le magasin Magasin, l’appareil est
Mode Silence
Réglage du Volume
Changement du Mode Audio
Utilisez VOL / pour régler le volume
’écran
Zoom
Horizontalement pour remplir l’écran
’écran. Le haut de l’image est rogné Zoom
Réduction de la Luminosité
Informations sur Écran
Appuyez sur Info
Optionnelle
Configuration
Programmation Auto
Menu Principal
Ajouter Chaînes
Liste Chaînes
Image Liste chaînes
Ajouter chaînes Ajouter Chaînes
Sélection de la Langue
Vérification de l’Antenne
Français, et appuyez sur OK
Utilisez / pour sélectionner English, Español ou
Réglage de l’Image
Mode image
Réglez les paramètres suivants
Réglage du Son
Mode audio
Haut-parleurs du téléviseur
Égaliseur
Mode Paint-on Mode Pop-on Mode Roll-up
Service Sous-titrage
Sous-titres
Style des Sous-titres
Service Sous-titrage Num
Couleur police
Style police
Opacité l’arrière-plan
Type bord
Verrouillage de Chaîne
Verrouillage
Verrou qualif. US Ciné
Changez Code
Verrou qualif. US TV
Appuyez sur pour quitter
Marche automatique téléviseur
Commande de Fun-Link
Liste Des dispositifs
Arrêt auto. du dispositif
Info Logiciel Actuel
Mode Économie d’Énergie
Région
Dépannage
Foire aux Questions FAQ
Question
Réponse
Guide de Dépannage
Symptôme Solution
Et le volume sonore change
’appareil garde en mémoire le dernier réglage de volume
Entendez un son inhabituel
Ou des « parasites »
Entretien
Glossaire
Spécifications Électriques
Spécifications Générales
Autres Spécifications
Page
Imprimé en Chine
Communiquez avec le centre de service à la clientèle
Español Français English
Equilátero tiene la fi nalidad de avisar al usuario
El signo de exclamación dentro de un triángulo
De la presencia de instrucciones de utilización y
Acompaña al aparato
Parte Responsable Funai CORPORATION, Inc
Información sobre Marcas Registradas
Nombre Comercial Sylvania
Modelo LC320SL1
Contenido
Introducción
Características
Símbolos Utilizados en este Manual
Accesorios Suministrados
Acoplamiento de la Base
Fijación de la Unidad al Soporte de TV
Panel de Control
Indicador de Power on
15 p.17
Ventana del sensor de infrarrojos
Panel Lateral
Terminales
Panel Trasero
Instalación de las Pilas
Función de Mando a Distancia
Preparación
Disponibles en su zona. Configuración Inicial p.15
Conexión de Antena
Conexión al Receptor de Cable o Caja de Satélite
Conexión Hdmi
Conexión de Dispositivo Externo
Definición mediante un solo cable
Para conexión Hdmi
Conexión de S-Video
Conexión de Vídeo en Componentes
Cable S-Video
Parte lateral de la unidad
Conexión de Salida de Audio
Conexión de Vídeo Compuesto
Digital solamente para la emisión digital
Audio analógicos externos
Resolución
Conexión de PC
640 480
800 600
Enchufe el Cable Alimentador de CA
Colocación de los Cables
Toma de CA
Cable de alimentación de CA
Utilice / para seleccionar la locación deseada, y
Configuración Inicial
Presione OK
Para VER LA Televisión
Ajuste de Volumen
Modo Silencioso
Para Cambiar el Modo de Audio
Normal Total Punto por punto Original
Ambos extremos de la pantalla
Total muestra una imagen que se extiende fuera de
Proporción horizontalmente para llenar la pantalla
Reducción del Brillo
Información de Pantalla
Presione Info
Título de programa Guía de programas
Menú Principal
Ajuste Opcional
Sintonización Automática
Agregar Canales
Lista de Canales
Utilice / para seleccionar Agregar canales, y presione OK
Selección de Idioma
Confirmación de la Antena
Presione Menu para visualizar el menú principal
Utilice / para seleccionar English, Español o
Ajuste de Imagen
Ajustes imagenPicture Mode
Ajuste de los siguientes elementos
Modo sonido
Ajuste de Sonido
MTS primario
Ecualizador
Hay 3 modos de visualización según los programas
Subtítulo Cerrado
Servicio Digital de Subtítulos
Utilice / para seleccionar Config. usuarid, y
Estilo de los Subtítulos
Tamaño, etc
Tamaño fuente
Opacidad fondo
Color borde
Color fuente
Bloqueo de Canales
Bloqueo Infantil
Aj clasif. cine. EE.UU
Introduzca Código Actual
Aj. clasif.TV
Entre Mirar y Bloque
Clasificación
Lista de dispositivos
Encendido automático del TV
Control de Fun-Link
Información Actual del Software
Modo de Ahorro de Energía
Ubicación
Actualmente
Preguntas Frecuentes
Solución DE Problemas
¿Por qué no puedo ver algunos programas de TV?
Esta unidad no cuenta con función de reloj
Síntoma Solución
Guía de Solución de Problemas
Impureza Esto podría producir ruido o impureza
El volumen
Pantalla del televisor
De entrada concretos
Glosario
Información
Mantenimiento
Especificación Eléctrica
Especificaciones Generales
Page
Introduction Preparación
1EMN25719
Imprimido en China
Comuníquese con el Centro de Atención al Cliente al