PROGRAMMING
Programs
Programs 00 and 50 are permanent bypass locations for the instrument signal to pass straight through the SansAmp PSA.
NOTE: Being
SAVING A PROGRAM
If you want to create a custom setting from scratch:
1.Go to any program location from 51-127.
2.Edit controls to taste.
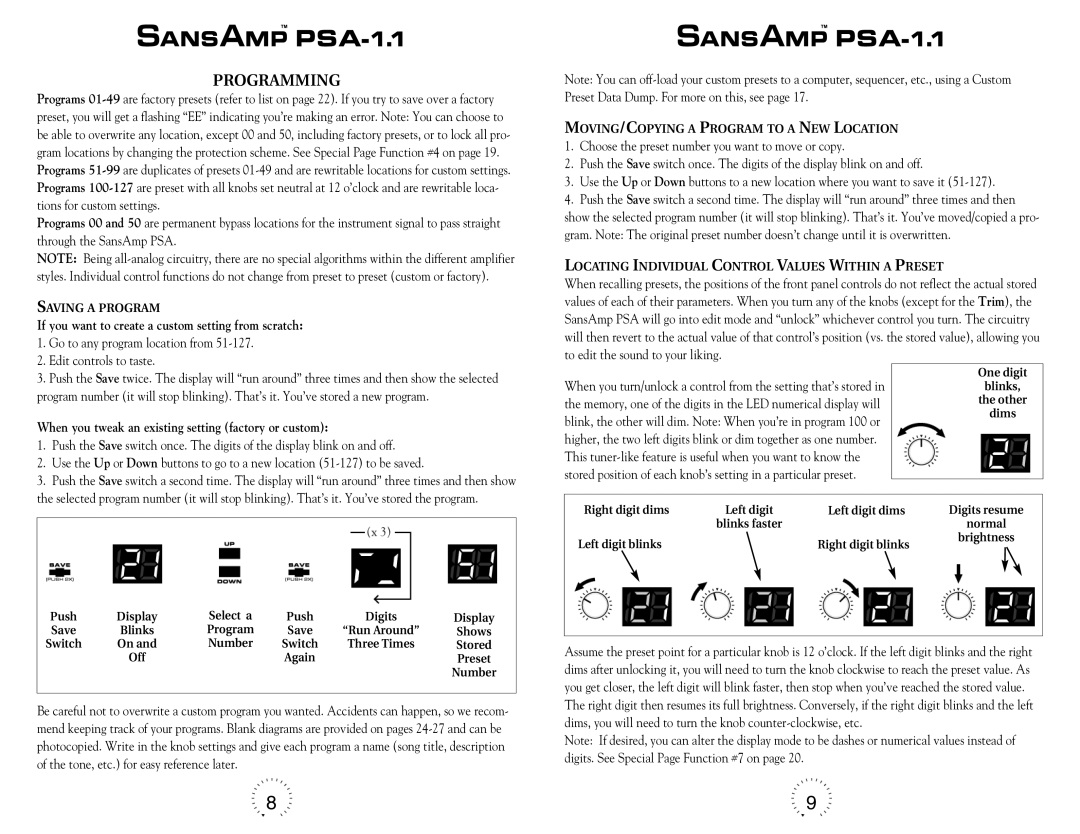
3.Push the Save twice. The display will “run around” three times and then show the selected program number (it will stop blinking). That’s it. You’ve stored a new program.
When you tweak an existing setting (factory or custom):
1.Push the Save switch once. The digits of the display blink on and off.
2.Use the Up or Down buttons to go to a new location
3.Push the Save switch a second time. The display will “run around” three times and then show the selected program number (it will stop blinking). That’s it. You’ve stored the program.
Push | Display |
| Select a | Push | Digits | Display |
Save | Blinks |
| Program | Save | “Run Around” | Shows |
Switch | On and |
| Number | Switch | Three Times | Stored |
| Off |
|
| Again |
| Preset |
|
|
|
|
|
| Number |
|
|
|
|
|
|
Be careful not to overwrite a custom program you wanted. Accidents can happen, so we recom- mend keeping track of your programs. Blank diagrams are provided on pages
Note: You can
MOVING/COPYING A PROGRAM TO A NEW LOCATION
1.Choose the preset number you want to move or copy.
2.Push the Save switch once. The digits of the display blink on and off.
3.Use the Up or Down buttons to a new location where you want to save it
4.Push the Save switch a second time. The display will “run around” three times and then show the selected program number (it will stop blinking). That’s it. You’ve moved/copied a pro- gram. Note: The original preset number doesn’t change until it is overwritten.
LOCATING INDIVIDUAL CONTROL VALUES WITHIN A PRESET
When recalling presets, the positions of the front panel controls do not reflect the actual stored values of each of their parameters. When you turn any of the knobs (except for the Trim), the SansAmp PSA will go into edit mode and “unlock” whichever control you turn. The circuitry will then revert to the actual value of that control’s position (vs. the stored value), allowing you to edit the sound to your liking.
|
|
|
|
|
|
|
|
|
|
|
|
|
|
|
|
When you turn/unlock a control from the setting that’s stored in |
|
|
|
| One digit |
| |||||||||
|
|
|
| blinks, |
| ||||||||||
the memory, one of the digits in the LED numerical display will |
|
|
|
| the other |
| |||||||||
blink, the other will dim. Note: When you’re in program 100 or |
|
|
|
| dims |
| |||||||||
|
|
|
|
|
|
| |||||||||
higher, the two left digits blink or dim together as one number. |
|
|
|
|
|
|
| ||||||||
This |
|
|
|
|
|
|
| ||||||||
stored position of each knob’s setting in a particular preset. |
|
|
|
|
|
|
| ||||||||
|
|
|
|
|
|
|
|
|
|
|
|
|
|
| |
|
|
|
|
|
|
|
|
|
|
|
|
|
|
| |
|
| Right digit dims | Left digit | Digits resume | |||||||||||
|
|
| Left digit dims | ||||||||||||
|
|
|
|
| blinks faster |
|
|
|
|
|
| normal |
|
| |
|
|
|
|
|
|
| |||||||||
|
|
|
|
|
|
|
|
|
|
|
| brightness |
|
| |
|
|
|
|
|
|
|
|
|
|
| |||||
| Left digit blinks |
|
|
|
|
|
|
| |||||||
|
|
|
|
| Right digit blinks |
| |||||||||
|
|
|
|
|
|
|
|
|
|
| |||||
|
|
|
|
|
|
|
|
|
|
|
|
|
|
|
|
|
|
|
|
|
|
|
|
|
|
|
|
|
|
|
|
|
|
|
|
|
|
|
|
|
|
|
|
|
|
|
|
|
|
|
|
|
|
|
|
|
|
|
|
|
|
|
|
Assume the preset point for a particular knob is 12 o’clock. If the left digit blinks and the right dims after unlocking it, you will need to turn the knob clockwise to reach the preset value. As you get closer, the left digit will blink faster, then stop when you’ve reached the stored value.
The right digit then resumes its full brightness. Conversely, if the right digit blinks and the left dims, you will need to turn the knob
Note: If desired, you can alter the display mode to be dashes or numerical values instead of digits. See Special Page Function #7 on page 20.
8 | 9 |
