32C110U 40E210U 46G310U 55G310U
Safety Precautions
Dear Customer
Important Safety Instructions
Additional Safety Precautions
Installation, Care, and Service
Installation
Care
On a bed, sofa, rug, or Similar surface
Service
To Display your LCD TV using a Wall Bracket
Choosing a location for your LCD TV
To Display your LCD TV on the included Pedestal Stand
TV Size Hole PatternHxV
Removing the Pedestal Stand
32 TV
40 TV
Important notes about your
Trademark Information
Contents
Introduction
Features of your new TV
CableClear digital picture noise reduction
Page
Power LED Green = Power indicator
TV front and side panel controls and connections
Left side panel
TV top 1無 Green LED
Power Cord
TV back panel connections
Overview of cable types
Connecting your TV
About the connection illustrations
Connecting a VCR, Antenna, Cable TV, or Camcorder
To view antenna or Cable channels
To view the DVD player
To view the VCR or view and record antenna channels
To record a TV program while watching a DVD
To connect an Hdmi device, you will need
To view the Hdmi device video
To connect a DVI device, you will need
One HDMI-to-DVI adapter cable
REGZA-LINKconnection
Before controlling the devices
Hdmi cables
TV back panel Audio receiver
Connecting a digital audio system
Connecting a personal computer PC
To control the audio
To connect a PC to the PC in terminal on the TV
Signal names for mini D-sub 15-pin connector
Pin Signal Name
Ground Reserved
Ground Sync Reserved
Installing the remote control batteries
Using the remote control
Remote control effective range
13無 VOL + adjusts the volume level
Learning about the remote control
9無 Recall displays TV status information
Main menu layout
Menu layout and navigation
Icon Option
Setup/Installation menu layout
Navigating the menu system
Setting up your TV
Initial Setup
To configure the ANT/CABLE input source
Selecting the menu language
Setting channel skip
Programming channels into the TV’s channel memory
Programming channels automatically
To program channels automatically
Setting the Hdmi audio mode
Viewing the digital signal meter
Setting the time zone
Reset Factory Defaults
Viewing the system status
Using the TV’s features
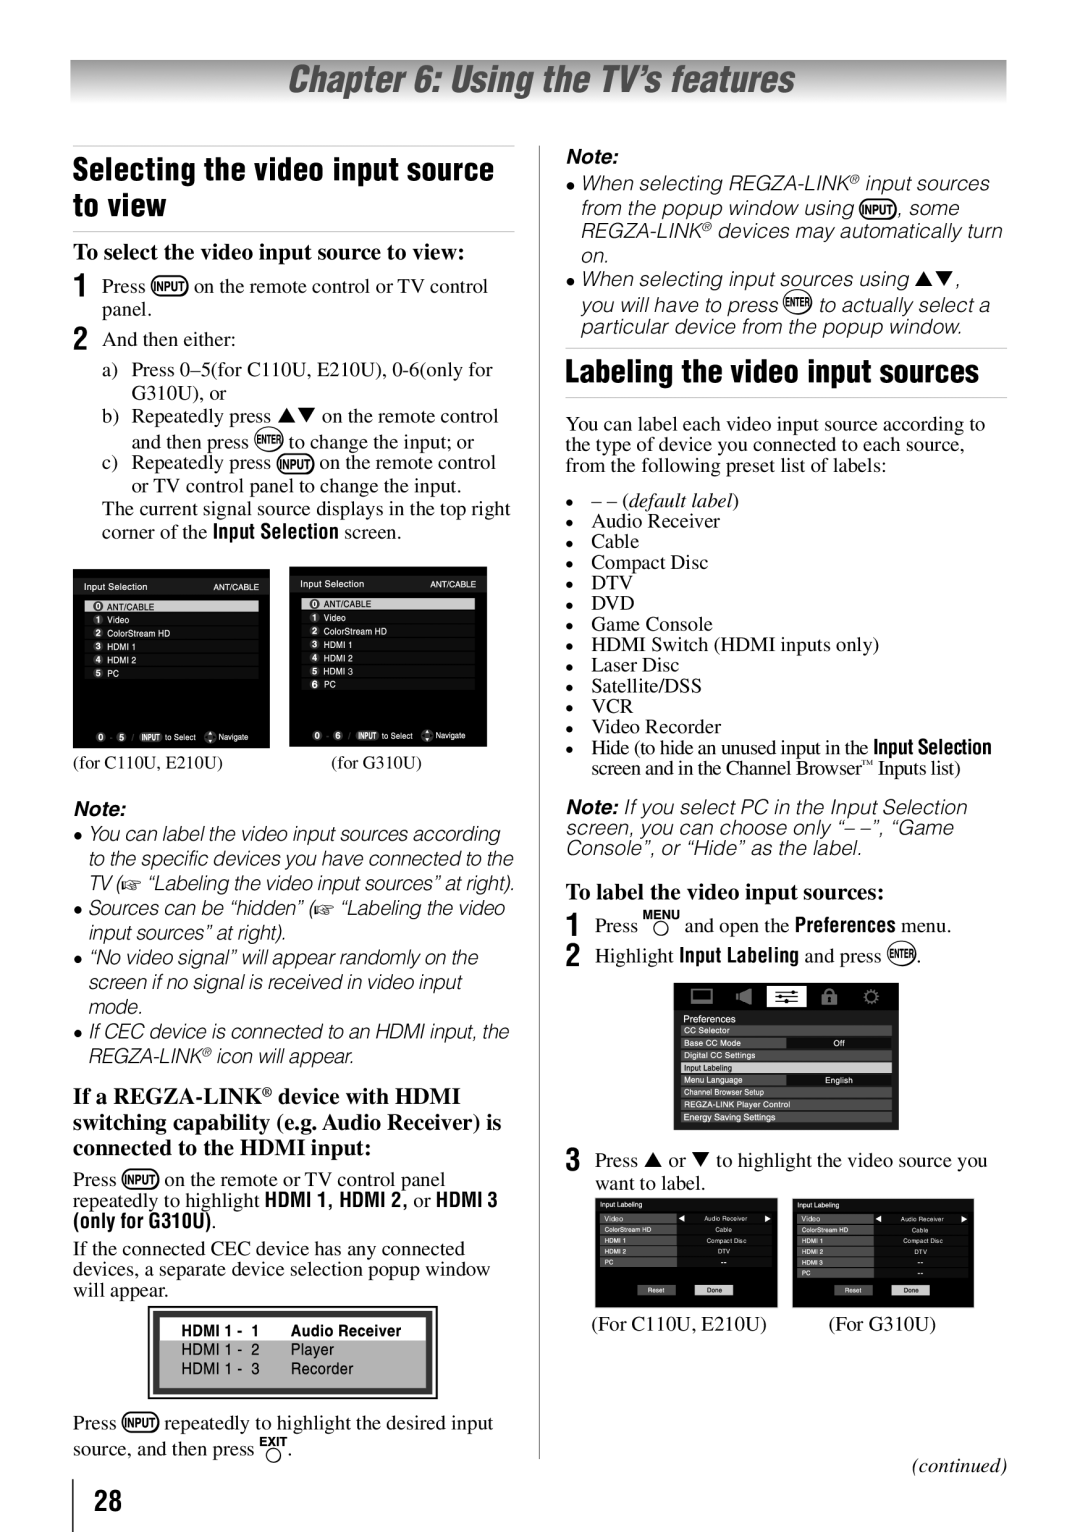
Selecting the video input source to view
Labeling the video input sources
To select the video input source to view
Tuning channels using Channel Browser
Tuning channels
Favorites Browser
Elements of the Channel Browser
Adding and clearing channels and inputs in the History List
Tuning to the next programmed channel
Setting the Channel Tuning Mode
Switching between two channels using Channel Return
Switching between two channels using SurfLock
For 1080i, 1080p and 720p signal program source
Selecting the picture size
Full For 169 480i, 480p source programs only
TheaterWide For letter box programs
TheaterWide For letter box programs with subtitles
Native
Normal
Using the Freeze feature
Adjusting the picture
Using the auto aspect ratio feature
Selecting the picture mode
Adjusting the picture quality
Using the closed caption mode
Base closed captions
Digital CC Settings
Base CC Mode setting
CC Selector
To customize the closed captions
Adjusting the audio
Using the digital audio selector
Adjusting the audio quality
Muting the sound
Using the Locks menu
Using the Dolby Digital Dynamic Range Control feature
Selecting the optical audio output format
Entering the PIN code
4無 Press to highlight Enable Rating Blocking
Changing your PIN code
Blocking TV programs and movies by rating V-Chip
To block and unblock TV programs and movies
Press to highlight Enable Rating Blocking
Blocking TV programs by Canada rating
Not intended for anyone 17
Canadian Rating Menu will appear
Using the input lock feature
Using the GameTimer
Unlocking programs temporarily
Locking channels
Using the PC settings feature
Using the panel lock feature
To adjust the PC settings
To lock the panel
Setting the PC Audio
Using the Media Player
Using the Media Player with USB
To select the Auto Start function
Viewing photo files
Single View
Slideshow
Playing music files
To set the repeat mode
During playback
To close the Music Player
3無 Press or to select Off, All or 4無 Press
Automatic Power Down
Setting the sleep timer
No Signal Power Down
Using REGZA-LINK
Available remote control key functions
REGZA-LINKplayback device DVD player, etc. control
REGZA-LINKinput source selection
Volume and Mute controls of Audio Receiver
To set the REGZA-LINKSetup
To display TV status information using Recall
Displaying TV status information
Understanding the last mode memory feature
To display TV status information using Info
To close the screen
Press again
Using the TV’s advanced features
Using the advanced picture settings features
Using Dynamic Contrast
Using the static gamma feature
Selecting the cinema mode
Using the ClearFrame feature
Using the Film Stabilization feature
Using CableClear digital noise reduction
Using Mpeg noise reduction
Using the Game Mode feature
To turn on Game Mode
To turn off Game Mode
Troubleshooting
General troubleshooting
Sound problems
Remote control problems
Channel tuning problems
Closed caption problems
Specifications
Appendix
Acceptable signal formats for PC in and Hdmi terminals
PC in signal formats
Hdmi signal formats
Format Resolution Frequency Pixel Clock Frequency
Limited United States Warranty for LCD Televisions
How to Obtain Warranty Service
Rental Units
Your Responsibility
Limited One 1 Year Warranty on Parts and Labour
Disclaimer and Limitation of Remedy
Arbitration and Dispute Resolution
Critical Applications
How to Obtain Warranty Services
General Provisions
Page
Toshiba America Information SYSTEMS, INC