Chapter 6: Using the TV’s features
Independent rating system for broadcasters
Ratings | Description and Content themes | |
|
| |
| Mature Audience Only (This | |
| program is specifically designed to | |
| be viewed by adults and therefore | |
| may be unsuitable for children | |
under 17.) | ||
| ||
| L) Crude or indecent language | |
| S) Explicit sexual activity | |
| V) Graphic violence | |
| Parents Strongly Cautioned (This | |
| program contains some material that | |
| many parents would find unsuitable | |
| for children under 14 years of age.) | |
D) Intensely suggestive dialog | ||
| ||
| L) Strong, coarse language | |
| S) Intense sexual situations | |
| V) Intense violence | |
|
| |
| Parental Guidance Suggested (This | |
| program contains material parents | |
| may find unsuitable for younger | |
| children.) | |
D) Some suggestive dialog | ||
| ||
| L) Infrequent coarse language | |
| S) Some sexual situations | |
| V) Moderate violence | |
| General Audience (Most parents | |
would find this program suitable for | ||
| all ages.) | |
| Directed to Older Children (This | |
| program is designed for children | |
age 7 and above. Note: Programs | ||
TV- | in which fantasy violence may be | |
Y7FV | more intense or more combative than | |
| other programs in this category are | |
| designated | |
|
| |
| All Children (This program is | |
designed to be appropriate for all | ||
| children.) | |
|
| |
| ||
Independent rating system for movies | ||
|
| |
Ratings | Description and Content themes | |
X
Not intended for anyone 17 and | ||
under | ||
|
RRestricted (Under 17 requires accompanying parent or adult)
| Parents Strongly Cautioned (Some |
material may be inappropriate for | |
| children under 13) |
PG | Parental Guidance Suggested |
(Some material may not be suitable | |
| for children) |
GGeneral Audience (Appropriate for all ages)
Note:
••If you place an “ ![]() ” in the box next to “ None Rated” programs rated “None” will be blocked; however, programs that do not provide any rating information will not be blocked.
” in the box next to “ None Rated” programs rated “None” will be blocked; however, programs that do not provide any rating information will not be blocked.
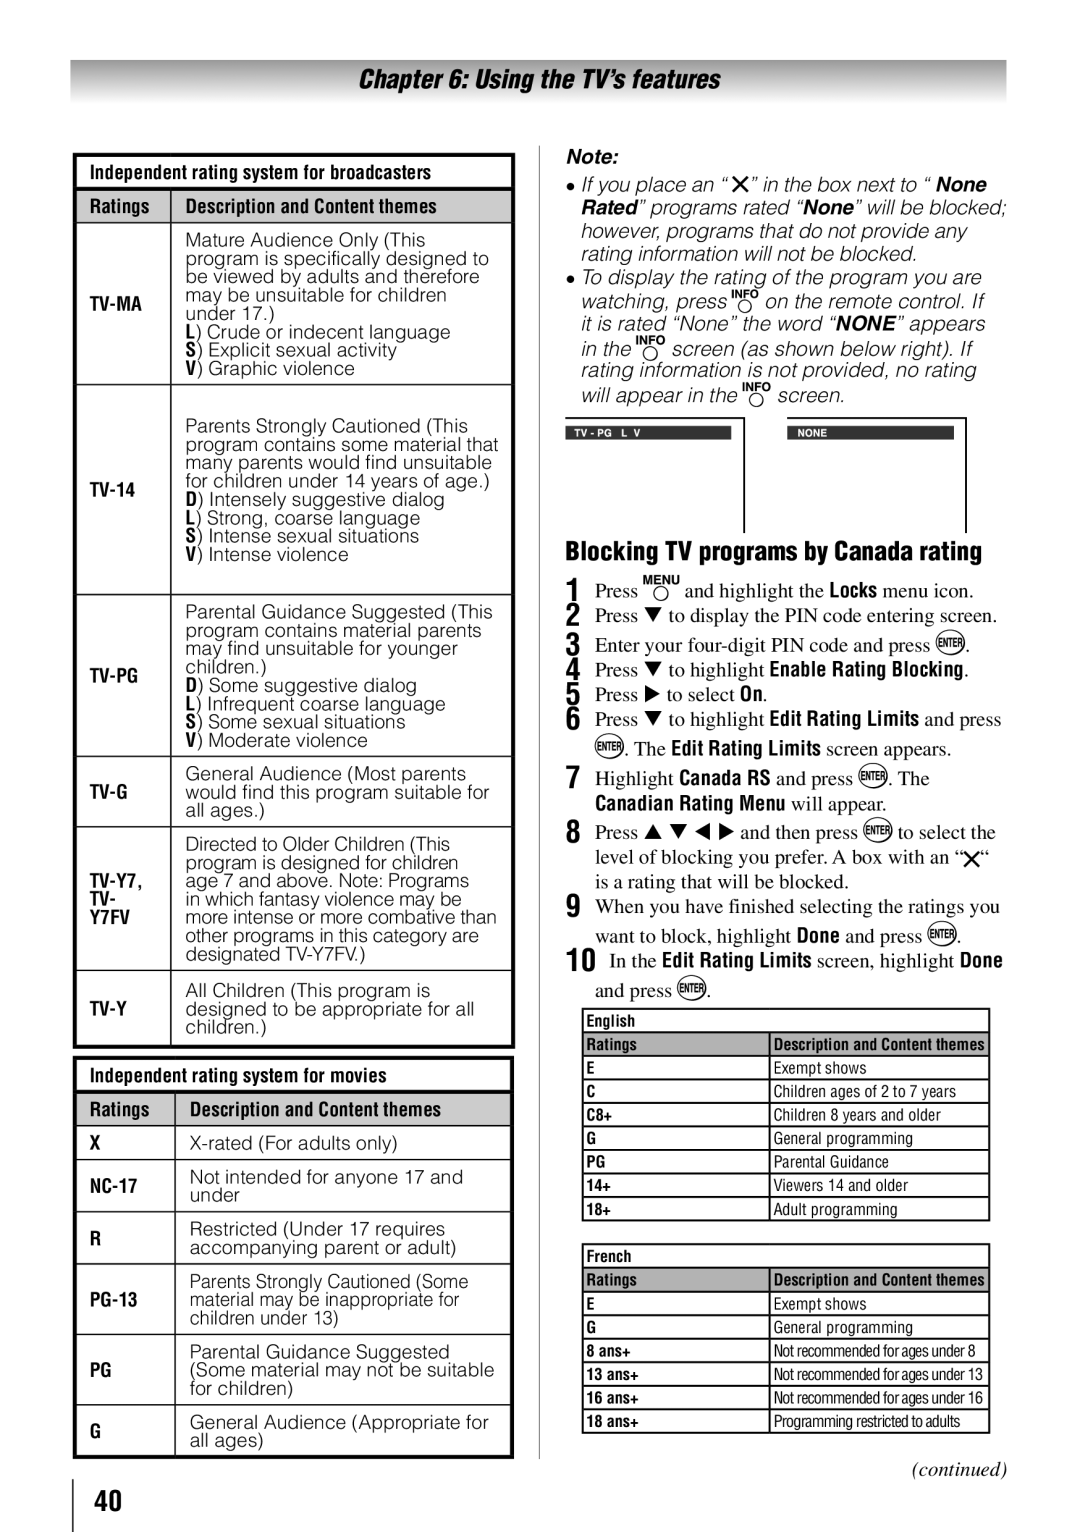
••To display the rating of the program you are watching, press on the remote control. If it is rated “None” the word “NONE” appears
in the screen (as shown below right). If rating information is not provided, no rating
will appear in the ![]() screen.
screen.
Blocking TV programs by Canada rating
1無 Press | and highlight the Locks menu icon. | |||||||
2無 | Press to display the PIN code entering screen. | |||||||
3無 Enter your |
| . |
| |||||
4無 | Press to highlight Enable Rating Blocking. | |||||||
5無 | Press to select On. |
|
|
|
| |||
6無 | Press to highlight Edit Rating Limits and press | |||||||
|
| . The Edit Rating Limits screen appears. |
|
|
| |||
7無 Highlight Canada RS and press | . The |
|
|
| ||||
|
| Canadian Rating Menu will appear. |
|
|
|
| ||
8無 Press and then press | to select the | |||||||
|
| level of blocking you prefer. A box with an “ | “ | |||||
9無 | is a rating that will be blocked. |
|
|
|
| |||
When you have finished selecting the ratings you | ||||||||
|
| want to block, highlight Done and press | . |
|
| |||
10無 In the Edit Rating Limits screen, highlight Done | ||||||||
|
| and press | . |
|
|
|
|
|
|
|
|
|
|
|
|
| |
| English |
|
|
|
|
|
| |
| Ratings |
| Description and Content themes |
| ||||
| E |
|
| Exempt shows |
|
|
|
|
| C |
| Children ages of 2 to 7 years |
|
|
| ||
| C8+ |
| Children 8 years and older |
|
|
| ||
| G |
| General programming |
|
|
| ||
| PG |
| Parental Guidance |
|
|
| ||
| 14+ |
| Viewers 14 and older |
|
|
| ||
| 18+ |
| Adult programming |
|
|
| ||
|
|
|
|
|
|
|
| |
| French |
|
|
|
|
|
| |
| Ratings |
| Description and Content themes |
| ||||
| E |
|
| Exempt shows |
|
|
|
|
| G |
| General programming |
|
|
| ||
| 8 ans+ |
| Not recommended for ages under 8 |
| ||||
| 13 ans+ |
| Not recommended for ages under 13 |
| ||||
| 16 ans+ |
| Not recommended for ages under 16 |
| ||||
| 18 ans+ |
| Programming restricted to adults |
|
| |||
(continued)
40