CONVERGENCE ADJUSTMENT
Adjust convergence from center to circumference in order.
|
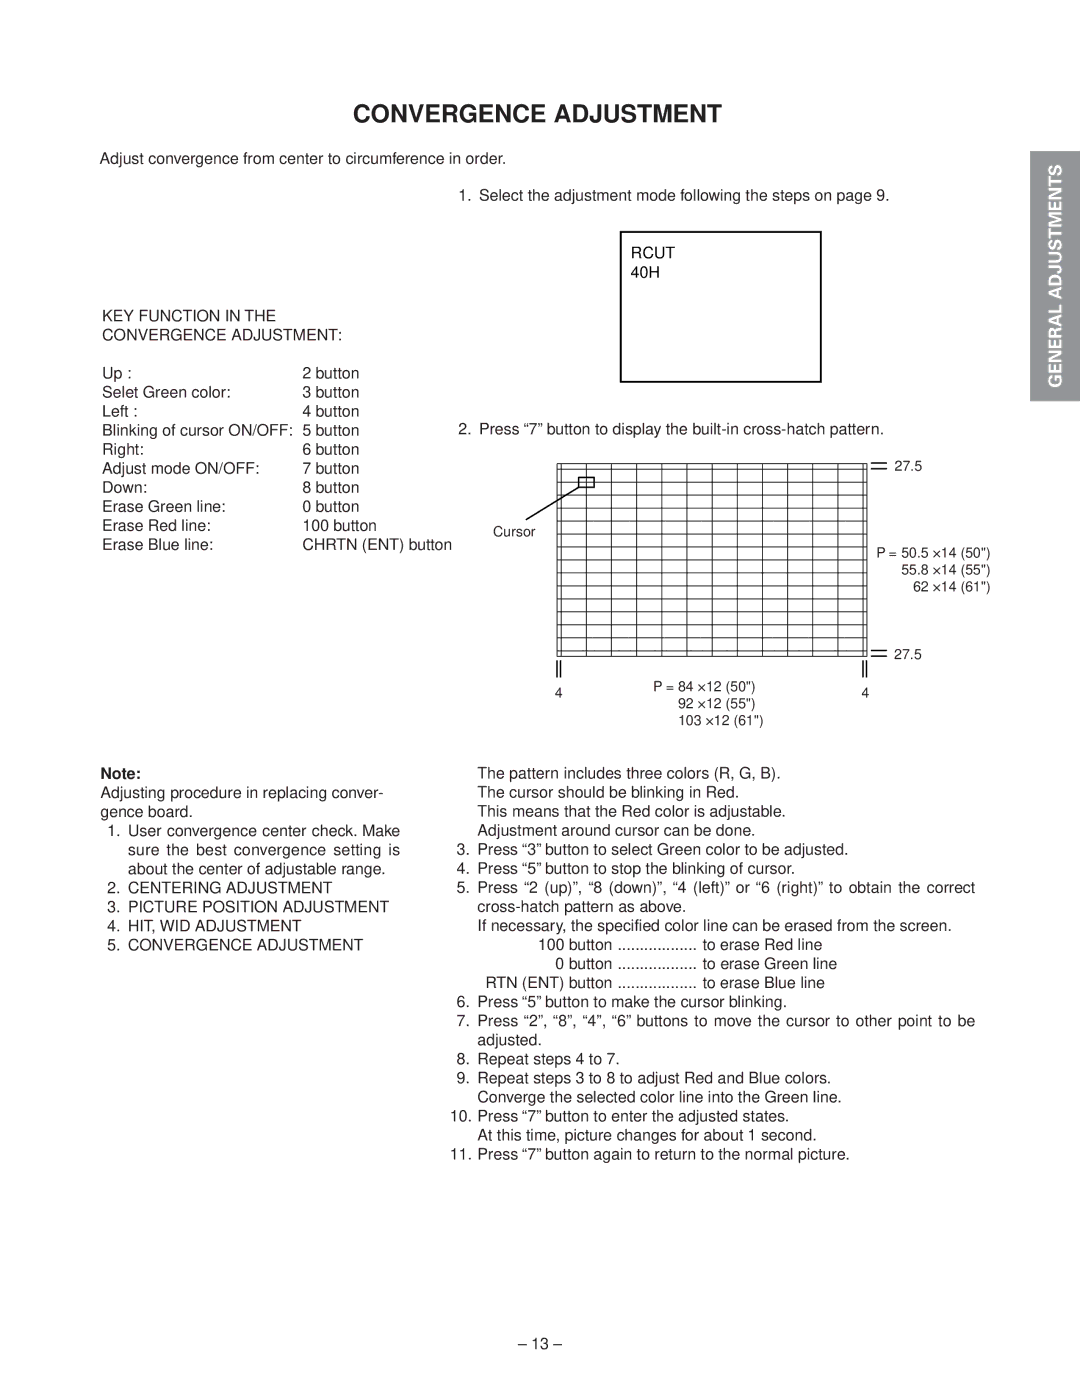
| 1. Select the adjustment mode following the steps on page 9. | ||||||||||||||||||
|
|
|
|
|
|
|
|
|
|
| ||||||||||
|
|
|
|
|
|
| RCUT |
|
|
|
|
| ||||||||
|
|
|
|
|
|
| 40H |
|
|
|
| |||||||||
KEY FUNCTION IN THE |
|
|
|
|
|
|
|
|
|
|
|
|
|
|
|
|
|
|
|
|
CONVERGENCE ADJUSTMENT: |
|
|
|
|
|
|
|
|
|
|
|
|
|
|
|
|
|
|
| |
Up : | 2 button |
|
|
|
|
|
|
|
|
|
|
|
|
|
|
|
|
|
|
|
Selet Green color: | 3 button |
|
|
|
|
|
|
|
|
|
|
|
|
|
|
|
|
|
|
|
Left : | 4 button | 2. Press “7” button to display the | ||||||||||||||||||
Blinking of cursor ON/OFF: | 5 button | |||||||||||||||||||
Right: | 6 button |
|
|
|
|
|
|
|
|
|
|
|
|
|
|
|
|
|
| 27.5 |
Adjust mode ON/OFF: | 7 button |
|
|
|
|
|
|
|
|
|
|
|
|
|
|
|
|
|
| |
|
|
|
|
|
|
|
|
|
|
|
|
|
|
|
|
|
| |||
Down: | 8 button |
|
|
|
|
|
|
|
|
|
|
|
|
|
|
|
|
|
|
|
|
|
|
|
|
|
|
|
|
|
|
|
|
|
|
|
|
|
| ||
Erase Green line: | 0 button |
|
|
|
|
|
|
|
|
|
|
|
|
|
|
|
|
|
|
|
|
|
|
|
|
|
|
|
|
|
|
|
|
|
|
|
|
|
| ||
Erase Red line: | 100 button | Cursor |
|
|
|
|
|
|
|
|
|
|
|
|
|
|
|
|
|
|
|
|
|
|
|
|
|
|
|
|
|
|
|
|
|
|
|
| |||
Erase Blue line: | CHRTN (ENT) button |
|
|
|
|
|
|
|
|
|
|
|
|
|
|
|
|
| P = 50.5 x14 (50") | |
|
|
|
|
|
|
|
|
|
|
|
|
|
|
|
|
|
| |||
|
|
|
|
|
|
|
|
|
|
|
|
|
|
|
|
|
| |||
|
|
|
|
|
|
|
|
|
|
|
|
|
|
|
|
|
|
|
| |
|
|
|
|
|
|
|
|
|
|
|
|
|
|
|
|
|
|
|
| 55.8 x14 (55") |
|
|
|
|
|
|
|
|
|
|
|
|
|
|
|
|
|
|
|
| |
|
|
|
|
|
|
|
|
|
|
|
|
|
|
|
|
|
|
|
| 62 x14 (61") |
|
|
|
|
|
|
|
|
|
|
|
|
|
|
|
|
|
|
|
| |
|
|
|
|
|
|
|
|
|
|
|
|
|
|
|
|
|
|
|
| 27.5 |
|
|
|
|
|
|
|
|
|
|
|
|
|
|
|
|
|
|
|
| |
|
|
|
|
|
|
|
|
|
|
|
|
|
|
|
|
|
|
|
| |
|
|
|
|
|
|
|
|
|
|
|
|
|
|
|
|
|
|
|
| |
|
|
|
|
|
|
|
|
|
|
|
|
|
|
|
|
|
|
|
| |
|
|
|
|
|
|
|
|
|
|
|
|
|
|
|
|
|
|
|
| |
|
|
|
|
|
|
|
| P = 84 x12 (50") |
|
| ||||||||||
|
| 4 |
|
|
| 4 | ||||||||||||||
|
|
|
|
|
| 92 x12 (55") | ||||||||||||||
|
|
|
|
|
|
|
|
|
|
|
| |||||||||
|
|
|
|
|
|
|
|
| 103 x12 (61") |
|
|
| ||||||||
Note: |
| The pattern includes three colors (R, G, B). |
|
|
| |||||||||||||||
Adjusting procedure in replacing conver- | The cursor should be blinking in Red. |
|
|
| ||||||||||||||||
gence board. |
| This means that the Red color is adjustable. |
|
|
| |||||||||||||||
1. User convergence center check. Make | Adjustment around cursor can be done. |
|
|
| ||||||||||||||||
sure the best convergence setting is | 3. Press “3” button to select Green color to be adjusted. |
|
|
| ||||||||||||||||
about the center of adjustable range. | 4. Press “5” button to stop the blinking of cursor. |
|
|
| ||||||||||||||||
2. CENTERING ADJUSTMENT | 5. Press “2 (up)”, “8 (down)”, “4 (left)” or “6 (right)” to obtain the correct | |||||||||||||||||||
3. PICTURE POSITION ADJUSTMENT |
|
|
| |||||||||||||||||
4. HIT, WID ADJUSTMENT |
| If necessary, the specified color line can be erased from the screen. | ||||||||||||||||||
5. CONVERGENCE ADJUSTMENT | 100 button .................. to erase Red line |
|
|
| ||||||||||||||||
|
| 0 button .................. to erase Green line |
|
|
| |||||||||||||||
|
| RTN (ENT) button .................. to erase Blue line |
|
|
| |||||||||||||||
6.Press “5” button to make the cursor blinking.
7.Press “2”, “8”, “4”, “6” buttons to move the cursor to other point to be adjusted.
8.Repeat steps 4 to 7.
9.Repeat steps 3 to 8 to adjust Red and Blue colors.
Converge the selected color line into the Green line.
10.Press “7” button to enter the adjusted states.
At this time, picture changes for about 1 second.
11.Press “7” button again to return to the normal picture.
SPECIFIC INFORMATIONS GENERAL ADJUSTMENTS
– 13 –