T60
Contents
Handrails Horizontal Handlebar
Assembly
Safety KEY
Power Cord Grounding Instructions
Basics on Exercising
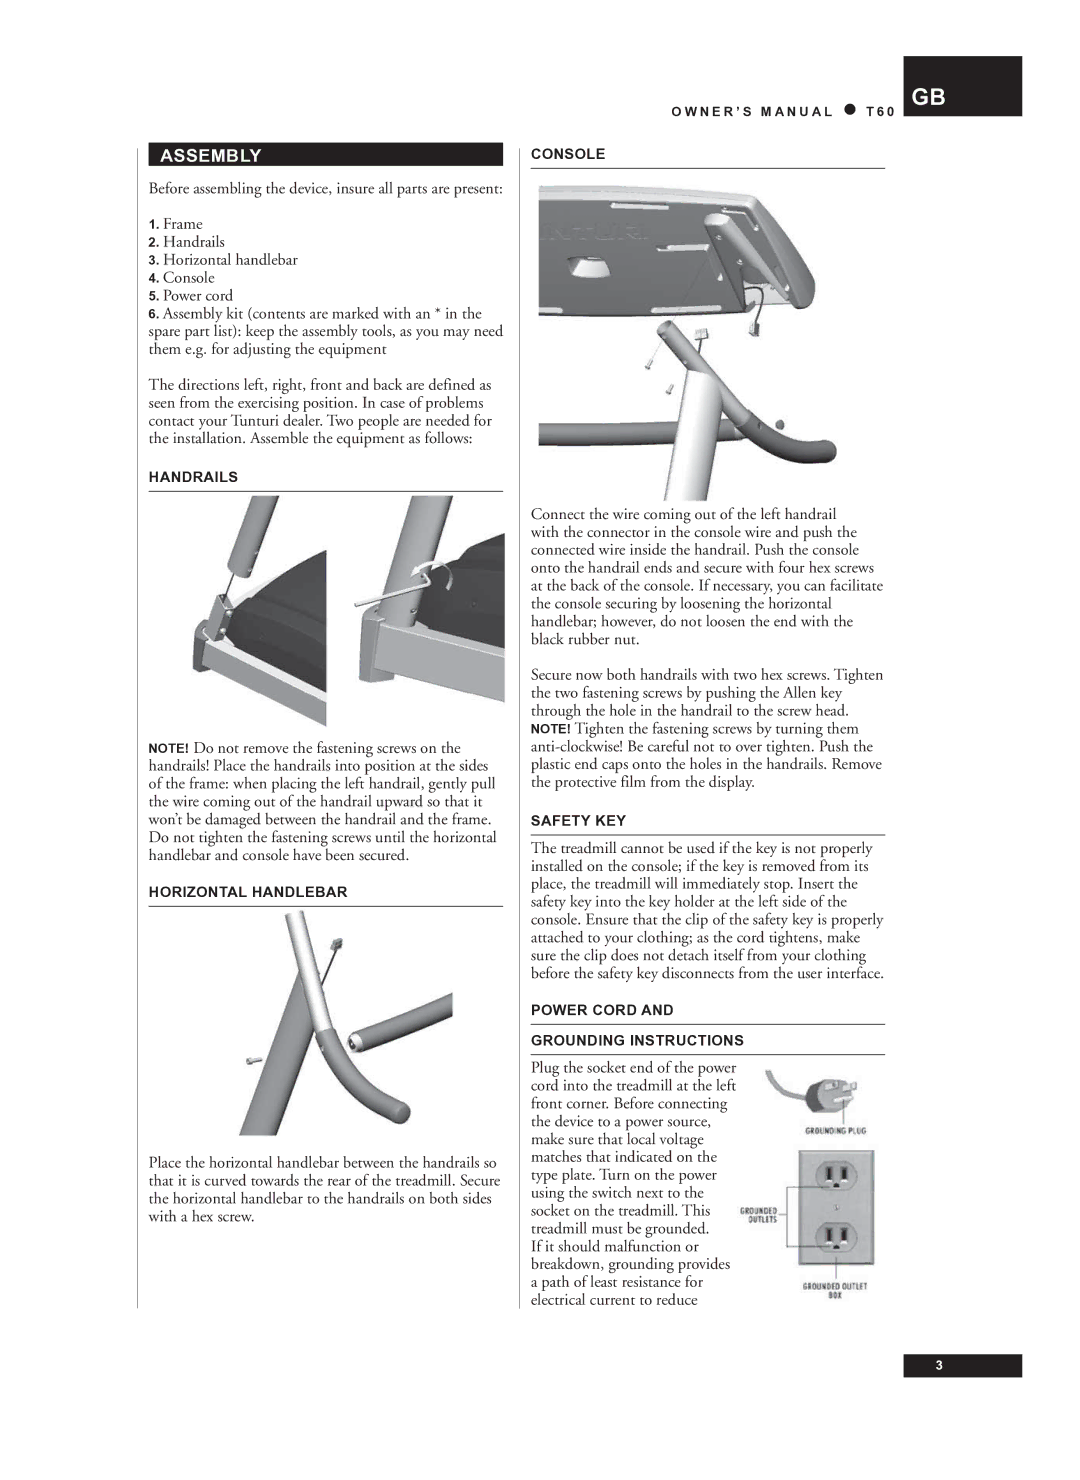
Console
Starts the selected training and activates the running belt
Function Keys
Displays
Position Speed Control PSC
10 %, 0,5 % increment
00-99.99 km, 0,01 km increment
Heart Rate Controlled Exercise
PSC Settings
Choosing AN Exercise
Manual Exercise
KM Walking Test
Fitness Tests
Exercise Profiles
Press Stop and the treadmill stops and moves
Cooper Test
Saving Your OWN Profile
Memory Function
If there are no empty memory slots, replace a previous
Profiles
Race Function
Maintenance
Using Your OWN Profile
Cleaning and Lubricating the Treadmill
Malfunctions
Moving and Storage
Alignment of the belt is correct
Technical Data
Inhalt
Montage
Herzfrequenz
Allgemeines ZUM Training
Funktionstasten
Cockpit
Fortgeschrittene 60-70 % der maximalen Herzfrequenz
Beginnen Sie mit der gewählten Trainingseinheit
Schalten Sie die Verwendung der Tonsignale
Anzeigen
Eingabe DER Benutzerangaben
Position Speed Control PSC
Wahl DER Trainingseinheit
MANUAL-TRAINING
Herzfrequenzgesteuertes Training
Konditionstest
KM Gehtest
COOPER-TEST
Die Konditionsniveauklassen bei verschiedenen Altersgruppen
Trainingsprofile
Die Abbildungen finden Sie am Ende dieser Anleitung
Profil 7 Cardio. Mittelschweres Pulsprofil, das auf
Profile
Wartung
Speicherfunktion
Betriebsstörungen
Ausrichten DER Laufmatte
Nachspannen DER Laufmatte
Überstromschutz
Transport UND Aufbewahrung
Fehlermeldungen
Wartungsmeldung
Geschwindigkeit 18,0 km/h / 0,3-11,2 mph
Technische Daten
105 kg
51 x 138 cm
Conseils ET Avertissements
REPOSE-MAINS Transversal
Assemblage
Châssis
Barres D’APPUI Avant
Cordon D’ALIMENTATION
Généralités SUR ’ENTRAÎNEMENT
Compteur
CLE DE Verrouillage DE Securite
Rythme Cardiaque
’hygrométrie ne doit jamais excéder 90 %
Mais soit toutefois facile à atteindre
Entraînement Actif 70-80 % du pouls maximum
Unite DES Compteurs
Débutant 50-60 % du pouls maximum
Entraînement 60-70 % du pouls maximum
Heart Rate pouls d’entraînement
Affichages
Réglage DES Données Utilisateur
Training Avec LA Fonction PSC
Vitesse Contrôlée PAR Positionnement PSC
Choix DE L’ENTRAINEMENT
Manual Entrainement Manuel
DE LA Frequence Cardiaque
Entrainement PAR Controle
Test DE Condition Physique
LE Test DE Marche 2 KM
Test DE Cooper
Profils D’ENTRAINEMENT
Fonctions DE LA Mémoire
Profils
Enregistrement DE VOS Propres Profils
Fonction Compétition
Entretien
Validez votre sélection en appuyant sur la touche
Utilisation DE Votre Propre Profil
Code D’ERREUR
’appareil a été placé sur une surface bien plane et le
Reglage DE LA Tension DU Tapis
Defauts DE Fonctionnement
Vitesse 18,0 km/h / 0,3-11,2 mph
Transport ET Rangement
Caracteristiques Techniques
107 kg
Inhoud
Fitness Training
Hartslag
Gebruik van de apparatuur door kinderen mag daarom
Gebruikt worden
Toetsen
Meter
Functies
Instelling VAN Gebruikergegevens
Manuele Training
Trainingskeuze
Hartslagaangepaste Training
Coopertest
Conditietest
Trainingsprofielen
KM Looptest
Aan het eind van het programma begint de
Wedstrijdfunctie
Geheugenfunctie
Profielen
UW Eigen Profiel Opslaan
Onderhoud
Reiniging EN Smering VAN DE Looptrainer
HET Centreren VAN DE Loopmat
Gebruiksstoringen
Storingen
Transport EN Opslag
Technische Gegevens
51 cm
Snelheid 18,0 km/u / 0,3-11,2 mph
Assemblaggio
Indice
Allenamento
Inizio DI Esecuzione
Battito Cardiaco
Circa L’AMBIENTE in CUI Esercitarsi
Circa L’USO DELL’ATTREZZO
Pannello
Parti con l’esercizio prescelto
Tasti Funzione
Ángulo de inclinación, 0-10 %, con intervalli di 0,5 %
Display
Inserimento Dati Utente
Controllo Velo Cità DA Posizione PSC
Segnale pulsazioni. Passati 8 secondi di misurazione
Base al tipo di selezione fatta durante l’allenamento
Dell’utente, in direzione della parte anteriore del
Così il contatore misura la tua distanza, basandosi sul
Scelta DELL’ESERCIZIO
Esercizio in Manual
Esercizio a Controllo Pulsazioni Cardiache
Test DI Condizione Fisica
Profili DI Esercizio
Test Fitness DI 2 KM DI Camminata
Test Cooper
N U a L E D ´ U S O T 6
Memorizzazione DEL Proprio Profilo
Funzione Memoria
Le foto sono riportate nella copertina di fondo
Profili
Allineamento DEL Nastro
Manutenzione
Funzione Competizione
Pulizia DAL Treadmill ED Lubrificazione
Spostamento ED Immagazzinaggio
Codici Disfunzioni
Velocità 18,0 km/h / 0,3-11,2 mph
Dati Tecnici
Montaje
Información Y Precauciones
Llave DE Seguridad
Barandillas Delanteras
Reposabrazos Transversal
Contador
La máquina de caminar
Aspectos Generales DEL Entrenamiento
Ritmo Cardíaco
Conectada a la fuente de alimentación
Teclas DE Función
Contador
Entrenamiento 60-70 % del ritmo cardíaco máximo
El ejercicio elegido se pone en marcha
La velocidad de la cinta, 0,5-18 km/h /11,2 mph en
Kcal Consumo estimado de energía
Time Duración
Distancia recorrida en kilómetros 0,00-99,99 km en
Ejercicios DE Ritmo Cardíaco Constante
Selección DEL Ejercicio
Ejercicio Manual
Prueba Para Medir LA Condición Física
En la pantalla aparece el texto Press Enter
Control DE Velocidad POR LA Posición PSC
Prueba DE Cooper
Test DE Caminata DE LOS 2 KM
Perfiles DE Ejercicio
Utilización DE SU Propio Perfil
Función DE Memoria
Perfiles
Almacenado DE SU Propio Perfil
Mantenimiento
Limpieza Y Lubricacion
Ajuste DE LA Cinta Rodante
Defectos DE Funcionamento
Traslado Y Almacenaje
Poner en marcha la cinta a 5 km/h
Datos Técnicos
Velocidad 18,0 km/h / 0,3-11,2 mph
5HP
Montering
Innehåll
Allmänt OM Träning
Puls
Mätare
Starta träningen
Funktionstangenter
Visning PÅ Skärmen
Inställning AV Användaruppgifter
Uppskattad energiförbrukning 0-9999 kcal i steg om 1 kcal
Lutningsvinkeln 0-10 % i steg om 0,5 %
VAL AV Träning
MANUAL-TRÄNING
Pulsstyrd Träning
Coopers Test
Konditionstest
Meddelandet Warm UP anger att du kan börja
KM Gångtest
Träningsprofiler
Bilderna finns på den invikta sidan i slutet av handboken
Profiler
Tävlingsfunktion
Service
Minnesfunktion
ATT Spara Egna Profiler
Störningar VID Användning
Rengöring OCH Smörjning AV Löpband
Centrering AV Löpband
Justering AV Löpbandets Spänning
Transport OCH Förvaring
Tekniska Data
Bandhastighet 18,0 km/h / 0,3 11,2 mph
Asennus
Sisältö
Yleistä Harjoittelusta
Venyttelyä harjoituksen päätyttyä
Syke
Laitetta saa käyttää vain sisätiloissa
Sisäkäyttöön tarkoitettuja urheilujalkineita
Painamalla jänispainiketta lisäät maton nopeutta
Mittari
Aloittelijan Taso 50 60 % maksimisykkeestä
Käynnistät valitun harjoitteen
Käyttäjätietojen Asetus
Näytöt
Harjoittelu Pscn Kanssa
Harjoituksen Valinta
MANUAL-HARJOITUS
Sykeohjattu Harjoitus
Cooperin Testi
Kuntotesti
Juoksualustan kulma säätyy automaattisesti 1 %
KM Kävelytesti
Valmiit Harjoitusprofiilit
42 km, muutokset 1 km portain
Ja sykeprofiilin
Muistitoiminto
Profiilit
Kilpailutoiminto
Maton Kireyden Säätö
Huolto
Juoksumaton Puhdistus JA Huoltovoitelu
Maton Keskittäminen
Huoltoilmoitus
Käyttöhäiriöt
Kuljetus JA Säilytys
Virheilmoitukset
Nopeus 18,0 km/h / 0,3 11,2 mph
Tekniset Tiedot
T60
105
Profiles
Page
5834031 B