Dutchwest Direct Vent / Natural Vent Gas Heater

Gasket Replacement

The Dutchwest Gas Heater uses a ‘tadpole’ type gasket to seal between the glass panel and the frame. In time, this gasket can become brittle and compressed and should be replaced. New gasket is available from your dealer.

Shut off the gas supply and allow the stove to cool. Wear safety goggles and a dust mask.

1.Remove the Front, Glass Frame and Glass Panel. (Figs. 56 & 57) Remove the old gasket. Use a razor blade to separate the glass and gasket from the frame, and to clean the glass of any remaining cement or bits of gasket. Use a cold chisel if neces- sary.

2.Determine the correct length of gasket by laying it out around the edge of the glass. Allow an extra 1

- 2” (25-50 mm). Mark the spot to be cut. Use a utility knife.

3.Starting on a long edge, remove about 6” of the pro- tective paper strip and apply the flat adhesive face of the gasket around the outside-facing edge of the panel. Continue around the panel, applying a bout 6” at a time and being careful to not stretch the mate- rial. Do not overlap the gasket ends. (Fig. 60)

4.Apply a thin bead of high temperature silicone rubber sealant along the inside corner of the glass frame, all around the perimeter. Place the flat gasketed side of the glass panel back into the steel frame. Pinch the rounded inside-facing gasket material to bulk it up.

5.Replace the glass frame and front panel as previ- ously described.

ST179

Fig. 60 Wrap the gasket material around the outside edge of the glass.

Inspect the Vent System Annually

Have the vent system inspected annually by a qualified technician. Shut off the main gas supply before inspect- ing the system. Both the inner exhaust pipe and the out- er combustion supply pipe must be checked to confirm that they are unblocked and in good condition.

Check the Gas Flame Regularly

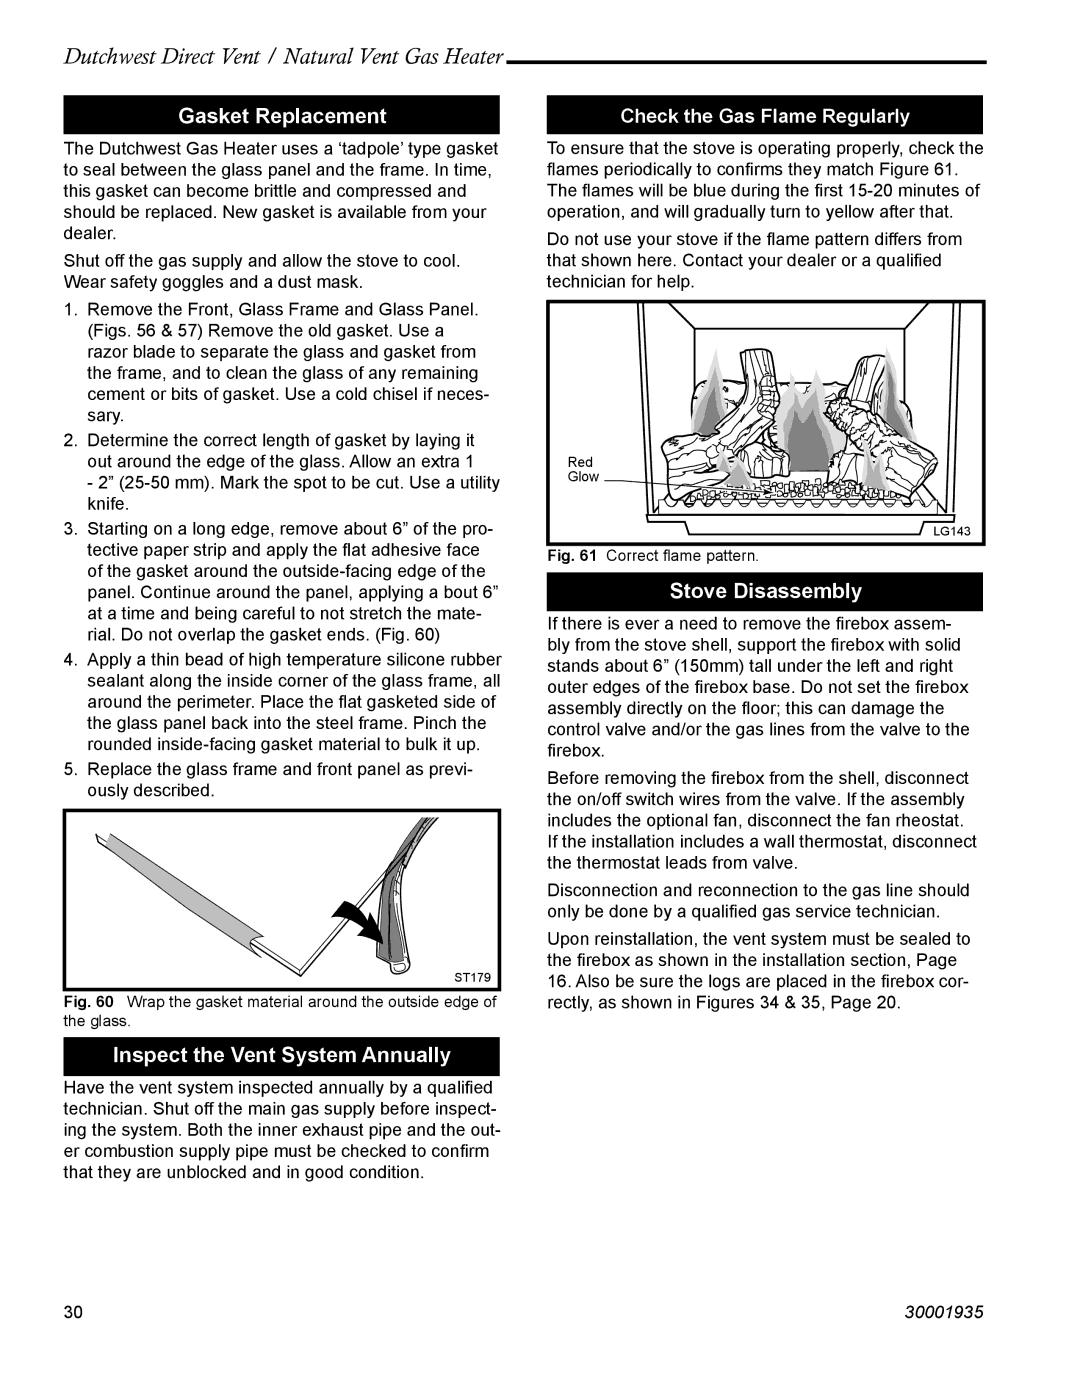
To ensure that the stove is operating properly, check the flames periodically to confirms they match Figure 61. The flames will be blue during the first 15-20 minutes of operation, and will gradually turn to yellow after that.

Do not use your stove if the flame pattern differs from that shown here. Contact your dealer or a qualified technician for help.

Red

Glow

LG143

Fig. 61 Correct flame pattern.

Stove Disassembly

If there is ever a need to remove the firebox assem- bly from the stove shell, support the firebox with solid stands about 6” (150mm) tall under the left and right outer edges of the firebox base. Do not set the firebox assembly directly on the floor; this can damage the control valve and/or the gas lines from the valve to the firebox.

Before removing the firebox from the shell, disconnect the on/off switch wires from the valve. If the assembly includes the optional fan, disconnect the fan rheostat.

If the installation includes a wall thermostat, disconnect the thermostat leads from valve.

Disconnection and reconnection to the gas line should only be done by a qualified gas service technician.

Upon reinstallation, the vent system must be sealed to the firebox as shown in the installation section, Page

16.Also be sure the logs are placed in the firebox cor- rectly, as shown in Figures 34 & 35, Page 20.

30

30001935

Page 30
Image 30
Vermont Casting 2466, 2465 manual Gasket Replacement, Inspect the Vent System Annually, Stove Disassembly

2466, 2465 specifications

Vermont Casting's 2465 and 2466 stoves are renowned in the world of wood-burning appliances, celebrated for their blend of traditional craftsmanship, modern technology, and efficient features. These stoves bring warmth and aesthetic appeal to any home while providing an eco-friendly heating solution.

The Vermont Casting 2465 model stands out with its classic styling and robust construction, made from high-quality cast iron. Its design not only provides durability but also enhances heat retention, allowing for longer-lasting warmth in your space. Featuring a large viewing window, the 2465 allows you to enjoy the mesmerizing flames while also providing ample heat output, making it a focal point of any room.

Similarly, the Vermont Casting 2466 shares many characteristics with its counterpart but introduces slightly elevated features. One of the notable features of the 2466 is its increased heating capacity, suitable for larger homes or open-concept living spaces. Both models are equipped with a user-friendly air control system that optimizes airflow and combustion, ensuring that wood burns more efficiently and cleanly. This results in minimal smoke emissions and contributes to a lower environmental impact.

One of the standout technologies in both the 2465 and 2466 is the patented “Dual Air Control” system. This innovative design allows homeowners to easily adjust the airflow for more efficient burning, regardless of the type of wood used, enhancing combustion efficiency. Users can start with a higher airflow for a quick fire start and then throttle back once the wood is burning well, ensuring an effective and adjustable burn rate.

Additionally, both models come with an integrated ash pan located at the bottom, designed to simplify maintenance by making ash removal quick and easy. The stoves also feature a built-in heat shield that helps to increase the heating efficiency of the stove while reducing the clearance needed for safe installation.

Overall, the Vermont Casting 2465 and 2466 stoves represent an intersection of function and beauty. Their classic cast iron design paired with modern heating technologies makes them a perfect choice for those wishing to combine traditional aesthetics with efficiency and environmental responsibility in their home heating solutions. Whether you're heating a cozy cabin or a spacious family room, these stoves deliver exceptional performance and timeless appeal.