Radiance Natural Vent Gas Heater


Rear Shroud


A


Cover Plate


A

ST371


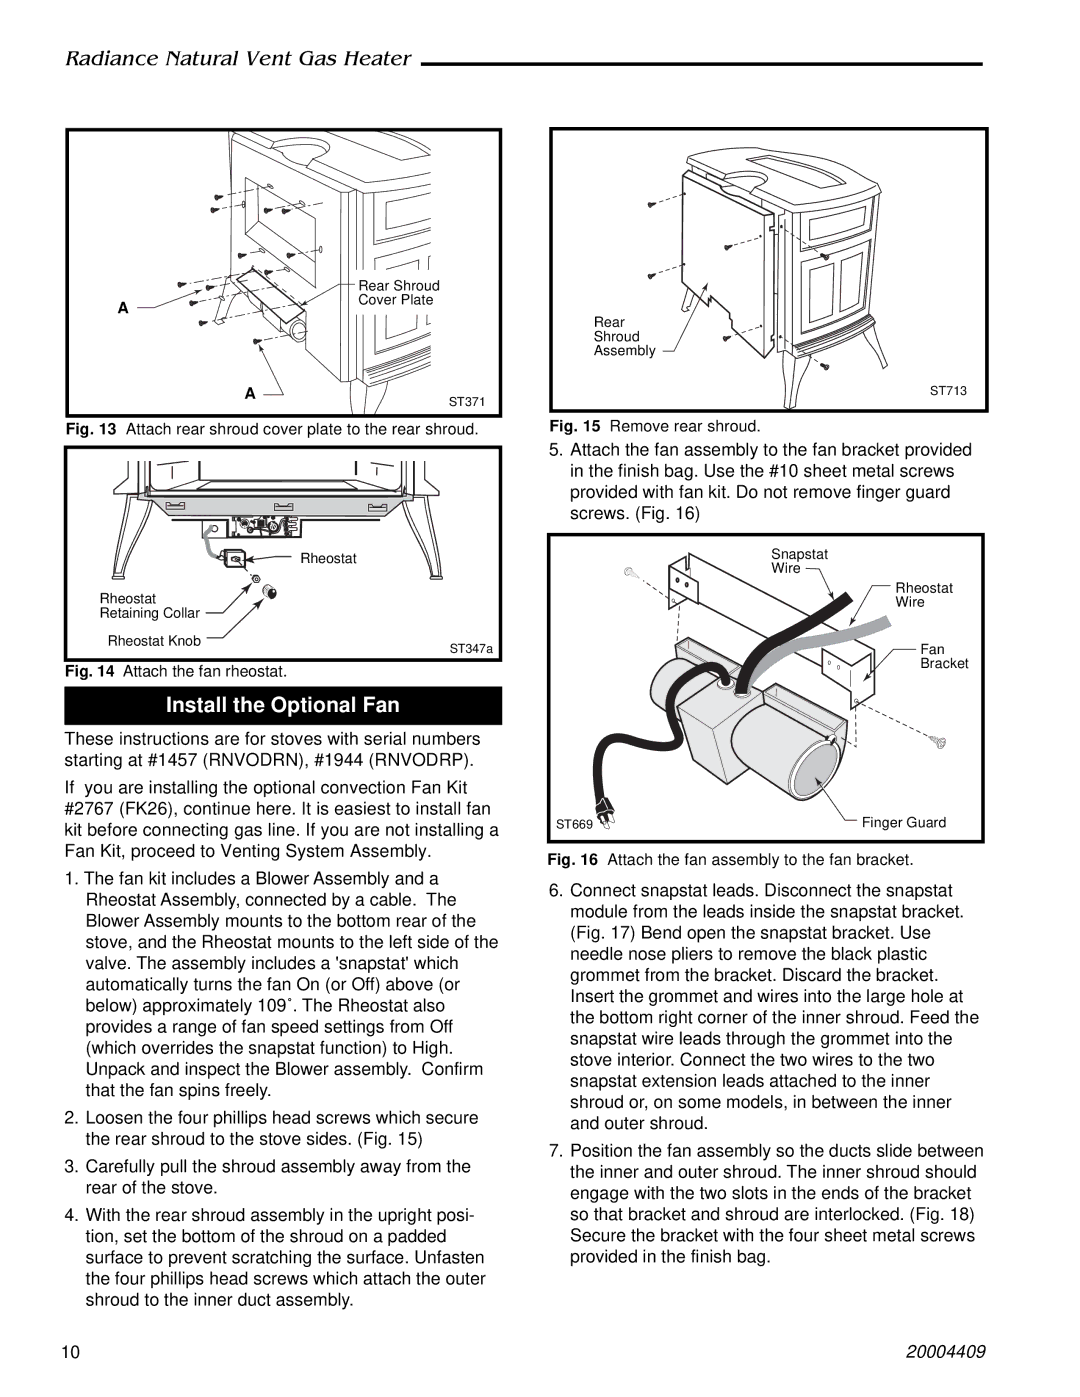
Fig. 13

Attach rear shroud cover plate to the rear shroud.

Rheostat

Rheostat

Retaining Collar

Rheostat Knob

ST347a

Fig. 14 Attach the fan rheostat.

Install the Optional Fan

These instructions are for stoves with serial numbers starting at #1457 (RNVODRN), #1944 (RNVODRP).

If you are installing the optional convection Fan Kit #2767 (FK26), continue here. It is easiest to install fan kit before connecting gas line. If you are not installing a Fan Kit, proceed to Venting System Assembly.

1.The fan kit includes a Blower Assembly and a Rheostat Assembly, connected by a cable. The Blower Assembly mounts to the bottom rear of the stove, and the Rheostat mounts to the left side of the valve. The assembly includes a 'snapstat' which automatically turns the fan On (or Off) above (or below) approximately 109˚. The Rheostat also provides a range of fan speed settings from Off (which overrides the snapstat function) to High. Unpack and inspect the Blower assembly. Confirm that the fan spins freely.

2.Loosen the four phillips head screws which secure the rear shroud to the stove sides. (Fig. 15)

3.Carefully pull the shroud assembly away from the rear of the stove.

4.With the rear shroud assembly in the upright posi- tion, set the bottom of the shroud on a padded surface to prevent scratching the surface. Unfasten the four phillips head screws which attach the outer shroud to the inner duct assembly.

Rear

Shroud

Assembly

ST713

Fig. 15 Remove rear shroud.

5.Attach the fan assembly to the fan bracket provided in the finish bag. Use the #10 sheet metal screws provided with fan kit. Do not remove finger guard screws. (Fig. 16)


Snapstat


Wire


Rheostat


Wire


Fan


Bracket

ST669

Finger Guard

Fig. 16

Attach the fan assembly to the fan bracket.

6.Connect snapstat leads. Disconnect the snapstat module from the leads inside the snapstat bracket. (Fig. 17) Bend open the snapstat bracket. Use needle nose pliers to remove the black plastic grommet from the bracket. Discard the bracket. Insert the grommet and wires into the large hole at the bottom right corner of the inner shroud. Feed the snapstat wire leads through the grommet into the stove interior. Connect the two wires to the two snapstat extension leads attached to the inner shroud or, on some models, in between the inner and outer shroud.

7.Position the fan assembly so the ducts slide between the inner and outer shroud. The inner shroud should engage with the two slots in the ends of the bracket so that bracket and shroud are interlocked. (Fig. 18) Secure the bracket with the four sheet metal screws provided in the finish bag.

10

20004409

Page 10
Image 10
Vermont Casting 3356 4409 410, 3340, 3349, 3355 manual Attach rear shroud cover plate to the rear shroud

3356 4409 410, 3340, 3355, 3349 specifications

Vermont Castings offers a diverse lineup of wood stoves designed to provide warmth, efficiency, and aesthetic appeal to any home. Among their impressive models are the 3355, 3340, 3356, 4409, 410, and 3349, each featuring unique characteristics that cater to various heating needs and preferences.

The Vermont Castings 3355 model stands out for its large firebox and high-efficiency design, making it an excellent choice for those seeking extended burn times. This model employs a catalytic combustor that enhances fuel efficiency while minimizing emissions, allowing you to enjoy heat from fewer logs. Its classic design complements traditional and modern aesthetics alike.

The 3340 model emphasizes versatility and functionality. With adjustable airflow controls, users can customize the heat output to suit their needs. A notable feature of this model is its built-in ash pan, simplifying maintenance and cleanup. The durable construction ensures longevity, while the beautiful cast iron exterior makes it a focal point in any room.

For those seeking a more compact option, the 3356 model is an ideal choice. This wood stove features a smaller footprint without sacrificing performance. Designed for smaller spaces, its efficient heating capabilities and elegant detailing provide warmth without overwhelming your living area. It also incorporates Vermont Castings’ advanced clean-burning technology, ensuring reduced emissions and a more sustainable heating solution.

The 4409 model, known for its robust output, is perfect for larger homes or open spaces. Its impressive heating capacity, combined with the brand’s signature craftsmanship, allows for effective warming even in the coldest climates. Furthermore, the 4409 features a unique top-loading design, making it easy to refuel without interrupting the warmth.

The 410 model is a modern take on traditional wood stoves, offering an eye-catching contemporary design that easily integrates into any decor. This model combines cutting-edge technology with user-friendly features, like easy-loading doors and a large viewing window to enjoy the dancing flames.

Lastly, the 3349 is designed for optimal performance with a focus on efficiency and sustainability. This model is equipped with a clean-burning system that significantly reduces particulate emissions, making it eco-friendly. It also boasts a spacious firebox that accommodates larger logs for longer burn times, maximizing heat output while minimizing wood consumption.

In summary, Vermont Castings offers a variety of wood stoves, such as the 3355, 3340, 3356, 4409, 410, and 3349, each with unique features and technologies. Their commitment to performance, efficiency, and elegant design ensures that there is a perfect fit for every heating need, providing both warmth and style for your home.