ViewSonic
For Canada
FCC Statement
CE Conformity for European Countries
Following information is only for EU-member states
Important Safety Instructions
Iii
Declaration of RoHS Compliance
For Your Records
Copyright Information
Trademark acknowledgment
About this manual
Contents
Troubleshooting
Maintenance
Specifications 106
Audio menu
Network Presentation 141
Network Guide Connection to the Network 108
Other Functions 182
Troubleshooting 193 Appendix 196
Web Control 149
Contents of package
Projector
Part names
Part names
Control panel and Lens adjusters
STANDBY/ON button
Computer IN1 port
Enter button
UP button Down button Volume + button
Reset button
Arrangement
Setting up
1024X768 ±10%
Projector top Projector bottom
Arrangement
Arrangement
About Plug-and-Play capability
Connecting with your devices
Computer
Connecting with your devices
Computer Access point USB storage device
Digital VCR/DVD/Blu-ray Disc player Video Device
Microphone function
Microphone Wired
SpeakersMonitor
Remote
Power cord
Connecting to a power supply
Using the security bar and slot
Installing the batteries
Remote control
About the remote control signal
Obey the local laws on disposing the battery
Using as a simple PC mouse & keyboard
Changing the frequency of remote control signal
Turning on the power
Power on/off
Turning off the power
Power indicator
Selecting an input signal
Adjusting the volume
Operating
Temporarily muting the sound
Remote control. The input signal will be changed
Selecting an input signal
While on is selected for Auto Search item in Option
Press the MY Source / DOC. Camera button on
For an Hdmitm signal
Searching an input signal
Selecting an aspect ratio
Normal 43 169 1610
Adjusting the projector’s elevator
Adjusting the lens
Adjusting the position
Using the automatic adjustment feature
For a computer signal
For a video signal and s-video signal
Correcting the distortion
Pro9500
Magnify ON/OFF button
Using the magnify feature
Temporarily blanking the screen
Temporarily freezing the screen
Freeze button
Blank button
Easy Menu
Using the menu function
Advanced Menu
Position button
Indication in OSD On Screen Display
Using the menu function
Aspect
Picture Mode
Auto Keystone
Keystone
Reset
ECO Mode
Mirror
Filter Time
Brightness
Picture menu
Contrast
Gamma
Tint
Color Temp
Color
Active Iris
Sharpness
Image menu
For a computer signal
For an Hdmitm signal
USB Type B or Hdmi port
Position
Adjusted
Set to the default
Progressive
Input menu
Video NR
Color Space
Hdmi Range
Video Format
Hdmi Format
Frame Lock
Computer
Resolution
Setup menu
Auto ECO Mode
Monitor OUT
Standby Mode
Audio menu
Volume
Speaker
Audio Source
MIC Level
MIC Volume
Hdmi Audio
Menu Position
Screen menu
Blank
Start UP
MyScreen registration is finished
Capturing error has occurred. Please try again
MyScreen
Message
MyScreen Lock
Source Name
Template
Display
Description Closed Caption
Mode
Channel
Option menu
Direct Power
Auto Search
Auto
OFF
Auto Power
USB Type B
Type B port
Air filter
Lamp Time
Messenger Function in the Network Guide
MY Button
Picture Mode Changes the Picture Mode
Active Iris Changes the active iris mode
Resolution Turns on/off the Resolution dialog
MIC Volume Turns on/off the MIC Volume dialog
FAN Speed
Service
High ó Normal
Ghost
Remote Freq
KEY Lock
Control port
Network Guide
Communication Type
Serial Settings
Baud Rate
Parity
Guide
Response Limit Time
Stack
Information
Factory Reset
Dhcp
Setup
Network menu
Setup Gateway
Default
IP Address
Subnet
Projector Name
AMX D.D
MY Image
Presenter
Quit
Presentation
Multi PC
User Name
.1.3 Switching
Display mode in the Network Guide
Information
Security menu
Password
Enter to the Security menu
Security
MyScreen
Turning on the MyScreen Password
Turning off the MyScreen Password
Turning on the PIN Lock
PIN Lock
Turning off the PIN Lock
If you have forgotten your PIN code
Turning on the Transition Detector
Transition
Detector
Turning off the Transition Detector
Turning off the MY Text Password
Turning on the MY Text Password
MY Text Password
MY Text
Indicator
Writing
Stack Lock
PC-LESS Presentation
Presentation tools
Supported storage media
Supported format
Selected image Thumbnail menu Thumbnail images
PC-LESS Presentation
Operating by buttons or keys
Setup menu for the selected image
Button operation Functions
Down
Operating by the menu on the Thumbnail screen
Presentation tools
Button operation
Control Projector Software
Slideshow mode
Select the Slideshow mode
Returns to the thumbnail mode
Play the Slideshow
Set the beginning number
Example of playlist.txt files
Playlist
USB Port USB cable 1 piece
USB Display
Hardware and software requirement for computer
If you select Display on the Right-Click
USB Display
Optimize Performance
Keep PC resolution
Transmission speed
Image quality
Type number RLC-063 DT01175 Replacing the lamp
Maintenance
Replacing the lamp
Replacing the lamp
Lamp warning
Cleaning and replacing the air filter
Cleaning and replacing the air filter
Raised dot Knob
Replacing the internal clock battery
Battery Battery Cover
Other care
Caring for the cabinet and remote control
Inside of the projector
Caring for the lens
Message Description
Troubleshooting
Related messages
Button operation is not available
Internal temperature is rising
Related messages
Regarding the indicator lamps
Shutting the projector down
Resetting all settings
Signal cables are not correctly connected
Electrical power cord is not plugged
Signal source does not correctly work
Input changeover settings are mismatched
Volume is adjusted to an extremely low level
Signal cables are not correctly connected
Audio SOURCE/SPEAKER setting is not correct
Mode selected for Hdmi Audio is not suitable
Color Space setting is not suitable
Color settings are not correctly adjusted
Projector is operating in Eco mode
Frame Lock function cannot work on the current Input signal
Network Bridge function is turned off
Saving function is working
Is working properly
Forced to shut down
Specification
Specifications
107
Unit mm
System requirements
Connection to the network
Required equipment preparation
CD-ROM drive
109
System requirements
110
Installing the LiveViewer
Installing the LiveViewer
Windows XP
Installing the LiveViewer
Windows Vista or Windows
111
112
Process to connect the network
Process overview
113
Process to connect the network
Starting the LiveViewer
114
Selecting the network connection mode
Selecting either the wireless LAN or wired LAN
115
Selecting the network connection mode
116
Selecting My Connection
117
118
Selecting the network connection method
Enter PassCode
Passcode connection
Selecting the network connection method
Getting the Passcode
Method
120
121
Entering the Passcode
122
123
124
Confirming the connection to your destination
To item 1.5 Selecting the network connection method
125
Configuring manually
Wireless LAN
126
Wired LAN
127
Manual configuration
Profile connection
128
Manual configuration
History connection
Select the Configure Network Settings Manually
Configuring the network settings manually
If you use the wired LAN, go to Wired LAN
129
130
Configuring the network settings manually Wireless LAN
131
Configuring the network settings manually
132
133
134
Confirming the connection to your destination
Connection and transmission
135
Confirming the connection to your destination
136
Connection error
Outline of Profile data
Profile data
Making Profile data
137
138
Profile data
Editing Profile data
139
Registering My Connection
Click the My Connection
140
Network Presentation
Using the LiveViewer
Using the LiveViewer
Indicator Status
Indicator Indicator shows the following status
Displaying the status
Status Status icon
144
Switching the display mode
Status Display
145
Display User Name
Presenter Mode
Refer to Network menu in the Operating Guide
146
147
Display mode
Starting the Network Presentation
Starting the Network Presentation
Presenter mode
Display User Name
148
149
Web Control
150
Logon
Administrator Blank
User name Password
Logon
Main menu
Displays the Dhcp configuration settings
Projector Name Displays the projector name settings
Network Information
152
Displays and configures network settings
Network Settings
Dhcp on
Dhcp OFF
154
Port Settings
Displays and configures communication port settings
Click the Apply button to save the settings
Port Settings
Send Test Mail
Mail Settings
Displays and configures e-mail addressing settings
Displays and configures failure & alert settings
Alert Settings
Alert Settings The Alert Items are shown below
159
Schedule Settings
Displays and configures schedule settings
Date Month/Day
Schedule Settings The schedule settings are shown below
Description Schedule
161
Schedule Settings
Displays and configures the date and time settings
Date/Time Settings
First, 2, 3, 4, Last
162
Time difference
Date/Time Settings
Sntp
Sntp Server Address
Snmp
Security Settings
Projector Control
Projector Control
Keystone H
Setup Auto Keystone
Monitor OUT LAN
Monitor OUT USB
LAN
Audio Volume
USB Type a
Screen Language
Auto Power OFF
Direct Power on
Option Auto Search
MY BUTTON-1
170
Menu
Remote Control
Enter
Slideshow
172
Displays and configures the current projector status
Projector Status
Restarts the projector’s network connection
Network Restart
Description Restart
173
174
My Image Function
Transfer image data Display image data 1
175
My Image Function
176
Messenger Function
Transfer text data Display text data ex
177
Messenger Function
LAN port Control port
Connecting devices
Network Bridge Function
Menu Service Communication in the Operating Guide
Communication setup
Communication port
Condition
Operating Guide
Transmission method
OFF 1s 2s 3s OFF
180
181
Transmission method
Other Functions
Mail Settings
Mail Alerts
182
183
Mail Alerts
184
Projector Management using Snmp
Snmp Settings
185
Event Scheduling
186
Schedule Settings
Event Scheduling
187
Date/Time Settings
Following two ports are assigned for the command control
Command Control via the Network
Communication Port
188
189
Command Control via the Network
Reply Error code
Command Format
Header Data length RS-232Ccommand Check Sum Connection
TCP #9715
Reply Data format
192
Authentication
Automatic Connection Break
193
ViewSonic 194
Troubleshooting
195
RD2 DTR GND DSR RTS
RS-232C Communication
DTS
196 Pro9500
Header code Packet Data size
Type Setting code
CRC flag
Action
ACK reply 06h
Error reply 1Ch + 0000h
NAK reply 15h
Data reply 1Dh + xxxxh
199
Command Control via the Network
Security Settings
Port Settings
Control Port1 Port 23 to use TCP #23
Port1 Port
Header
RS-232C commands
Data Length
Check Sum
202
ACK reply 06h + ××h
××h connection ID
203
Network Bridge Communication
4800bps / 9600bps / 19200bps / 38400bps
Condition
Start bit Bit fixed
204
205
RS-232C Communication / Network command table
Gamma
206
207
208
209
210
211
Mirror
212
213
214
Blank
215
216
RS-232C- Communication//Networkcommandtable
MY BUTTON-1
217
MY Source
218
PJLink command
5th byte Refers to Filter error one of 0 to
4th byte Refers to Cover error one of 0 to
6th byte Refers to Other error one of 0 to
= Error is not detected 1 = Warning 2 =
221
Instant Stack Guide
Contents
Instant Stack feature
Entries and graphical symbols explanation
Important safety instruction
224
General installation
Installation styles
Remote control for Intellectual Stack and Simple Stack
Basic information and preparations
Instant Stack
227
Preparing for Intellectual Stack
Deciding installation position
Installing the first projector Set a
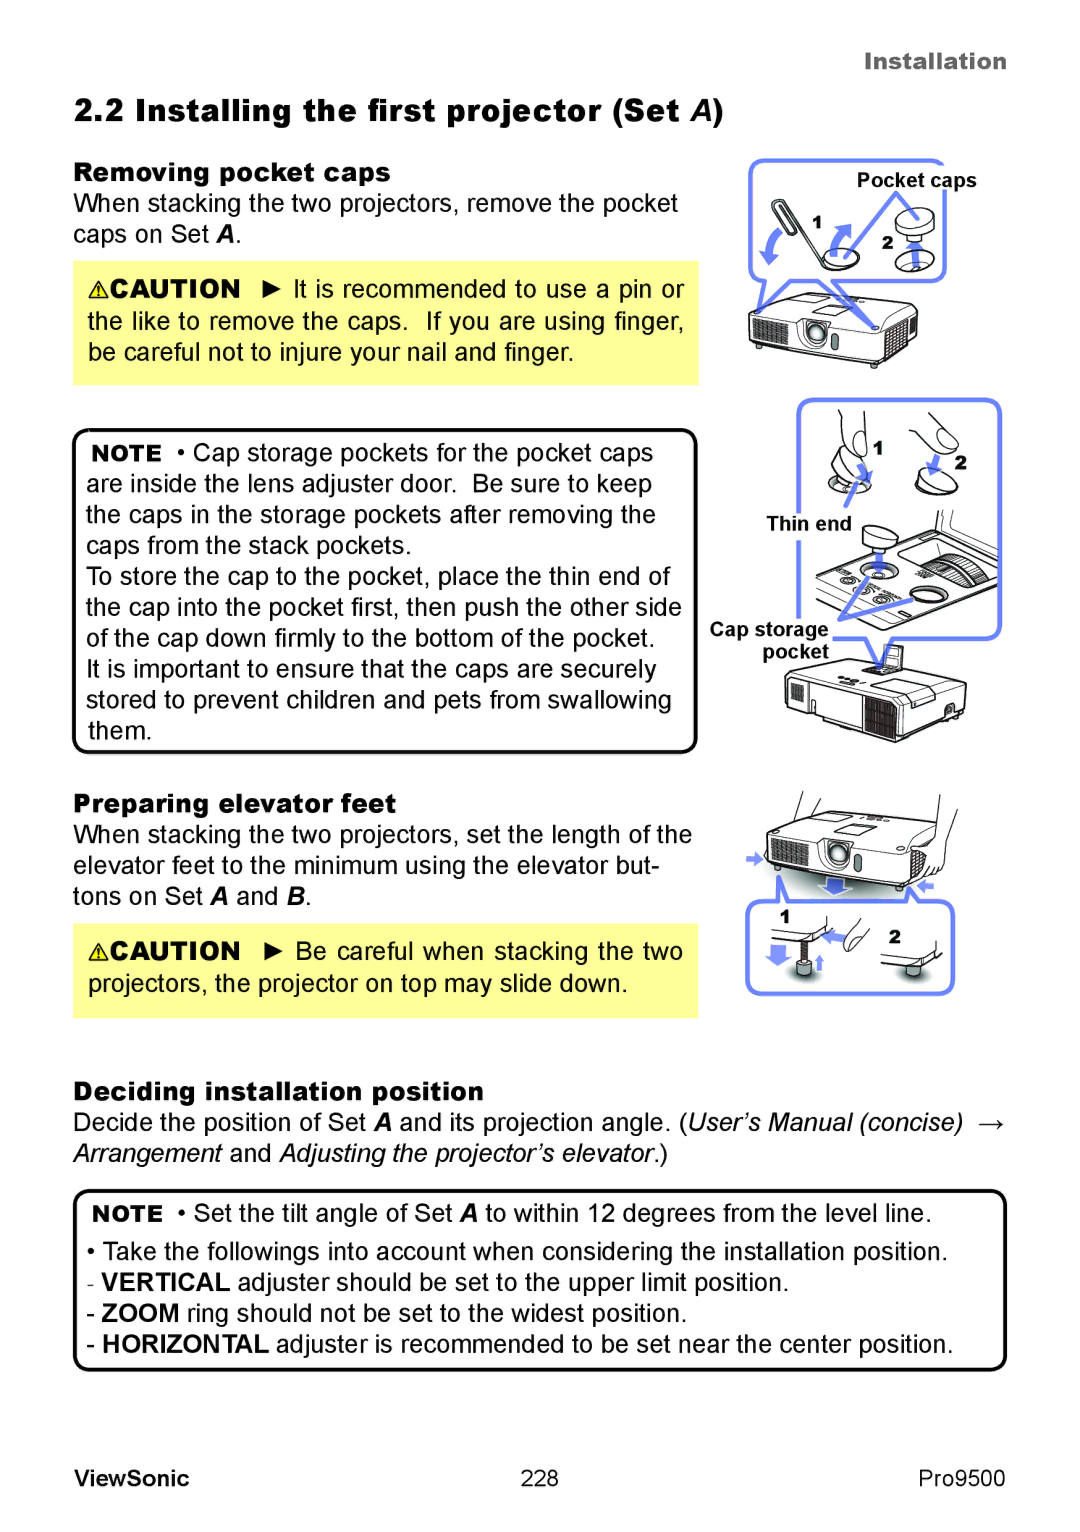
Removing pocket caps
Preparing elevator feet
Advanced Menu Option Service Communication Stack
Setting up Set a
230
Stacking the projectors
Installing the second projector Set B
Connecting projectors
Stack menu will appear on screen. Op
Setting up Set B
233
Confirming Main and Sub settings
For Intellectual Stack users
Fine adjusting image position
236
For Simple Stack users
237
Displaying Stack menu
238
Selecting Main, Sub or off
Gamma and Color Temp are
Selecting lamp operation mode
Not displayed It takes slightly longer time to
Turn on the projectors. This is not Malfunction
240
241
Selecting lamp switching mode
242
Selecting input source for Sub
Dialog from Stack menu
Exiting Intellectual Stack menu
Stack menu
Important information for Intellectual Stack
Example
Turning on/off Auto Keystone Operating Guide → Option menu
Input source from the following ports cannot be selected
246
247
Connecting an RS-232C cable
Inputting image to Sub and Main individually
Connecting signal cables
Inputting image from Main to Sub
249
Preparing for menu operations
Checking Main projectors operating status
250
Starting up Main projector
Inputting image from Main to Sub Computer signal
Setting the menu
Inputting image to Sub and Main individually
253
Restrictions on the Sub projector
Restrictions on the Main projector
255
RS-232C cable between the Main
No power is supplied to the Main and Sub Projector
Signal cables are not connected correctly
There are some adjustment differences Two images
Remote control is pointed at the Sub
Two images are not superimposed
Correctly
258
End User License Agreement for the Projector Software
259
260
Endbenutzerlizenzvereinbarung für die Projektorsoftware
261
262
263
Avtale om sluttbrukerlisens for projektorens programvare
264
Gebruiksrechtovereenkomst Eula voor de projectorsoftware
265
266
投影机软件的终端用户许可协议
267
프로젝터 소프트웨어 최종 사용자 라이센스 계약
268
Slutanvändarlicensavtal för projektorns programvara
269
270
Projektoriohjelmiston käyttöoikeussopimus
271
272
GNU General Public License Version 2, June
273
No Warranty
END of Terms and Conditions
274
275
GNU Lesser General Public License Version 2.1, February
276
277
278
About the OpenSSL Toolkit
279
Customer Support
280
Limited Warranty
281
Projector Warranty
282
Mexico Limited Warranty
Name, address, of manufacturer and importers
283